Looking for an unforgettable way to document a quilt that you have made ? The secret sauce is here. If you are going to all the trouble to create a quilt, you need to add a quilt label that will compliment your handcrafted quilt’s design and leave a lasting impression with a heartfelt message crafted on an adorable quilt label made by you. Choose one of my 5 original pattern designs included here and follow my instructions for creating it.
- Choose the quilt label design you want to make from the 5 patterns I’ve included for you.
- Select fabric that coordinates and compliments the design of your quilt.
- Choose the size you want it to be.
- Cut out your label pattern.
- Add a very personal touch to your label by hand writing a heartfelt message for the recipient of the quilt.
- Include identifying information on your quilt label.
- Use recommended permanent markers for writing on your quilt label.
- Sew your quilt label and attach your applique.
- Add some embroidery.
- Decide where you want to place your quilt label.
- Attach your quilt label with an invisible stitch if hand sewing. Or machine sew around the edge.
- You may want to add care of quilt so it is preserved properly.
- Take a photo of your quilt before gifting it.
Nothing cuter than a handmade quilt label. Then you add applique to it and your quilt becomes even more magical once your label is attached to your quilt. A cute hand designed label can change the whole kit and caboodle of the quilt you just made and make it even more valuable to the person you are gifting it to. Valuable because each quilt tells a story. This is your story. And the quilt label well, it connects your story to them. Your label can share the “why” you made this quilt and “how much they mean to you”. Let me help you design your quilt label so your quilt and label will be unforgettable.
Quilt Label Fabric Choices
Look at the colors in your quilt. Choose cotton fabrics for your labels and choose material that will look good with the colors in your quilt. You will most likely put your label on the back of your quilt, so keep in mind your backing fabric which should coordinate with your quilt topper and the colors of your quilt labels can match the quilt topper or coordinate with the colors of the quilt topper and backing. Savvy?
Quilt Label Size
With the handmade label patterns I have given you, you can choose to make a label bigger or smaller as you need. It might be just the right size but you can decide what will work best for your quilt.
Personalize Your Quilt Label And What To Write On It
When I make my quilt labels I add backing to it. There are two positives to doing this.
- Positive 1: Your quilt label is easier to attach when it has backing. This makes life so much easier than trying to turn the edges under as you hand sew or machine stitch it on. Here’s the thing, your edges will always stay in place as your quilt gets used.
- Positive #2: Your handmade quilt tag will lay flat once you sew it on.
Keep in mind for some of your quilt labels, you may want to write on it before you sew the backing to it. However some quilt labels might need to be sewn and appliqued before you write your info on it. Now that that is out of the way let’s talk making your cute quilt label unforgettable. Ask yourself these questions.
1. Why am I making this quilt? 2. Why do I want to make this quilt for so and so? (The person you are gifting it to.) 3. How do I feel about the person I am giving this quilt to? Give these questions some serious thought. After all, the message you want to give should be special. When I say special, I mean something that will be sincere from your heart. A short message can be something like, ” You are worth every stitch I made in this quilt! Love (your name)” then add the date. Or, ” Hope you feel wrapped in my love when you use this quilt, love….” or, ” Your birthday is my favorite day…love…” “The stitches sewn in this quilt are like the stars you can’t count how much you matter to me! Love… and then date. With a cleverly written short note signed by you and dated, your cozy quilt and handwritten handmade quilt label will be unforgettable.
What Markers To Use On Your DIY Quilt Labels
There are three types of markers I suggest you use to write with on your quilt labels. They are permanent markers. Ultra Fine Point Sharpies, Pigma Micron Ink Pens, or Dritz Fine Line Permanent Marker. Play around with the marker of your choice on scrap fabric before you write on your handmade label.
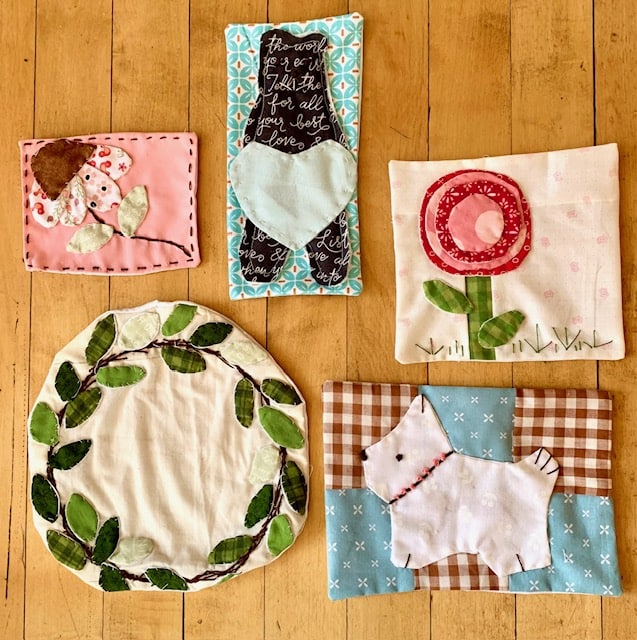
5 Free Quilt Label Design Templates
Homemade quilt tags can be easier to make then you might think. Once you try my patterns your creative juices will get flowing and you can come up with your own. Anything you can do to personalize a quilt makes it worth the extra effort.
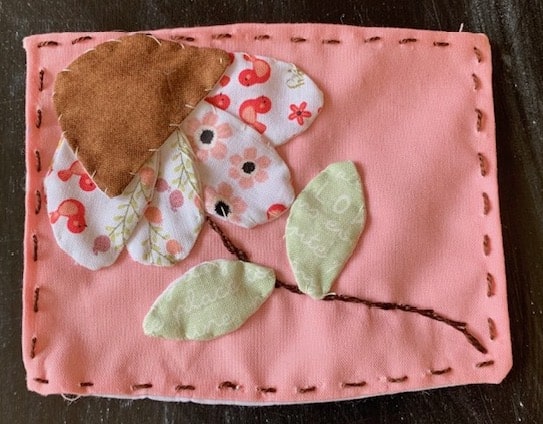
Supply List:
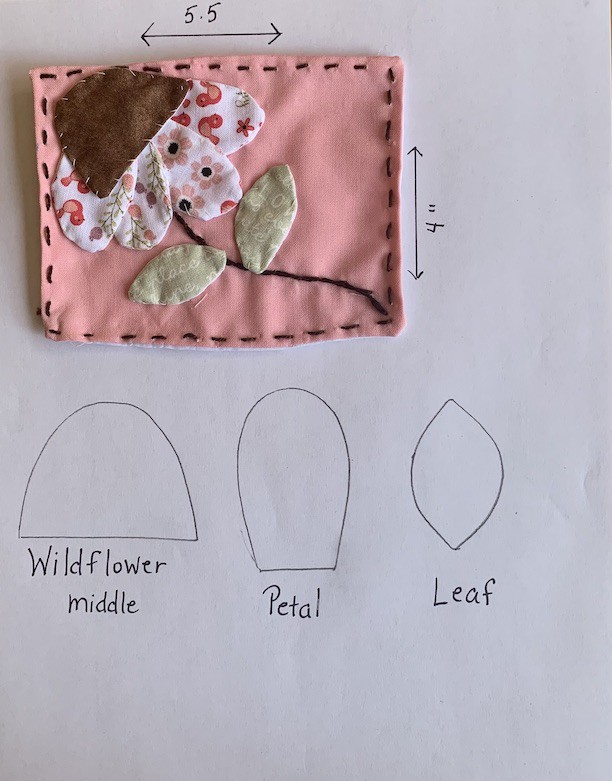
- Cut 1 main background fabric rectangle 4.5″ x 5/5″.
- Cut backing fabric 4.5″ x 5.5″.
- Cut out 1 wildflower middle piece out of brown fabric using the pattern.
- Cut a matching wildflower piece of fabric out of scrap fabric.
- Cut out 4 wildflower petals out of a floral fabric.
- Cut 4 wildflower petals out of scrap fabric.
- Cut out 4 leaves.
- Brown or green Perle cotton thread or DMC embroidery thread.
- Thread for appliquing.
Let’s make it!
Refer to your pattern for making this quilt label. Below find the tutorial for sewing it up.
For the quilt label rectangle: Place the main background fabric on top of the backing fabric so right sides are facing each other. Sew around the edge using a quarter inch seam. Cut a horizontal and a vertical line in the back of your backing fabric. Turn your rectangle inside out. Take your scissors and gently push out the edges. Then carefully press your rectangle.
Appliques:
Next put your two middle brown wildflower pieces together and sew right sides together. Do this to all of your flower petals. Then sew around the 4 leaves right sides together. One at a time, cut a slit in the back of your wildflower middle, your flower petals, and your leaves. Turn them right side out. *(Helpful tip for turning your appliques…I use the tip of a metal seam ripper to grab the fabric I need to cut a slit in. Be gentle with this. You don’t want to put holes in your appliques other than the slits you have to cut.) Once you have your appliques turned right side out and have gently pushed out the edges *(another tip…use a pin to pull the edges out of each small applique piece) press flat.
Arrange the pieces of your flower where you want to applique them except for the leaves. (Refer to the pattern.) Pin in place. Lift the edge of the 2 middle petals and back stitch a stem with your brown or green Perle Cotton. Then pin a leaf on each side of the stem where you want them to be.
Hand Sew On
Thread your needle with some brown Perle Cotton and sew a running stitch around the edge of your quilt label. Thread your needle with 100% cotton lightweight thread. Match the color to the background. Hand sew your flower petals on first. Set your brown middle flower part on top of your petals and hand sew it on. Sew on the leaves that you pinned to the stem.
Compose Your Message And Info
Write a short sentence message. Sign your name and date it. Whatever suits your style.
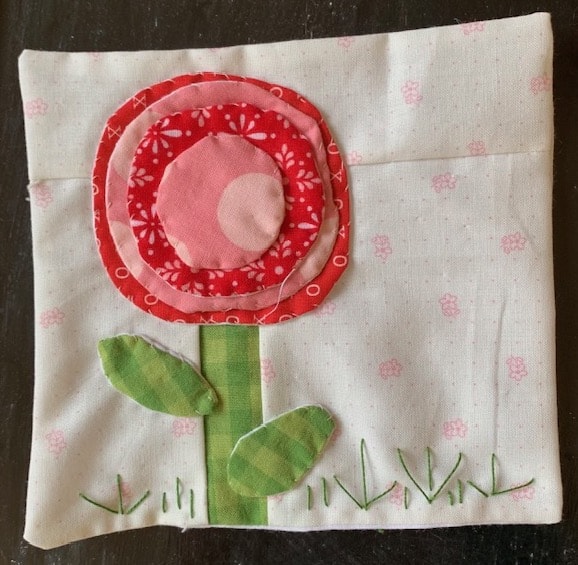

Supply List:
- Cut out 1 main background fabric piece 6.5″ x 6.5″.
- Cut out 1 backing fabric piece 6.5″x 6.5″.
- Cut out 2s stem out of green fabric 1″ x 4.5″.
- Cut out 2 round flowers per pattern piece. (You will need 4 different size round objects to trace around for round flowers. I used a large canning lid, an original size canning lid, etc…) you can trace and use for your flower appliques.
- Cut out 4 leaves out of green fabric.
- Green Perle Cotton thread
- 100% cotton thread for appliquing.
Cut out your label background. I placed the flower next to the left side of my background so that I had plenty of room to write on the label. Cut out your 6.5″ x 6.5″ background. Measure 2″ down and cut horizontally across the fabric. Take the biggest piece of fabric and measure about 2″ in and cut your fabric vertically. Sew your stem to one side of fabric your fabric quilt block. Then sew the other side of your stem to the fabric. Now match up the top piece of 2″ x 6.5″ fabric with the stem and sew it on top of the flower stem. Cut off excess fabric to the right side of the stem. Take your backing fabric and the stem quilt block right sides together and sew around the edge. Cut a vertical and a horizontal slit in the back of your backing fabric. Turn right side out and push edges gently out with scissors. Press.
Appliques
Cut out 2 round pieces for each flower circle on your pattern. Also cut 4 leaves out of green fabric. Sew each flower circle to its backing piece. Sew right sides together. Then cut a slit in the back of the circle and turn right side out. Press.
Hand Sew
Hand sew the flower to your quilt label. Layer each flower circle applique on top of the largest flower circle. The sew on leaves.
Embroider Grass
With the green Perle Cotton and sew a few lines to the bottom of the quilt label to look like grass. Pull your thread up through the fabric. Then put your thread down through the fabric to resemble a piece of grass.

Supplies List:
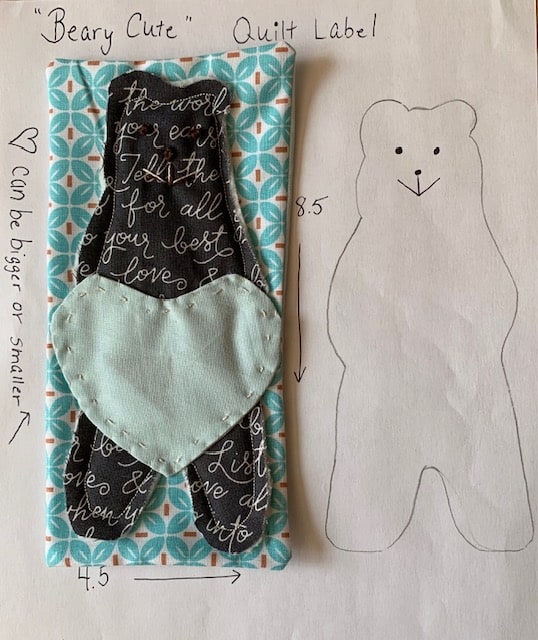
- Cut out a 8.5″ x 4.5 piece of fabric for your quilt label.
- Cut out a matching backing piece for your quilt label.
- Cut the bear out of fabric of your choice using the pattern.
- Cut the bear pattern out of low loft batting for raw edge applique.
- Cut out 2 hearts to write on for your quilt label. You create your own heart shape. It can be bigger or smaller than what is pictured.
- Brown and white Perle Cotton.
- Applique thread.
Cut the 2 pieces of fabric 4.5″ x 6.5″ and place them right sides together. Sew around the edges. Cut a slit in the back of your backing. Turn right side out and press. Now place the low loft batting in the center of your quilt label. Put the fabric bear on top of the batting and machine sew around the edge of your bear attaching the raw edge applique to your quilt label.
Sew two hearts right sides together. Cut a slit in the backing heart fabric and turn inside out and press. Sew a running stitch around the heart then hand sew to your quilt label. Add a face to your bear. Make eyes by sewing french knots. Make a nose by sewing a french knot and sew a short diagonal line on each side of the bear’s face with brown Perle Cotton thread. Then take the white Perle Cotton and sew over the brown diagonal line with white Perle Cotton thread.
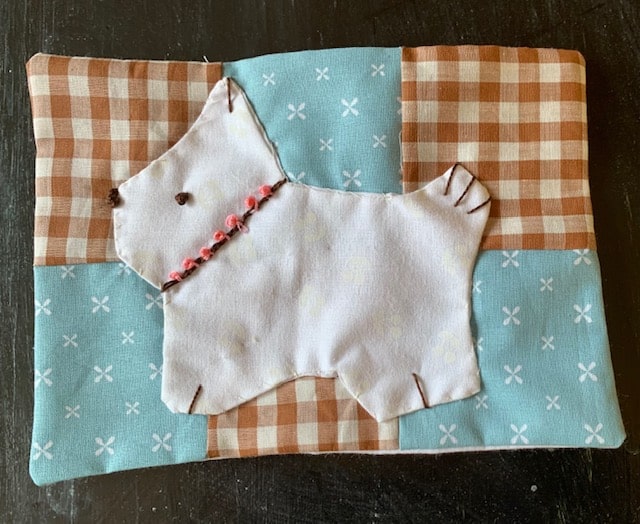
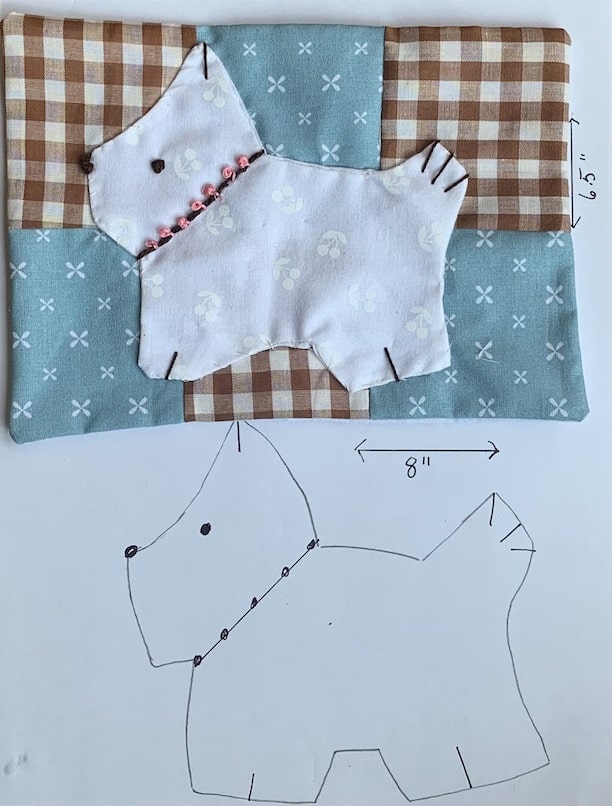
Supply List
- You will need two different types of fabric for patchwork quilt label.
- Backing fabric for the back of the patchwork.
- Cut out 2 Scottie dog appliques out of white fabric.
- Black and pink Perle Cotton thread.
- Applique thread.
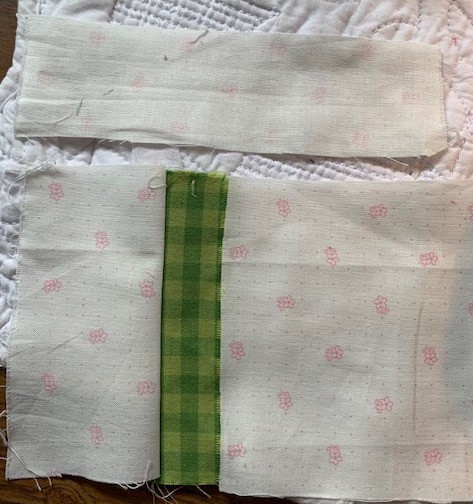
Cut 6 squares that measure about 2.5″ x 3″. Cut 3 squares out of gingham fabric and 3 squares out of coordinating fabric. Sew checkerboard style so you have 3 squares on top and 3 squares on bottom. Press. Now put backing fabric right sides together with the patchwork topper. Sew around the edges of these two fabrics. Cut a slit horizontally and vertically in the backing. Turn right side out and press. This quilt label should measure about 6.5″ x 8″.
Applique Scottie Dog
Sew the two white dog cutouts right sides together. Cut a slit in the backing of the dog applique. Then applique to the patchwork rectangle quilt label. With Perle Cotton, sew the lines as shown on your pattern. Give your doggie a french knot eye and large french knot nose. Backstitch a leash with brown thread on your Scottie and add pink french knots on the leash. Write your message on the dog applique.
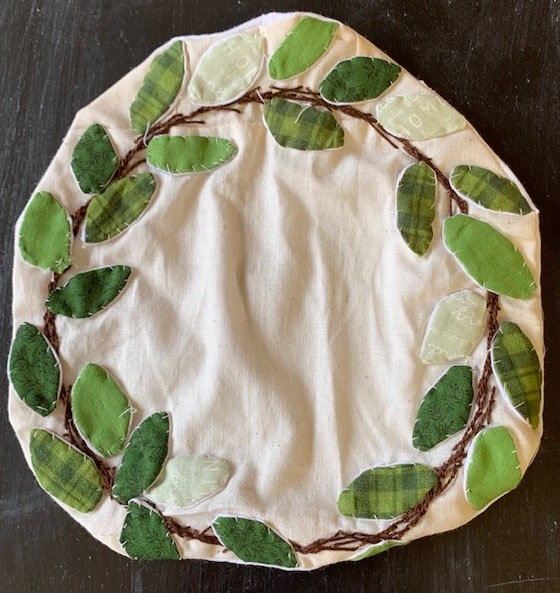
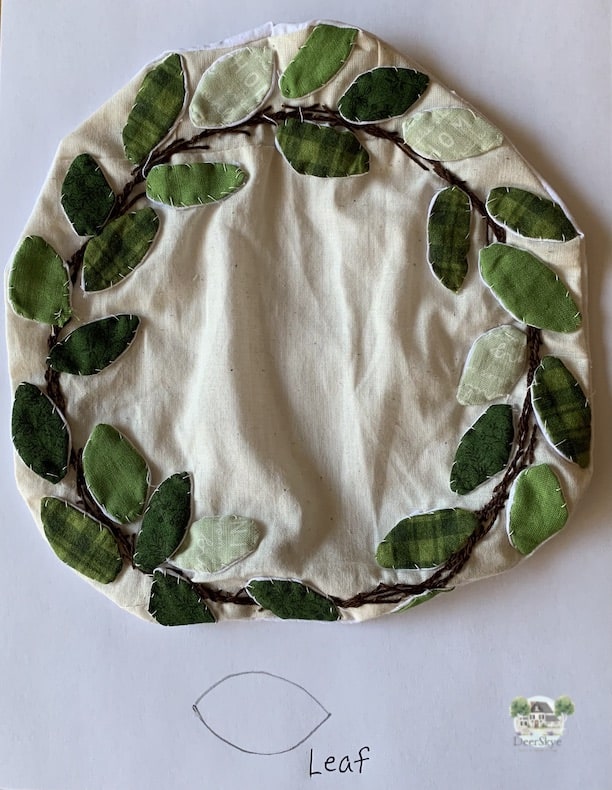
Supplies List:
- Cut out a round piece of solid fabric as big as you want your DIY quilt label to be.
- Cut a backing piece of fabric to match the round piece of fabric.
- Cut out as many leaves as you want for your handmade quilt tag. Each leaf should have a backing leaf. So cut 2 leaves for every leaf you cut.
- Brown or green Perle Cotton.
Sew your round pieces of the quilt label together placing right sides together and sewing around the edge. Cut a slit running horizontally and vertically in the backing fabric and turn inside out. Press.
Applique and Embroider
With your brown or green Perle Cotton thread, sew a backstitch around the circle of your quilt label. Try not to get too close to the edge of label. Then backstitch over and around the circle you just backstitched to give the look of a grapevine wreath.Also use high quality fabric for your quilt label. My fabric was too lightweight but it gives you the idea. Sew each leaf right sides together and then make a small slit (use a metal seam ripper to pick up the backing fabric so you can hold it away from your topper fabric to cut the slit.) Then turn inside out and press. Hand sew each leaf to your wreath. Write your message, sign your John Hancock and date your label and this label will get ooohs and ahhhhs for years to come!
Where To Place Your Quilt Label
Most likely you will want to attach your handmade DIY quilt label in the corner on the backing of your quilt. However you may want to put it on the topper or even on the middle of the backing. Think about how much use your quilt will get and this may determine where you want to place your cute quilt label. I leave the choice up to you. Two things here: #1 You can hand sew it on using the blind stitch or machine sew your quilt label on whichever you prefer. #2 You could also include care of your quilt like cold water wash or hand wash and line dry. Use a few words to describe how to care for it.
Don’t Be Shy Take A Photo
Be confident in your handwork. Take a photo of your quilt. Take a photo of your quilt label. You are a part of history now. It’s good to document and remember what you have made and why you made it.
You may also like:
Mini quilts are a great way to practice quilting. Here is a way to add some puffy raw edge letters to a mini quilt Puffy Raw Edge Alphabet Letters Applique Technique Using Low Loft Batting .
How about making a beautiful throw quilt with applique for a bed, to throw over a chair or to give as a gift? Make A Farmhouse Throw Quilt With Applique .
Got a bunch of t shirts and not sure what to do with them? I’ve got a solution for you in this post. How Do You Make A T Shirt Quilt? Quilt As You Go & No Interfacing .
Recent Posts
Wondering how to become a more confident quilter and how to zero in on what type of quilting really sings to you? How do you identify if you are a maker of quilts and keep believing in your abilities...
Do you need a quilt to give as a gift and need it like yesterday? Here is a fun quick quilt you can make in a day (maybe less) once you have your supplies. It features homemade raw edge, scrap back...