Here is a simple to make and oh so cute embroidery or cross stitch project organizer /holder for you to make. Easy to take along with you to work on the go and great for Christmas or birthday gifting too. Use your fabric stash to make it with. People will want one of these when they see you with it.
You will need:
- 5 or 6 fabrics that coordinate well together for the front and inside of your project holder
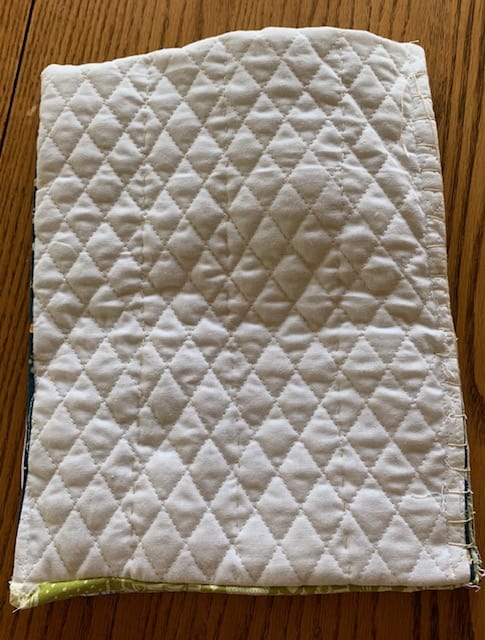
- 1/4 yard of white quilted fabric for the right side backing of your kit
- 1/4 yard fabric for the inside of your kit.
- Two different green fabric prints.
- Alphabet stamps and stamp pad.
- Supplies like small pair of sewing scissors, needle threader, embroidery thread, needles for embroidery.
- Embroidery hoop.
- Embroidery Kit to create.
- Dowel cut to measure about 6 to 7″ long.
- Perle Cotton Thread for quilting your project holder.
- Some low loft batting for applique on the front and for the left side of your kit.
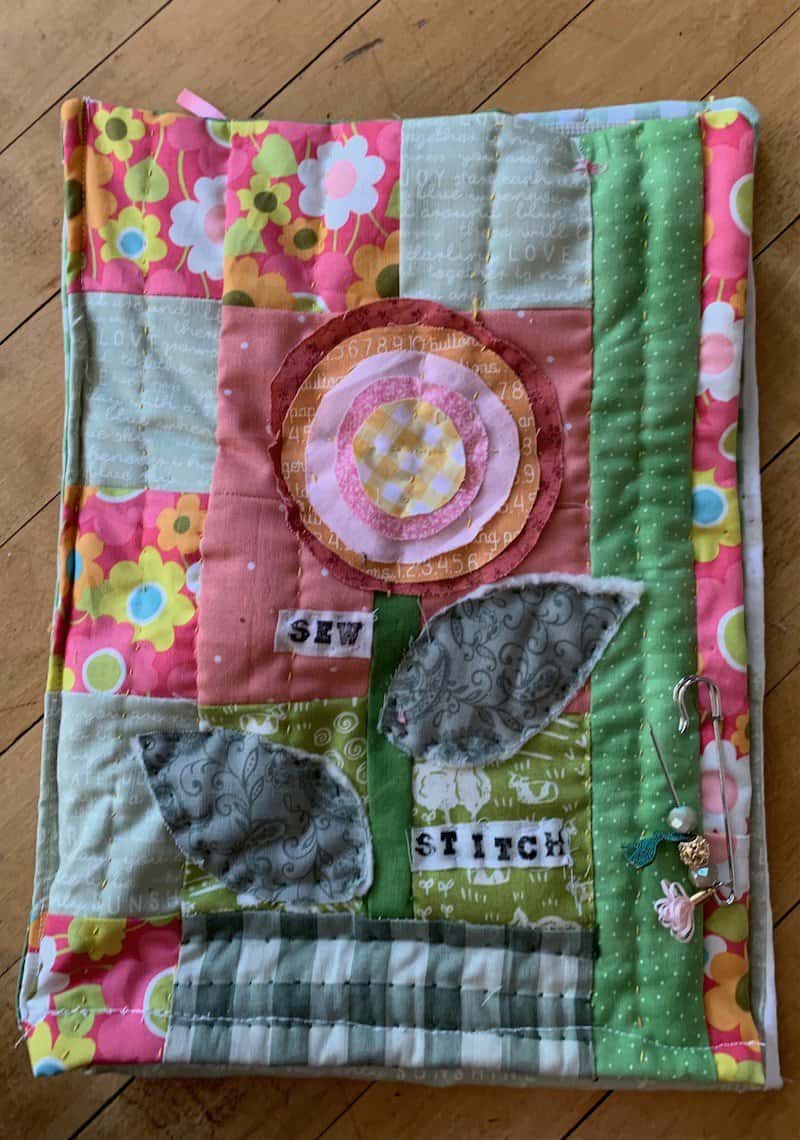
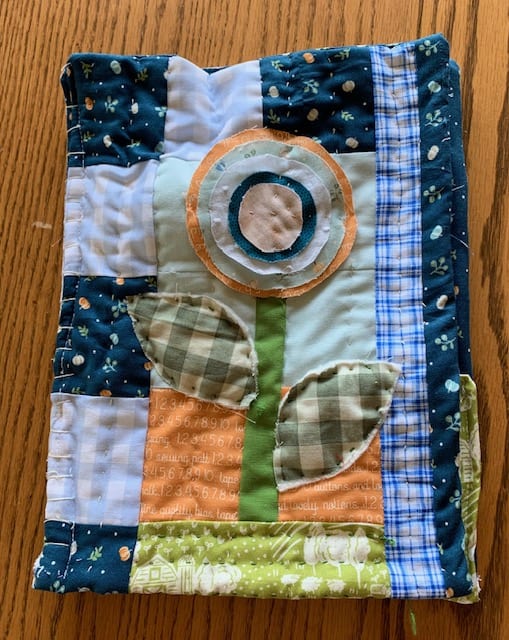
Ready to impress and delight a family member or friend? This is the gift to do just that. Once you make it though be forewarned… you will have a hard time giving it away! This project holder will make it possible for you to take your embroidery work on the go, or have ready in your favorite spot for watching tv. It can hold everything you need to work on an cross stitch or embroidery kit and keep you organized at the same time so you can pick up your embroidery and have everything ready to use to complete it. This project holder measures about 8 1/2″ x 11″. You can adjust the size bigger or smaller to fit your needs or to fit the size you want to give as a gift..
Choose Fabric For Your Project Holder
Patchwork is the name of the game for the front side of your embroidery/cross stitch project organizer holder. You can sift through your scrap stash to find fabrics to make this adorable embroidery project holder or you can shop for fabric that you love. Choose 6-8 fabrics that color coordinate with each other. Choose two main colors first. Then pull colors out of those two fabrics to add to your 2 main colors to make this project with. The front of your kit is fat quarter friendly. I took the advice I just gave you and shopped my own fabric stash to create this embroidery project holder.

Choose Fabric For Inside Of Your Kit
You will need fabric for the inside of your project holder. You can use one of the fabrics you chose for the front of your kit or you can choose a fabric that contrasts with it. Also, you will need a small amount of fabric for the pocket that will hold your embroidery project and embroidery hoop. It can be fabric that contrasts or that matches what you have on the front of your organizer.
Stamped Words (Optional)
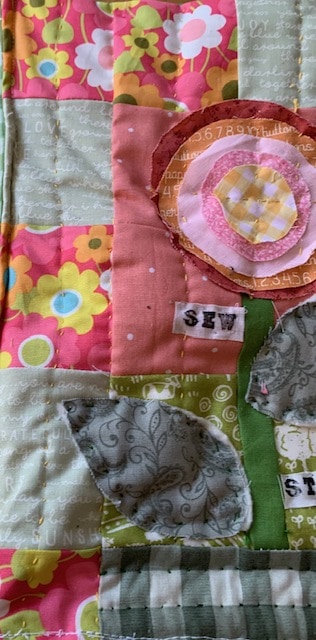
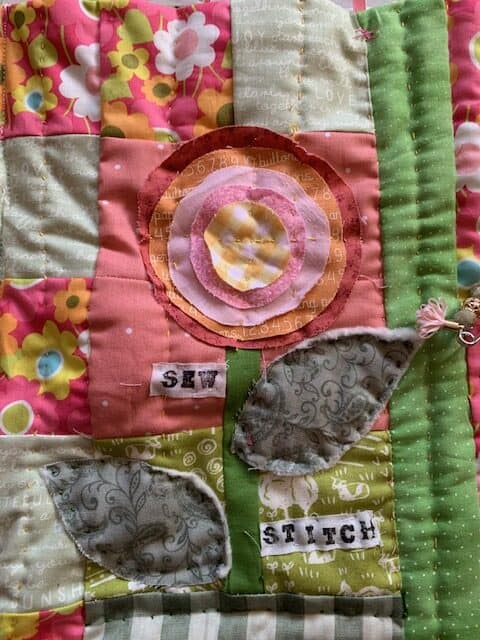
Let me start by saying you don’t have to do this, but it does give your project holder a little bit of punch! Cut out two small rectangles from muslin or white fabric. Stamp the words SEW on one piece of fabric and STITCH on the other. If you don’t have stamps, you could take a fine black Sharpie and write these words on the fabric instead. Or just skip this step altogether. Later you will hand stitch these words to the front of your project holder. They do add a little bit of something to the ffont of you organizer.
Let’s Start Sewing
Following the guide above, cutout your patchwork pieces. I used my trusty 6 1/2″ square ruler to cut out a large square and then folded it in half and cut it. Then took the two halved pieces folded them over and cut again. That gives you four squares.
- Sew a patchwork pattern however you want to do it. You can follow my pattern by referring to the picture above, or create your own. As long as you use a 6 1/2″ ruler to cut out your squares and fold and cut as explained above you will come out with about an 8 1/2″ x 11″ quilt block. Press your patchwork as you sew. (My pattern is basically alternating two colors creating patchwork squares along the left side and the top.)
- Then I chose a contrasting color notice the light greenish blue squares for 4 of my squares in the middle and below that two orange squares.
- You will sew your flower stem into 4 of the squares in the middle of your organizer. Here is how you do it.
- Cut a green fabric stem the length of two squares and about 1/2″wide.
- Take one set of a light greenish blue square and orange square that you sew on top of each other putting the greenish blue square on top of the orange.
- Sew the green stem to the right side of the two stacked squares.
- Now sew the stem to the left side of the other set of a light greenish blue square and orange square.
- Press. Square this set of 4 squares up so they are the same size as the 2 greenish blue squares you will sew to the top. You may have to trim off a little bit on each side of this quilt block.
- Take another contrasting green print fabric (measure and cut it the same size as two squares sewn side by side. Sew to the bottom of the stem and squares to look like it is growing out of the ground.
- Sew one piece of fabric measuring the same as the rectangle you just sewed and sew it to the bottom of your “green grass” we’ll call it.
- Next to the patchwork squares I cut out two contrasting strips of fabric that were the same length as the rest of the patchwork front of your organizer. They measure about 1″ to 1.5″ wide. You can make it as wide as you want it to be.
Cut The Backing For Your Patchwork Front
Cut a piece of contrasting fabric the same size as the quilt block you have just sewn for the front of your organizer/holder. Also cut a piece of low loft batting for the inside of your front and backing pieces.
- Place the batting on your table.
- Place your backing right side up on top of the batting.
- Place your front patchwork quilt block right sides together with the backing.
- Pin and sew around the left side, top, and right side using a 1/4″ seam.
- Leave the bottom unsewn.
- Turn inside out.

Hand Quilt The Front and Backing
Time to grab the color of Perle Cotton thread you want to quilt with. Hand quilt vertical rows of simple running stitches. Then fold the unfinished bottom edge twice and hem it with your Perle Cotton or hand quilting thread so the unfinished edge looks finished.
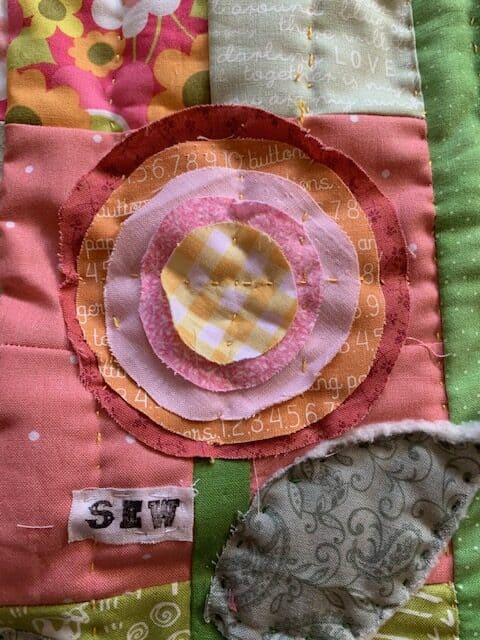
Raw Edge Applique
- Cut out 5 round fabric pieces for the flowers. I used a large mason jar ring and a regular size mason jar ring for the first two petals Then I used an assortment of smaller round shaped lids to use as pattern to cut out out smaller flower round petals.
- Attach the flower rounds with a few running stitches or make an x in the middle of the flower.
- Make a freehand pattern of a leaf. Cut two leaves out of green fabric. Cut two leaves out of low loft batting. Place the leaf on top of the batting. Put it on the stem where you want to sew it on and pin in the middle of the stem.
- Hand sew the leaf and batting to the right of the stem on the front of the organizer using Perle Cotton and a running stitch.
- Add your other leaf and batting and secure it by hand sewing it to the left of the stem.
- Hand sew your stamped words Sew and Stitch using Perle Cotton or hand quilting thread to the stem area. Refer to the picture above.
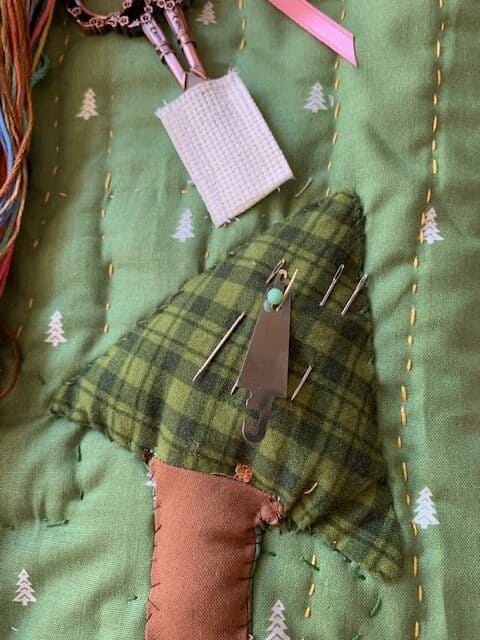
Add A Pin Cushion Inside The Project Holder
Turn your quilted patchwork to the backing side of your organizer. (Sorry not sure what to keep calling the project holder. It’s easier to just say organizer so I’m going with that so I hope I don’t confuse you.) Create a fun pin cushion. For the pink organizer I created a simple tree pattern using this applique method Needle Turn Applique Made Easier With No Fusible Web & Stunning Results . (You can easily make up your own tree pattern for this.) Applique to the right side of your fabric.
Flower Pin Cushion
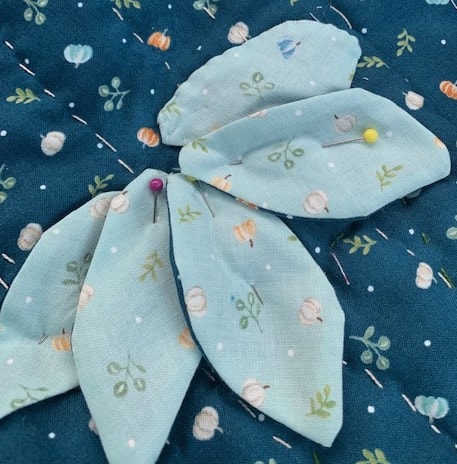
- Free hand drawing a petal pattern for a flower. Cut out 5 petals out of a contrasting fabric.
- Then cut out backing for each of your petals and sew them right sides together.
- Make an opening in the back of each petal and turn right side out and press.
- Applique them to your fabric.
- Cut out a middle of your flower from another piece of fabric. It can match or contrast with your petals.
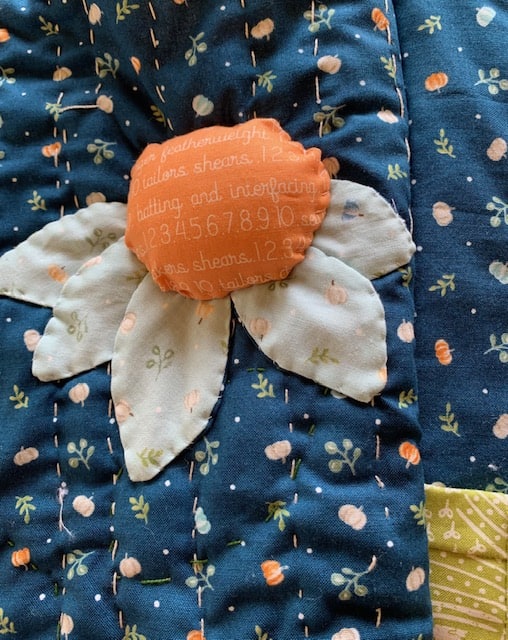
Middle Of The Flower
- Cut out 2 round pieces of fabric.
- Right sides together sew them together.
- Cut an opening in the back side of your flower and turn inside out.
- Press.
- Stuff with poly fil batting (the kind you stuff homemade dolls and stuffed animals with.
- Applique to the right side of your fabric.
Make The Right Side Of Your Organizer
We’re going to make the right side of your organizer just a little differently but nothing too hard so don’t worry. You will need a piece of matching or contrasting fabric that measures the same size as the left side of your organizer you just made.
- Cut a matching backing fabric for this side of your organizer from already quilted fabric. (Side note here…you can make this side exactly the same as the front of your organizer if you prefer.)
- Right sides together with the quilted fabric and your contrasting fabric. Sew them with a 1/4″seam leaving the bottom part open.
- Turn inside out. Adding a pocket will hide the raw edges of the right side of your organizer.
- Now hand quilt just like you did. to the patchwork side of your organizer.
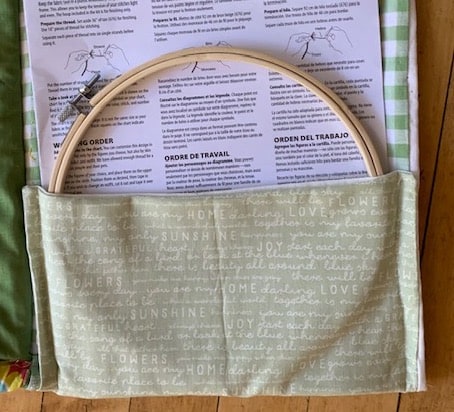
Adding A Pocket
You need to add a pocket to your organizer to hold your embroidery kit. Make a very simple pocket:
- Cut out two pieces of fabric exactly the same size. Your pocket is a rectangle shape that will fit across the right side of your organizer. It should come about half way up your organizer on the right side.
- Sew right sides together leaving the bottom open. (This should be old hat by now since you have done this process a few times already haha!)
- Turn right side out and press.
- Pin right sides together with your pocket upside down matched up to the raw edges of the bottom of your backing quilted fabric.
- Sew across the pinned edge.
- Fold your pocket on top of the front side of your two fabric pieces. This will hide the raw edges of the pocket to the inside. Press in place. Top sew your pocket to your organizer on each side of your pocket.
Sew Both Quilted Blocks Together
I’m calling the left and right sides of your organizer quilt blocks because that is basically what they are. Place wrong sides together (yes you read right…wrong sides together). Sew. You can sew a blanket stitch up the left side of your organizer where you just sewed wrong sides together but this is optional because it looks nice either way.
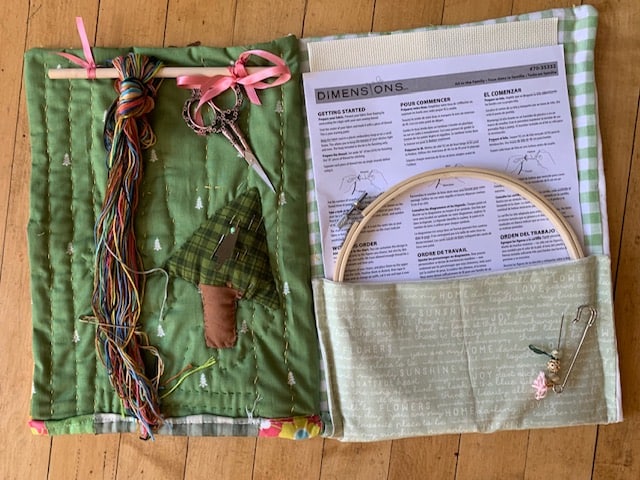
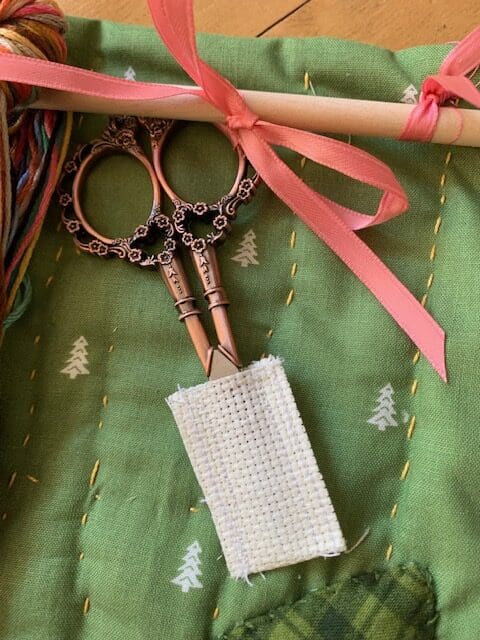
Use A Dowel To Hang Your Thread On
Sometimes when you create your own pattern it’s fun to get really innovative. Take a wooden dowel whatever size you would like and cut it to fit your organizer so it doesn’t get in the way of closing your organizer. It should be attached above your pin cushion. It should also be a little shorter on both sides of your organizer. Tie ribbon in a knot on each side of your dowel around your dowel. Sew the ribbon to your organizer. You can separate your thread and hang each color of thread individually to your dowel.
Finishing Touches
Add some cute embroidery scissors to your kit by hanging them on the dowel with a ribbon. Add a little cover so your scissors don’t cut into your fabric when you open and close your organizer. Tuck a cross stitching or embroidery kit in the pocket of your organizer. Add a needle threader and needles stuck in your pin cushion. This is sure to be a favorite gift to whomever you gift it to. That is if you gift it!
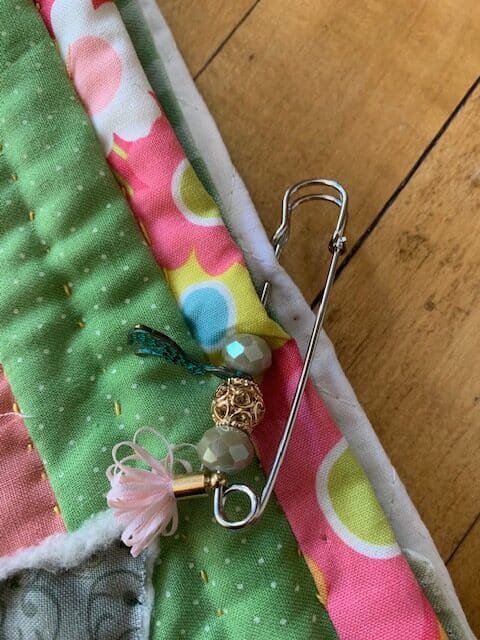
Fancy Safety Pin
To keep your kit closed you could add a button or velcro but I didn’t want to mess with those. Instead I added a fancy safety pin and dressed it up with beads and a tassle. Makes a cute addition to the front of your organizer.
You May Also Like
If you like the look of the flower on your organizer, you might also like to make a garden of flowers like this on a table runner. You’ll find how to’s here Fun, Easy DIY Quilted Raw Edge Flower Applique Table Runner .
Puffy raw edge alphabet letters add so much to a quilting project. Try your hand at creating some on a quilt block by using this tutorial Puffy Raw Edge Alphabet Letters Applique Technique Using Low Loft Batting .
Need a fun little pin cushion for yourself or as a gift? Try this DIY A Cute Cotttage Pincushion .
Recent Posts
Wondering how to become a more confident quilter and how to zero in on what type of quilting really sings to you? How do you identify if you are a maker of quilts and keep believing in your abilities...
Do you need a quilt to give as a gift and need it like yesterday? Here is a fun quick quilt you can make in a day (maybe less) once you have your supplies. It features homemade raw edge, scrap back...