Creating a concrete countertop isn’t as daunting as you might think. It is a project you can tackle if you have a little DIY knowhow and some extra muscles on hand. Though it is known as a more industrial look, I love it and you can use it in farmhouse, country, shabby chic, modern, or rustic design. In other words, almost any decor depending on how you decorate the room to accent it.
Take on this adventure once you pick up your supplies, make the form for your countertop, mix the special ingredients for your concrete countertop, pour concrete into your mold, cure, polish, spray on finish, and install.
Pick these supplies up from your local building store:
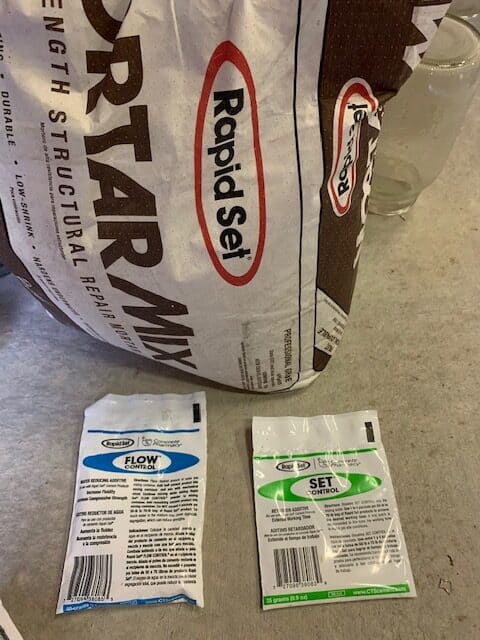
- Rapid Set Mortar Mix From Home Depot (I don’t benefit financially from mentioning Home Depot that is about the only place we can get this in our area. (We used two 55 pound bags for our small bathroom countertop.)
- 1 large sheet 4’x8′ melamine….I know it sounds super big but you will cut this down into strips to form a box frame.
- 1 to 4 bags per mortar mix (we used 2 bags) Concrete Pharmacy Rapid Set Flow Control (you will add this to your mortar mix when mixing it up). This makes your mortar mix more liquid for pouring.
- 1 to 4 bags per mortar mix used (We used 2 bags) Concrete Pharmacy Rapid Set Control (you will add Set Control to your mortar mix as well. This slows down the time your mortar mix sets up so you can get it even and smooth as you want before it sets up in your form.
- If will want to buy or borrow a 24″ chrome- plated steel and grout mixing paddle to attach to your cordless drill. This is the perfect way to mix up your mortar mix concoction for your countertop.
- A trowel
- (Harbor Freight) 10amp 7″ Variable Speed Polisher Sander and you will need polishing pads for the sander. (We bought this at Harbor Freight to save money.)
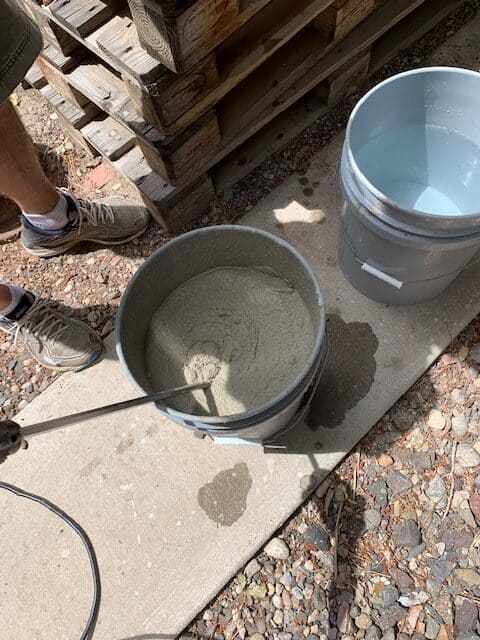
- 5 gallon bucket with water for mixing your mortar mix
- 5 gallon bucket to clean your mixing paddle
- Stone care granite and sealer (Bought on Amazon again no financial gain here)
- A couple of friends to help you lift and set your countertop in place.
My hubby and I finally decided to start remodeling the bathroom counters in our home. Our half bath had a chipped countertop that we were going to repair but didn’t love the tiles that the former homeowner had chosen. Our upstairs bath counter I had started taking apart a few years ago as it was made up of hundreds of tiny tiny tiles and looked 70’s. 70’s aaargh!!!! So we finally agreed it was time to get both countertops up to snuff as they say.
My hubby had seen a video on you tube and it convinced him that it would be cost effective and that he could do it. I was ecstatic! I had been talking concrete countertops for years and he just didn’t believe that was the answer. That is until he found Michael Builds on You tube. That made all the difference! My husband is a talented builder and has helped build two of the homes we have lived in so he is no stranger to projects like this. Michael just explains everything so well and makes it seem so simple which basically it is.
Supplies
I gave you a list of supplies above. You might want to take along some brawn though when you pick these supplies up. My husband sent this list with my daughter and I so we set off for the depot. Home depot that is. We managed to lift the mortar mix from the shelf but it was hefty and got all over my shirt. Then the sheet of melamine. I asked for a Home Depot customer service rep to come and help me lift the sheet of melamine off the shelf. The young man they sent was super skinny and I helped him lift it off the shelf. Hmmmm. Oh he did his best but not sure this was his expertise.
Then when I went to pay and have the sheet of melamine taken to my car the guy at the register called the same skinny young man to come and help. My daughter was the saving grace and lifted the sheet and wedged the sheet in between the two sides of the car. The worst part about our trip was I tried and tried to call my hubby to make sure we were getting the right mortar. His phone was turned off. Had to call my neighbor to send one of her kids down to his shop and tell him to call us. What was somewhat frustrating turned out magic in the end because I love the end result. My hubby did a fabulous job of making a concrete countertop.
Head On Over To Michael Builds
I’m telling you this guy is the best. He explains everything so clearly and easily. My husband was able to follow his instructions step by step. We chose to do the Inverted Cast method in case you are wondering because Michael gives three options for creating a concrete countertop. He says this is the easiest and fastest way to make a concrete countertop and I think my hubby and I would agree. This is the video we followed, Michael Builds as mentioned above. He has several varieties but starts out with this simple countertop first. We actually started with our half bath to try this out. We started out small before we attempt to pour a larger countertop.
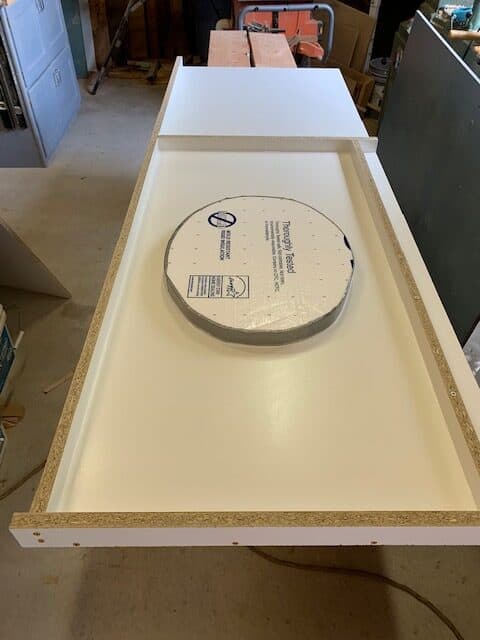
Make Your Mold
My hubby cut out strips of melamine from our melamine sheet following Michael Builds dimensions on the side and the length was as long as our countertop needed to be in our small half bath. In the middle he used some styrofoam to fill the circle where the sink will go.
Mix It Up
Put your water, mortar, Rapid Flow Control, and Rapid Set together in a 5 gallon bucket. (Don’t get confused on the two additives although it sounds confusing!) Attach the mixing paddle to your drill and let her loose. Mix your ingredients together.
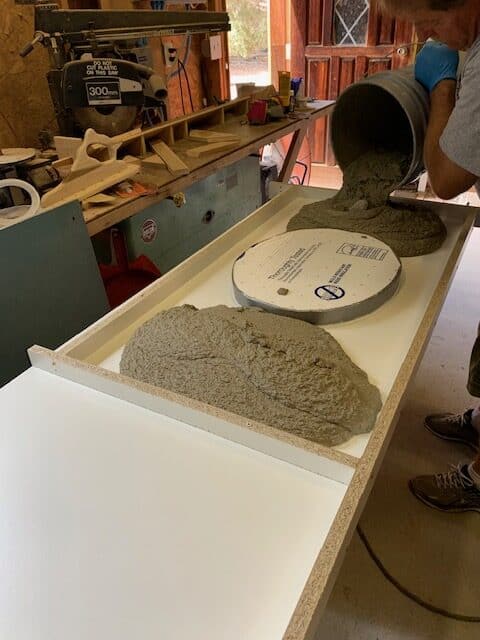
Pour It On
Time to pour. You need to work swiftly and with intention. The Rapid Flow and the Set Control should give you the time you need to get the bottom of your countertop smooth and the way you want it. Remember it is bottoms up because the top of your countertop is directly on top of the melamine. So the concrete you are smoothing on the top is actually the bottom side of your countertop.

Cure Your Countertop Pretty Quick
You’ve poured your countertop and now you just let it set and cure for awhile. Actually in about an hour you are ready to finish. Is that amazing or jump up and down exciting or what! You just sit back and wait for it to dry.
Take Off Surrounding Melamine Strips
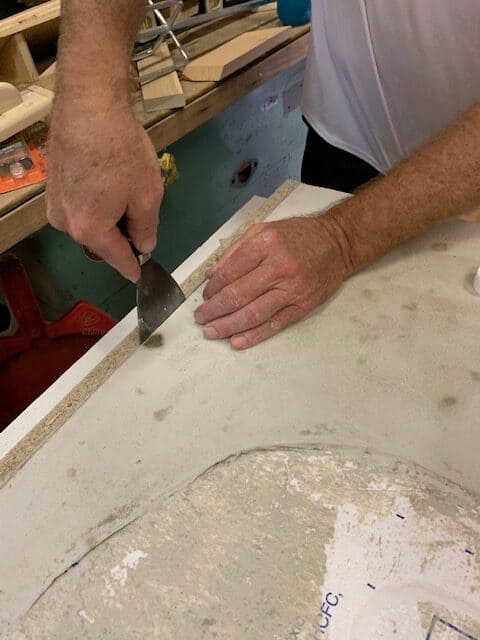
Unveil Your Countertop
My hubby took a simple spatula and carefully wedged it between the melamine strips and the edge of the newly poured and cured concrete countertop. It didn’t take a lot to get the edge frame off of the countertop. My husband worked carefully and consistently. Then we lifted it together and turned it over to see the top. The top was better looking than the bottom. We then moved our countertop outside my husband’s shop for polishing.

Time To Polish
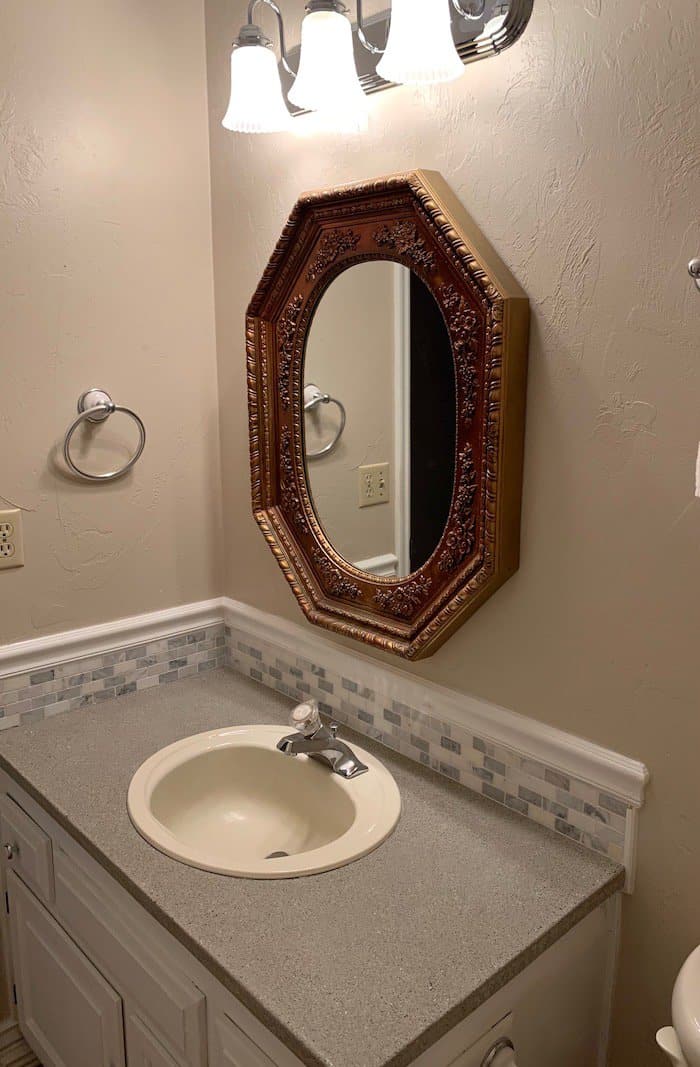
This is the part that gives your countertop a sheen, smoothness and brings a look of granite that I didn’t expect. My husband took his polisher/sander and went to work until he had the look he wanted. I was blown away. Really it does look just like granite as you can see from the picture above.
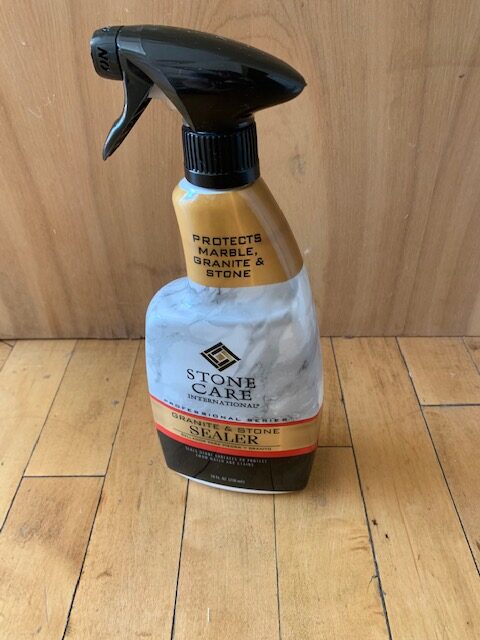
Finish With Sealer
We followed Michael Builds advice and used Stone Care Sealer which we bought on Amazon. It gave our concrete countertop a finished shine to it. So easy to use. Just spray it on take a rag and rub it in here and there where needed.
Install
John, my hubby put silicone (you could put glue or cement if you want) around the top of the vanity where we were going to install our countertop. We had silicone on hand so that is what we used to secure the countertop to our vanity after all that countertop isn’t going anywhere. We still have to add our backsplash but John is going to design it to match our beadboard wall on the opposite side of the sink. I’ll replace the main picture once we get that completed. So happy with the results! Definitely would recommend Michael Builds for your how to’s on making your own concrete countertop.
You May Also Like:
Need some inspo for decorating your new home? A Beginner’s Guide To Decorating A New Home Build
Need to make a space that is serene and peaceful to retreat to each day Calming Living Room: How To’s
How about a simple and cute project to inject some cuteness into a room Home Decor Sign DIY
Recent Posts
Wondering how to become a more confident quilter and how to zero in on what type of quilting really sings to you? How do you identify if you are a maker of quilts and keep believing in your abilities...
Do you need a quilt to give as a gift and need it like yesterday? Here is a fun quick quilt you can make in a day (maybe less) once you have your supplies. It features homemade raw edge, scrap back...