Here is a fun scrappy quilted heart you sew in patchwork then quilt and then stuff and hang on your front door. It’s super cute and a very unique Valentine door decor with a cute heart pocket that will add whimsy and smiles to your front porch.
You will need:
- A variety of red, white, pink, peach, cream etc… fabric.
- Low loft batting.
- Backing fabric for your large heart.
- Fabric for your pocket.
- Doll or teddy bear stuffing.
- Doily, small teddy bear, and red faux berries or dried flowers for your pocket.
- Don’t forget to press after adding each fabric strip or square to your base.
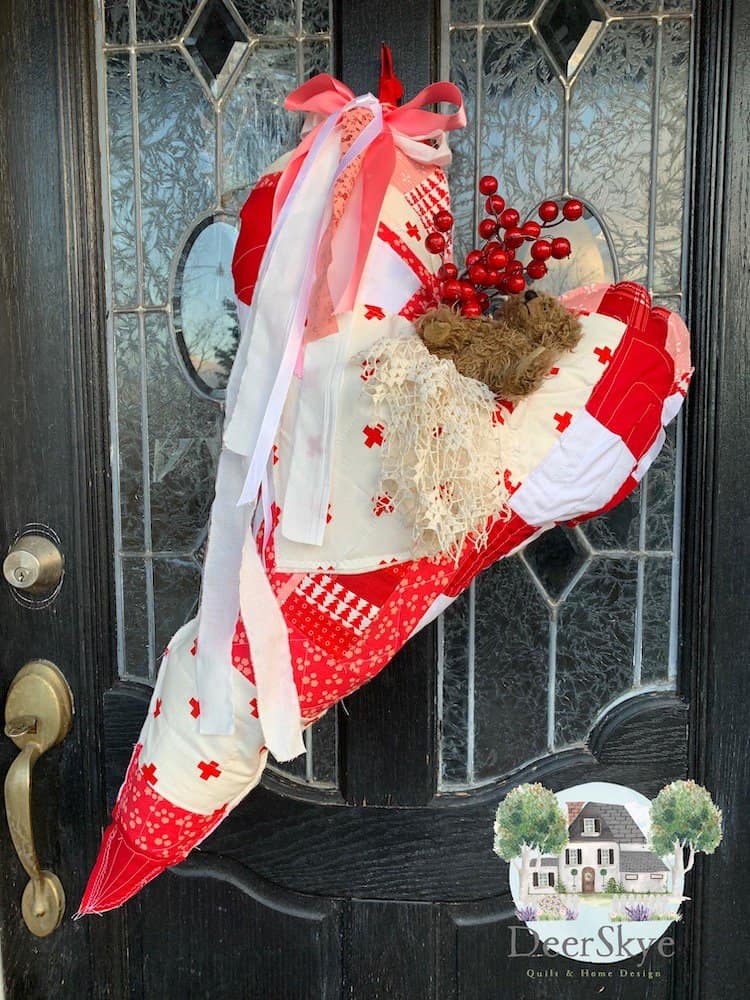
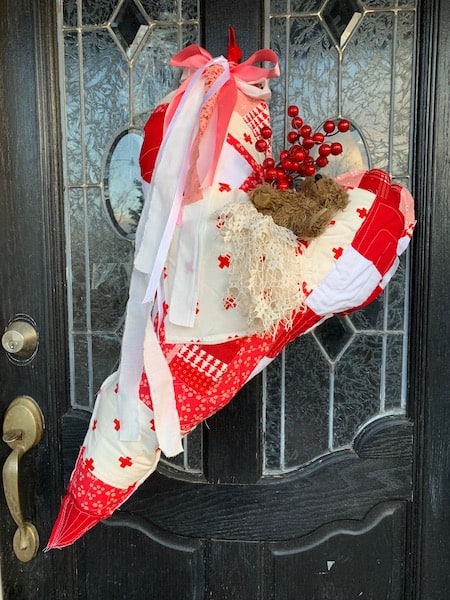
Once Christmas passes and you start putting away your decor, it might be hard to think ahead to Valentine’s Day. I knew I wanted to make a large, long whimsical scrappy heart to replace the big Christmas greenery wreath on my front door. I just started designing and sewing and before long, I had the heart sewn, quilted, stuffed and ready to hang on my front door. I’ve never seen anything like it but I love it! You can make it smaller if you like. I needed something longer to cover and decorate my front door.
Gather Your Fabric
I chose a variety of reds, whites, pinks, peaches, creams, etc… with a variety of prints or plain fabrics. You are going to mix and match in a scrappy fashion and then cut out your main heart. Put fabrics next to each other and see what you like. I started with some checkerboard squares sewn in plain nine patch red and white fabric. Let’s break this down so it is super easy to start this project.
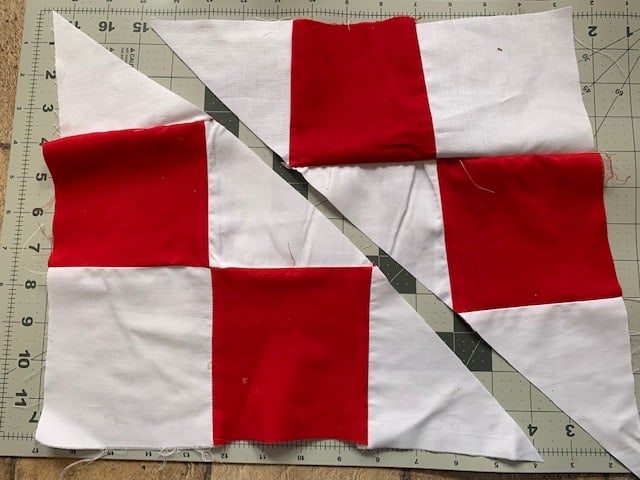
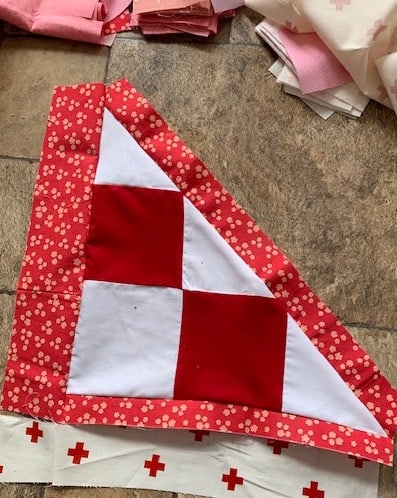
Step 1: Sew A Nine Patch In Red And White
Decide how big you want your red and white squares to be. Sew them in a nine patch quilt block. Press. Now take your rotary cutter and cut your nine patch on a diagonal. Now the fun begins as you add strips, rows, whatever suits your fancy when designing your scrappy heart. There are no wrong choices here. This is your scrappy heart to make. As I added more fabric to my scrappy red and white squares, I kept in mind the type of heart pattern I wanted to create.
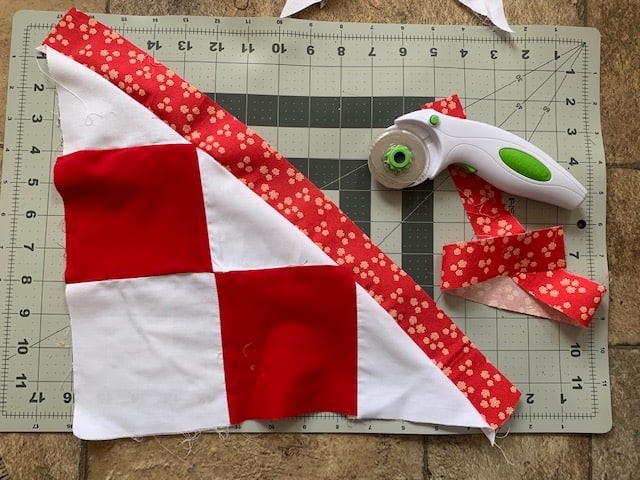
Step 2: Add A Strip Of Fabric
Sew a strip of fabric to the top your quilt blocks. It can contrast or compliment your red and white squares. It can be a thick or a thin strip whatever you would like it to be. It just keeps getting better as you continue to add more fabric to your scrappy heart base.
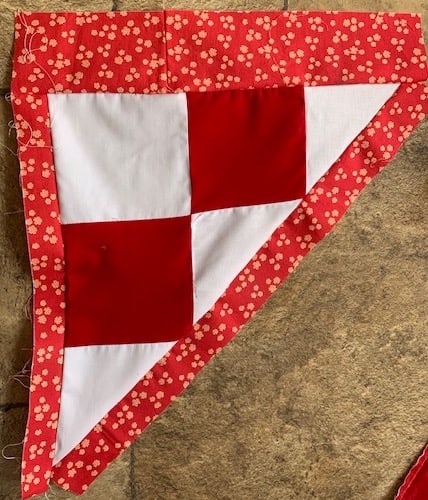
Step 3: Add The Same Fabric To The Side And Top Of Your Square
The general idea to making your scrappy quilted heart is to continue adding fabric. To your base add the same fabric you just added to the side and put a strip on the other side and a wider strip to the top. You determine how wide or how thin you want each strip to be. Step by step you will grow your scrappy heart base until it is just the size you want. Then it will be ready to cut out your pattern and quilt.
Step 4: Add More Fabric In The Mix
Now that you have a small base to your scrappy heart and yes it is triangular shape, you can build the bottom layer. I added this Swiss cross fabric. Isn’t it fabulous? I used it on my Christmas wreath and I love it so much I used it on my scrappy quilted heart as well. It’s called reverse Swiss cross by Trizzutto. Turns out it looks fabulous on my scrappy heart. Pick fabrics that make your heart sing. I added a wide strip to the bottom of my scrappy base. I know it looks weird but just trust me! Once you have enough fabric sewn to the top, sides, and bottom, your heart will be ready to take shape!
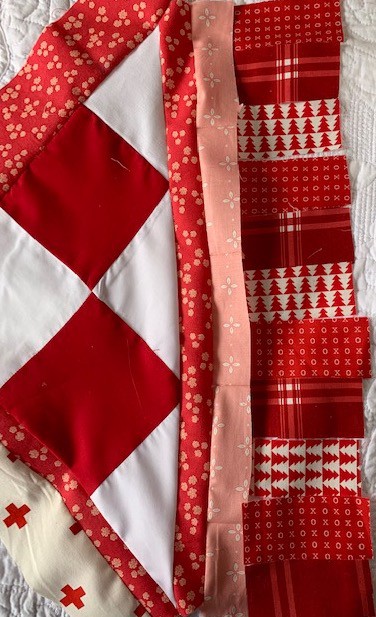
Step 5: Another Strip And A Row Of Reds
I pulled the peach color out of the floral strip on the side of my scrappy base and added a thin strip of cute peach fabric. Then I added a row of reds. I alternated three different Riley Blake fabrics cut the same width and length in a horizontal pattern and then sewed them as long as the side is of my scrappy heart. I then pressed them and sewed them to the peach strip of fabric. Now press again.
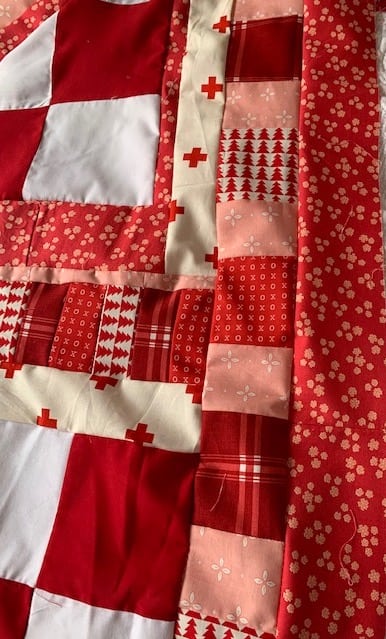
Step 6: Continue Adding Fabric To Each Side Of Your Scrappy Base
You can see from my picture that I added more fabric strips and blocks to each side of my scrappy base. It might seem a bit odd that I added peach colors to red but it really did work for me. I loved how it looked finished. The peach complimented the red and the red complimented the peach.
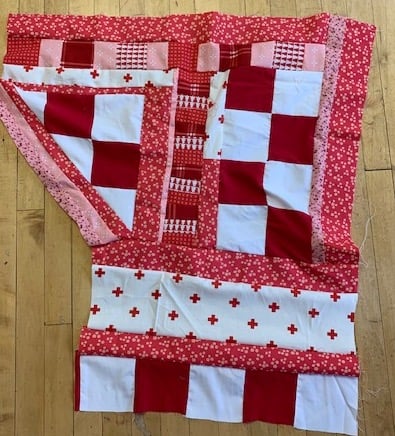
Step 7: The Shape Of Your Heart Blocks Base
Because I started with a diagonal piece of nine patch squares cut in half, my scrappy base might look a bit skiwhampus to you but there was , “A method to my madness,” so to speak. I wanted the left side of my scrappy heart to be a little wider and taller than the the right side of my scrappy heart so I built it this way. If you just want to keep your scrappy base square no worries. Sew it that way if you would rather. This design worked great for me. You will notice in the next picture that my left side of my scrappy quilty heart swings a little wider than the right side as planned. I wanted my Valentine heart decoration to be not only scrappy but a little crazy too.
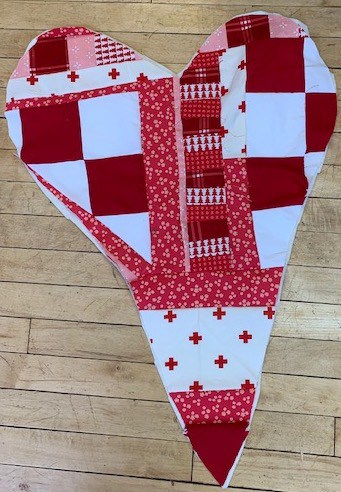
Step 8: Time For Your Heart To Take Shape
It takes a little time to sew up your heart base and get the variety of fabrics where you want them to go. Once your scrappy heart blocks and strips are as long and as wide as you want them to be, time to craft your pattern. This is where you get to freelance. Fold over your base and cut out the shape of heart you want. If you would rather be a little more confident in cutting out your heart shape, then tape together some computer paper and make a pattern to follow. I was pretty confident I had in mind the right shape for my scrappy heart.
Step 9: Add Batting And Machine or Hand Quilt
You’ve got your heart shape cut out so grab your low loft batting and lay it on your cutting table or lay it on your floor that will do too if it works better for you. Then lay your scrappy heart on top of the batting. Cut around it. I went to my sewing machine and sewed random straight stitches on my heart to quilt it. If you want your stitches to stand out and be more uniform, use some Perle Cotton in a contrasting color of your choice and hand quilt your heart. Next time I make one of these, I will definitely try that. I think it would add to the look of the scrappy heart.
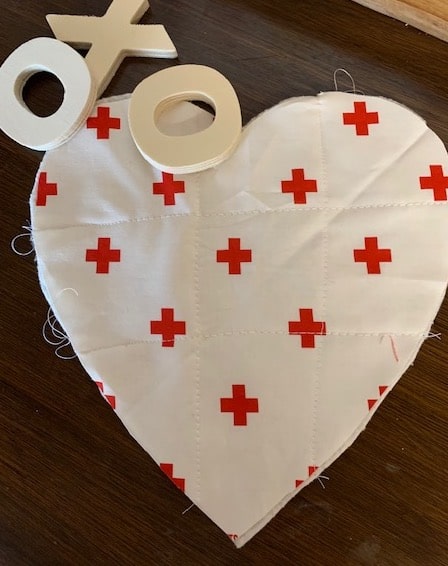
Step 10: Cut Out Your Heart Pocket & Add Batting
Not sure why I love this fabric so much but it became the focal point of my scrappy quilted stuffed Valentine heart.
- Make a pattern or just wing it like I did and fold over your fabric and cut out a pocket for your scrappy heart. Cut out 2 pieces. One from your fabric and one from your low loft batting. Cut a heart that is the size you want it to be but consider the proportions of the heart you will be sewing it to.
- Quilt it by hand or on your sewing machine (I used my machine).
- Sew a zig zag stitch on the top of the heart pocket. You will be sewing this heart to your long scrappy heart so you want to zig zag the raw edge at the top of the pocket because it won’t be sewn to your heart. Even though it is still a raw edge it finishes the top edge of the pocket.
- Sew your heart pocket to your Valentine Scrappy Heart and use a zig zag stitch leaving the top of your pocket unsewn.
Step 11: Cut Out Backing & Sew
Lay your backing on the floor or on your cutting table. Place your scrappy heart on top of the backing. Cut around the backing. Your edge will be raw but it looks so cute with this heart project! Sew around the edge of your heart and backing with a zig zag stitch. You have two options for stuffing your scrappy heart. Either leave a bit unsewn son the side or top so you can stuff your heart with batting or you can sew all the way around your heart. Then cut a straight line in the backing to stuff your scrappy heart.
Step12: Stuff Your Heart & Stuff your Pocket
This is the really fun part of this quilting project. If you chose option1 for stuffing your heart, which is you left a bit unsewn son the top side of your heart so you could stuff your heart. Stuff your scrappy quilted heart with doll stuffing like fiber fill then zig zag the hole closed. If you chose option 2 which is you cut a straight line in the back of your heart through the backing, fill the heart with fiber fill and then pin the opening in the back closed. Fold one side over the other side and pin. By hand using small sewing stitches, sew the opening closed. It’s taking shape now and looking so festive! I promise it will!
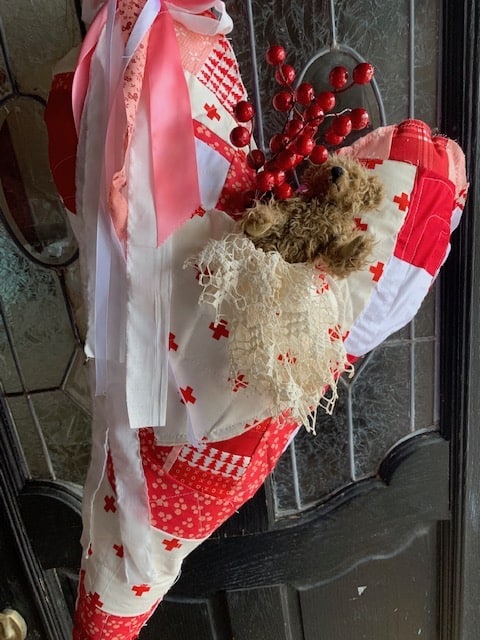
Time to stuff your heart pocket on the front of your quilted scrappy heart. You can fill it with what you want to but I chose three things. I had a doily that I folded over and put in the very front of my pocket so it hung down the front. Then I put a small teddy bear and some large red berries in the pocket. You can use more fabric stuffed hears, dried flowers, greenery, whatever you have on hand that you want to use.
Step 13: Add Ribbon And Ric Rac Hanger
Rip some fabric strips from the colors of fabric you want to add to the top of your scrappy quilted heart. Tie a bow with some contrasting satin ribbon. Then glue fabric strips, lengths of cut ribbon or lace to the top right side of your scrappy heart. Glue or hand sew it to the top of the left side of your Valentine heart. I added a piece of red ric rac looped to the back for a hanger. About this time you are getting anxious to hang this out on your front door. Go ahead. Hang your scrappy quilted Valentine heart door decor. You will love it! Your guests will love it as they get greeted by your festive scrappy heart. It’s definitely scrap happy!
You may also like:
Trying to pick out backing for a quilt? This might be helpful What Is Quilt Backing? Everything You Need To Know
Got a lot of quilt squares and not quite sure what to do with them? How about sewing a giant checkerboard quilt? What Can I Make Out Of Quilt Squares? Quick Sew Woodland Animal Checkerboard Quilt This makes a fun gift too and it can be made with two types of fabric. You don’t have to use the animal theme.
Need a quilting project for all those t shirts? Try this How Do You Make A T Shirt Quilt? Quilt As You Go And No Interfacing
Recent Posts
Wondering how to become a more confident quilter and how to zero in on what type of quilting really sings to you? How do you identify if you are a maker of quilts and keep believing in your abilities...
Do you need a quilt to give as a gift and need it like yesterday? Here is a fun quick quilt you can make in a day (maybe less) once you have your supplies. It features homemade raw edge, scrap back...