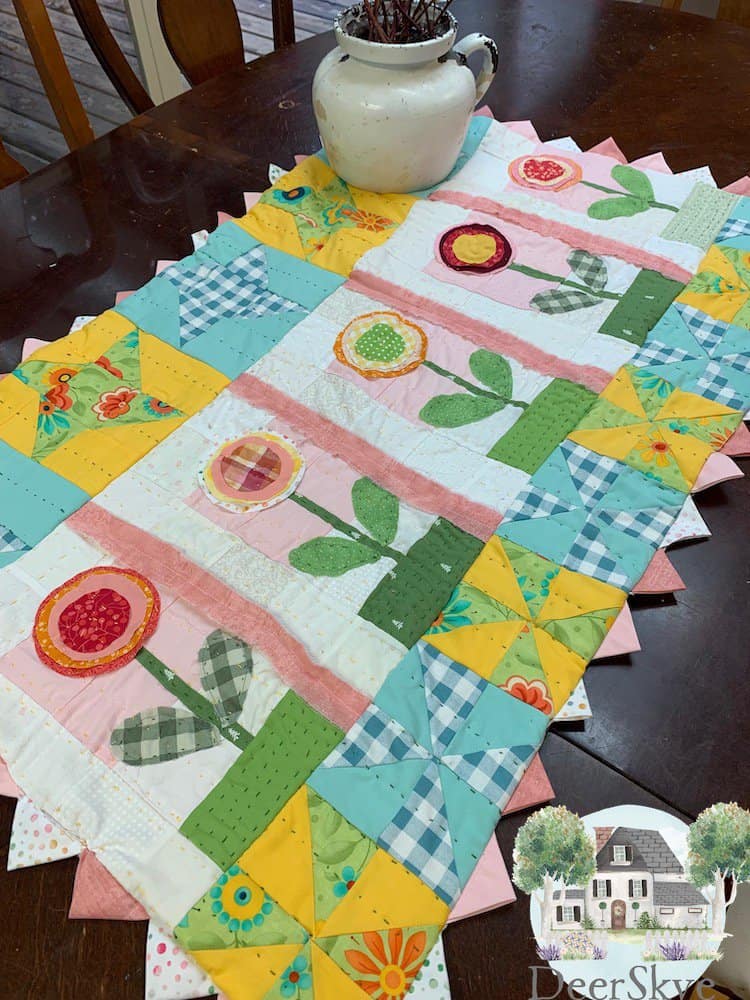
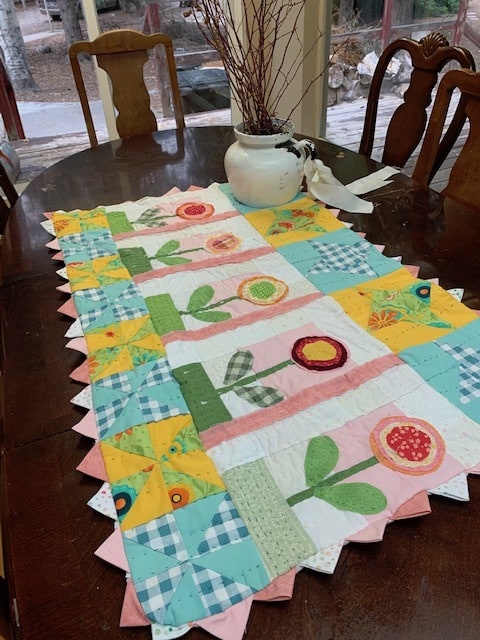
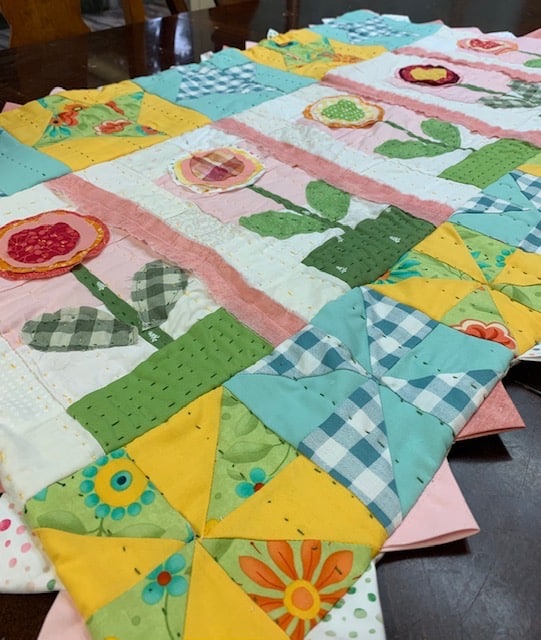
Sometimes your table just needs that certain something to make your dining room stand out. Here is a quilted flower applique table runner that you can make at your leisure. We are going to quilt as you go, make binding easy, and sew and quilt this up in no time. It’s bright, it’s fun, it’s cheery and it’s adorable!
You will need:
- Assorted white fabrics some with texture , some plain white, and some with prints on them
- 1 yard light pink fabric
- 1 yard dark pink fabric
- 2 fat quarters warm and dark yellow fabric
- 1 fat quarter bright printed fabric of your choice
- 1 fat quarter solid color
- 1 fat quarter contrasting print with the solid color fat quarter
- Low loft batting
- Backing Fabric
- 2 Colors of Perle Cotton Thread for quilting
Growing up, I had an amazing aunt who every summer invited me to her home for a week to craft and have fun and visit her family. She was my crafting buddy and taught me so many things including how to sew. I named this table runner in her honor “Gloria’s Garden”. Use your creativity when choosing the “seeds” (colors) to make your garden grow. Don’t panic about the applique. The blooms are hand sewn to your table runner and the leaves are raw applique sewn on the sewing machine. It may seem complicated but just take it a step at a time.
Choosing Fabric
This step doesn’t have to be hard. It comes with practice unless you have a talent for it. However, when I choose fabrics for a new pattern, my quilting studio looks like a tornado hit! I have to lay fabrics on top of fabrics and set them out on the floor to get a feel for what I want to create. To make it easy for you, I suggest you use an existing fabric line with coordinating fabrics, (you can purchase from your local quilting shop or online shops) reds, whites, and blues, varying colors of one of your fav colors, Christmas colors, complimentary colors on the color wheel, paint chip colors etc…
I went to my fabric stash and started with pink and white and branched out from there. I wanted a really soft background so the flowers in this garden stood out. The colorful blooms provide a wow factor. I added a variety of bright pinks, oranges, etc… to make it pop. The friendly friendship stars and pinwheels are made from some fabric scraps I had on hand and basically there are so many ways you can go with this pattern.
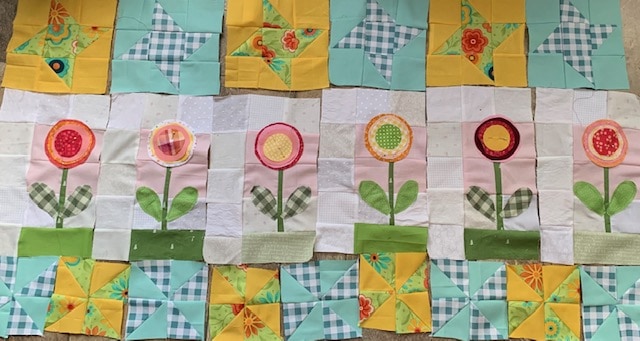
Cut Out Your Flower Quilt Blocks
Grab your cutting tools, your self healing mat, rotary cutter, and sharp scissors, and I used my trusty plastic 6 1/2″ square ruler. You can improvise if you don’t have this size ruler by cutting a 6 1/2″ square out of heavy cardboard. Or run down to your local quilt shop and purchase one there if they have them. Amazon also sells this size quilting ruler. Cutting out your DIY table runner will probably take you the longest of the whole process. Put in a movie or listen to a favorite podcast, listen to scriptures, whatever mood suits you and get cutting. Make this part enjoyable. You are going to want to get this done so you can get on to the fun stuff.
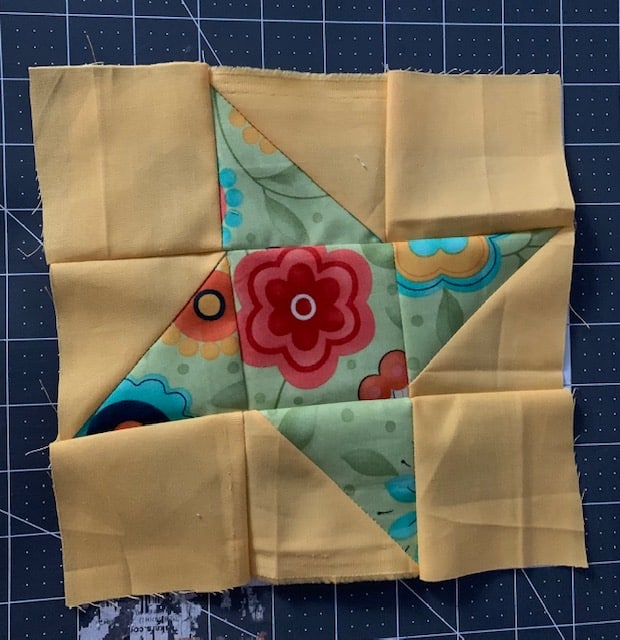
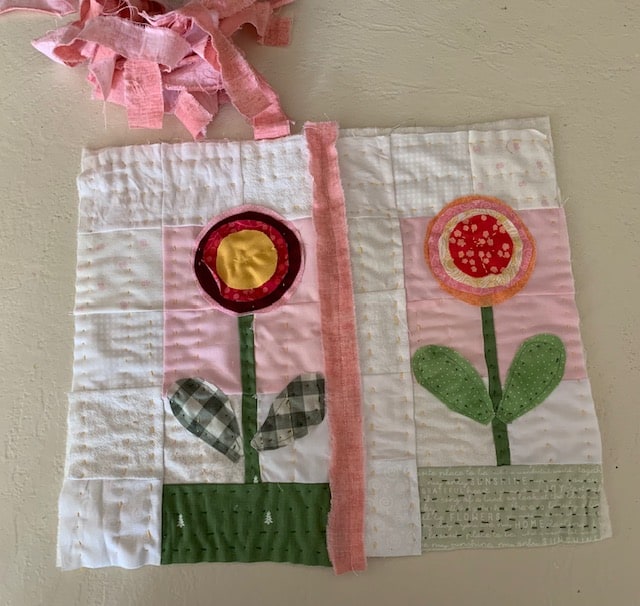
Flower Quilt Block:
- With a variety of white fabric ( it’s okay to use fabric with texture too if you want to) cut out (2) 6 1/2″ blocks out of white fabric. Fold each in half and cut in half. Then fold over your two pieces and cut them in half. This will give you 4 squares of white. Repeat this step until you have 9 squares of white fabric.
- Repeat this step with your light pink fabric. You will only need to cut out (1) 6 1/2″ square of light pink fabric. Fold it in half and cut lengthwise. Then fold over each half and cut in half to make 4 small squares. Do this step 5 times so you have squares to make 5 flower quilt blocks.
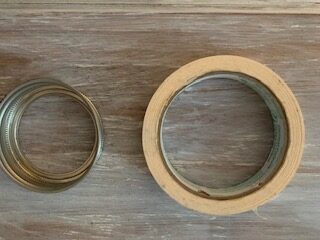
- Trace and cut out 4 circles different sizes for your blooms per quilt block to make enough bloom circles (each flower has 4 blooms) for 5 quilt blocks . I used the outside of a masking tape roll for the largest bloom.
- Next trace the inside of a masking tape roll for the next bloom.
- Trace the outside of a mason jar ring lid (normal size) and the inside of the mason jar lid for the next two blooms.
- Cut these circles from a variety of colorful print and solid fabrics you have in your stash or that you have bought.
- You will need to cut 5 green stems about 3/4″ wide and about 6 1/2″ tall.
- Sew 5 white squares together. Press and set aside.
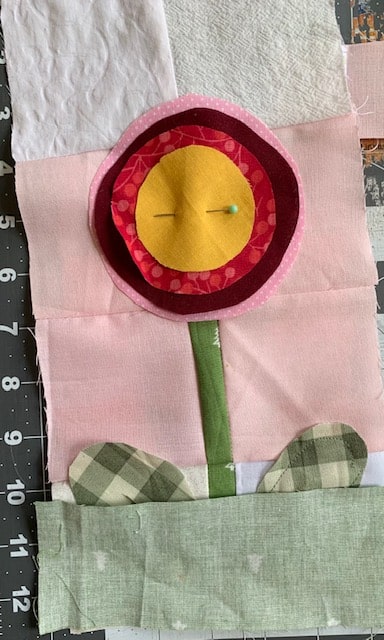
- Sew a white square to a light pink square and press. Repeat this with a white and light pink square. Press. Place the light pink square on top and take your green stem and sew it to the right side of your light pink and white square.
- Then sew the stem to the other white and pink square so it is in the middle of these 4 squares. Press this quilt block.
- Sew 3 white squares together. Press and sew them across the top of the pink and white squares.
- Cut out 5 rectangles measuring about 2 1/2″ wide x 5 1/2″ out of a variety of green fabric.
- Sew the green strip across the bottom of this quilt block.
- Sew the 2 remaining light pink squares side by side.
- Add them to the top of the 4 patchwork square of pink and white squares with the stem sewn in the middle.
- Sew 2 small white squares to the top of the quilt block you have made.
- Now grab the 5 white squares you have already sewn and set aside and sew it to the left side of your quilt block with the stem.
- Trim off excess and square it up.
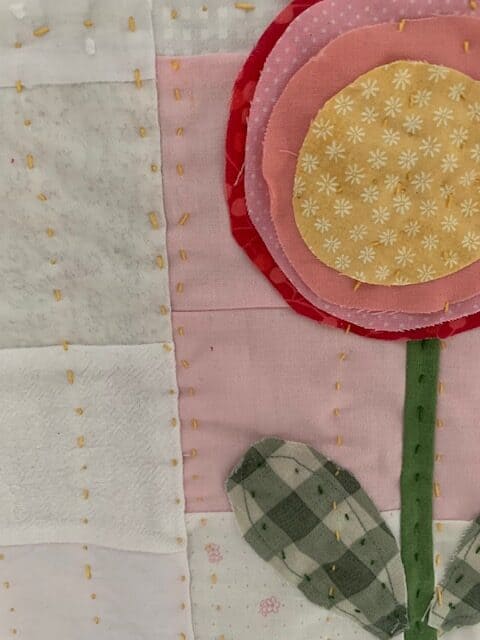
- Cut out the leaves and pin them on each side of your stem. Top stitch your leaves on to your quilt block with your sewing machine for raw applique.
- Set your flower circles one on top of the other starting largest to smallest and stack them on the top of your stem. Then pin them on.
- Make 5 of these quilt blocks.
- Be sure and press each set of small squares once you sew them together and then press your block each time you add something to it.
Make Your Friendly Star Blocks
The easiest way to make these blocks is to cut out all the squares you will need first. Then sew all the top rows, then the middle rows, and then the bottom rows. Press each row you sew as you go and then Sew each row together to make 5 friendly star blocks (also known as friendship quilt block.)You will need 4 different colors of fabric. 2 solids and 2 print fabrics that coordinate with each other. I chose a floral print and a bright yellow. The other fabrics I chose were a checked print with a solid green fabric.
- With each of your two solid fabrics and your 6 1/2″ square ruler cut out 5 squares. Fold each in half and cut in half. Then cut each half in half again. This will give you 12 solid small squares.
- With your printed fabric, cut out (1) 6 1/2 ” square and then fold in half and cut it. Fold in half again and cut each piece of halved fabric into half again for 4 small squares. Cut one more square the size of the small square. You will have 5 squares.
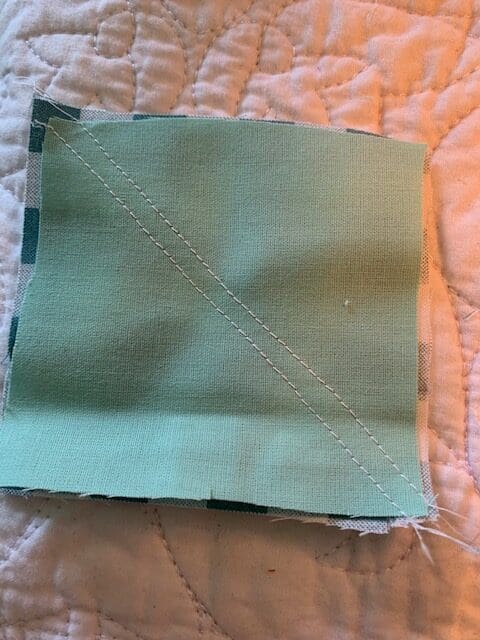
Take 1 solid fabric small square and place it right sides together on top of the printed fabric square. Sew a line to the side of the corner point. Use your sewing foot as a guide and sew next to the line you just sewed. Now cut down the middle of those sewing lines making two half square triangles. Press the two half square triangles open. Make 10 half square triangles out of each two fabrics you have chosen for your quilted table runner. 10 of the yellow and floral printed fabric and 10 out of the checked and solid fabric. (This is for reference to the colors I chose.) Your fabric choice will be different than mine but this will at least give you an example to follow.

This process goes pretty quick if once you cut out all of your squares as mentioned above, you sew in order all of your top rows, middle rows, and then the bottom rows. Press each row of three blocks as you sew them together.
You will hand quilt each friendly star block one by one before sewing them to the quilt.
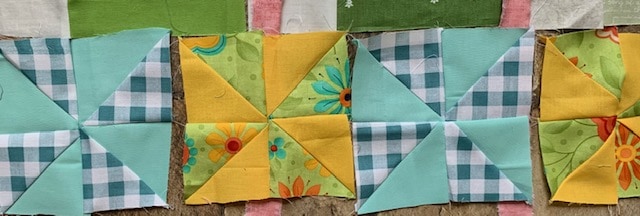
Pinwheel Quilt Block Squares
Pin wheels make up really fast too doing the same assembly line method you just did with your friendly stars. Cut out the squares same size as friendly friendship quilt blocks for half square triangles for each pinwheel. Make 4 half square triangles.
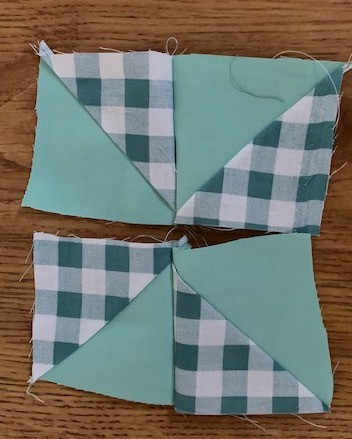
Sew pinwheel tops and then pinwheel bottoms first and then put together. It will take (1) 6 1/2 ” square out of your solid green fabric (or whatever color you have chosen). Then cut (1) 6 1/2″ checked fabric square. Cut each in half. Then cut in half again and sew your half square triangles together. Make 3 pinwheels of one design and 2 pinwheels of 2 other fabrics that will match your friendly stars on the top. Your 5 pinwheels will be sewn across the bottom of the flower quilt blocks.
Quilt As You Go
Time to start quilting your blocks by hand. Cut out low loft batting to match the size of your flower quilt blocks, pinwheels, and friendly stars. You will be hand quilting these blocks individually before they are all sewn together. (If you prefer, you can quilt them on your sewing machine but the hand quilting element is so charming…I think so anyway.) Before you start quilting, just a word about marking your lines. I usually just get in a groove quilting and don’t take time to mark my lines (I know gasp!) you do what works best for you. Mark your lines however you would like to.
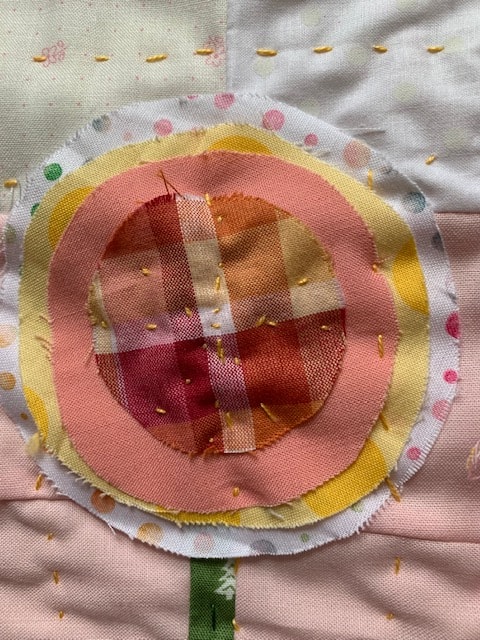
Use a color of your choice using Perle Cotton thread to hand quilt your blocks with. Starting with your flower blocks, I used a bright yellow thread and loved the look of it.
- In the center of each flower, make a running stitch from the center of the smallest circle (bloom) to the top of the smallest circle. Then stitch from the center again and stitch on the diagonal . Keep stitching until you have a starburst design.

- Start at the bottom of your quilt block and find the middle of your block. Stitch a running stitch in the middle of the block all the way to the top. You will stitch over the top of your flower. Tie it off.
- Start at the bottom again. Measure from the middle of your block to the left side and find the middle. Again do a running quilting stitch to the top.
- Now repeat on the left side.
- Just for good measure I quilted on each side of my flower blocks about 1/2″ in from each side. This is optional. Or you can create your own quilting pattern.
- Take your green Perle Cotton thread and quilt up the middle of your stem.
- Now quilt around the raw edge leaves you sewed on your quilt block.
- On your green rectangle at the bottom of your flower quilt block, quilt 4 or 5 rows of stitches horizontally.
- Across the top of your flower quilt block, quilt 3 rows of stitches horizontally.
- Hand quilt your friendly star quilt blocks with a contrasting color of Perle Cotton so the stitches stand out. Quilt up the middle of your block and then measure evenly from the middle to each side of your block and quilt from bottom to top a straight line.
- Sew three pinwheel blocks together alternating the colors. Then hand quilt like the friendly stars.
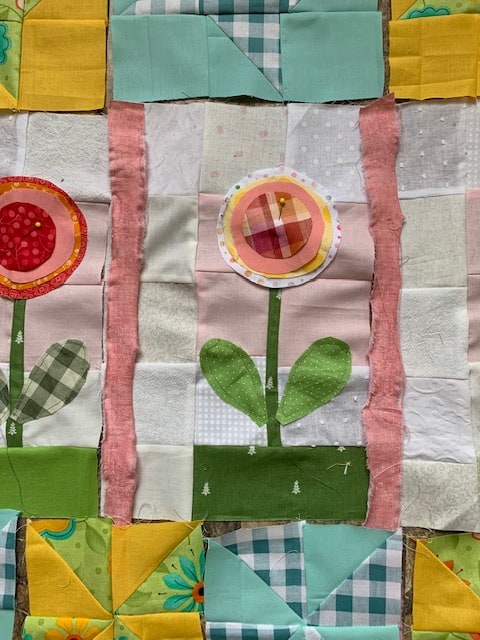
Bright Pink Strips Of Fabric
Take your bright pink fabric and rip strips that are about 1″ wide and about 14″ long of your fabric.
- Lay a pink strip at the top of your flower quilt block and top stitch on the pink strip sewing down the middle of the strip (edges of your strip will be raw edges) and sew it all the way to the bottom of each flower quilt block.
- The edge of your pink strip of fabric will fray and fluff up like your flowers when you wash it. (Gentle wash of course…it looks sweet even without washing it.)
Adding the pink strips of fabric are totally optional. I just think it adds the adorable to the table runner. Unique and different but adds such a pop of color and an element of surprise to your table runner!
Assembling Your Quilted Table Runner
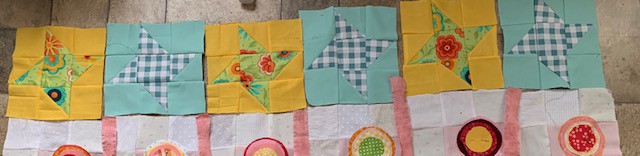
- We will start by sewing the right side of the table runner together and go from there. Sew 2 of your flower blocks together.
- Sew 2 friendly star blocks together.
- Then sew the friendly star blocks to the top of your flower blocks.
- Repeat until the flower blocks and friendly quilt blocks are sewn together.
- Next sew the pinwheels to the bottom of your flower quilt blocks.
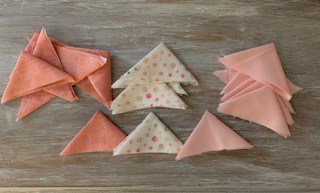
Make Prairie Points For The Edge
Check out how to make Prarie Points on a Christmas Table runner I made here How Do You Make A Simple Table Runner? Cut out 6 1/2 ” squares of fabric. Fold in half and cut. Fold the two pieces and cut them in half so you have 4 smaller squares. Go to your ironing station and fold your square into a triangle and iron it. Fold it again into a smaller triangle and press. Now you are in business with your prairie points. You will sew these around the outside of your table runner before attaching your backing.
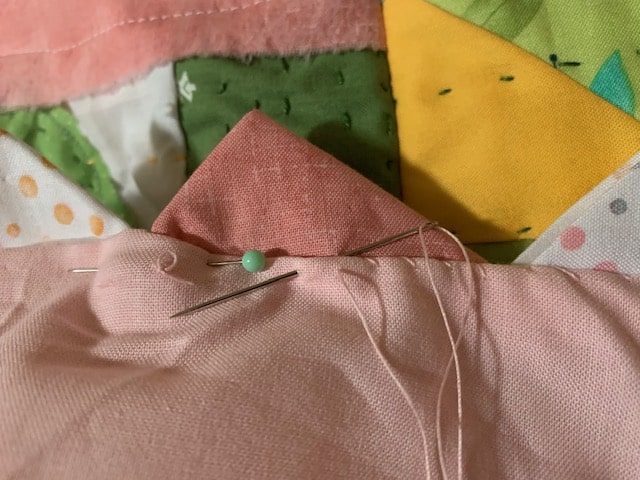
Lay each prairie point so they slightly overlap side by side around your runner. Pin the prairie point so it is laying on the right side of your fabric Pin in place and baste them close the edge of your quilt with your sewing machine. Check each point to make sure it is sewn to your quilt properly before you sew on the backing.
Finish With The Backing
Measure backing so it is the same measurement as your table runner topper. Place the topper and backing right sides together. Sew around the edge of both leaving an opening in the side of both and make sure you catch the bottom of your prairie points. Leave the end un sewn. Turn right sides out. Top stitch or hand stitch the opening closed. Press.
Your Beautiful Work Of Art
You can use your table runner in several different ways. It is heavy enough to use as a lap quilt. Stunning enough to use as a mini quilt wall hanging or a table runner. Enjoy the journey as you make your own beautiful handmade work of art.
You May Also Like:
Here is an easy and quick project to make for gifts and your own kitchen. Details here Easy Peasy Hot Pads You Can Make If you are looking for something to use your fabric stash, this is the project for you.
Would you like to make a scrap quilt that is cute and simple to make? This Swiss Cross quilt is perfect for those requirements. How Do I Make A Simple Scrap Quilt?
Have lots of t shirts and not sure what to do with them all? The answer is easy! Make a T shirt quilt. The nice thing about this is your t shirts don’t have to sit in your drawers but you can use a bunch of them all at once. I love the method I used on this quilt and my daughter (the one I made it for) loved it. Hope you will too! How Do You Make A T Shirt Quilt? Quilt As You Go & No Interfacing
Recent Posts
Wondering how to become a more confident quilter and how to zero in on what type of quilting really sings to you? How do you identify if you are a maker of quilts and keep believing in your abilities...
Do you need a quilt to give as a gift and need it like yesterday? Here is a fun quick quilt you can make in a day (maybe less) once you have your supplies. It features homemade raw edge, scrap back...