Combine an I spy game, checkers game, add a little Halloween sparkle put it into a quilt and you’ve got the makings of a festive, fun interactive Halloween quilt sure to be used long after Halloween has come and gone. All you need is a fabric with individual Halloween cut outs that are already in squares and rectangle shapes on your fabric and large enough to make quilt blocks. Fabrics that have pumpkins, bats, moon, Halloween type pictures on it for your I Spy game will work best. Add to that, contrasting and matching fabric (yardage, fat quarters or jelly roll) to make the checkerboard squares, backing fabric, and thin batting to quilt as you go. This makes the perfect gift to give your children, to friends, or to family members.
Start your quilt by doing the following:
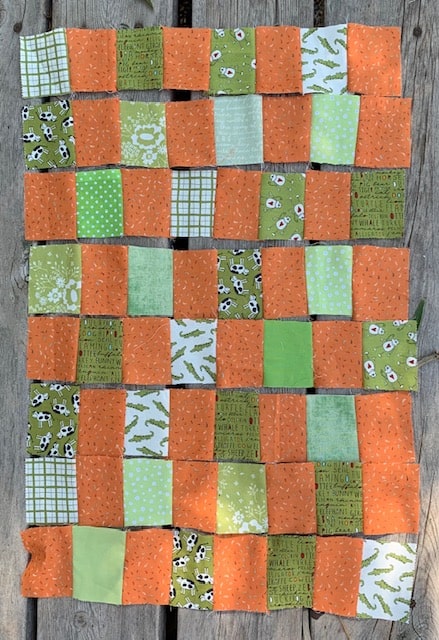
- Sew 8, 3 x 3″squares alternating two colors of fabric to create a row of patchwork squares.
- Press each row as you go.
- Add 7 more rows doing the same thing alternating the two colors of fabric you have chosen for your checkerboard.
- Press each row as you go.
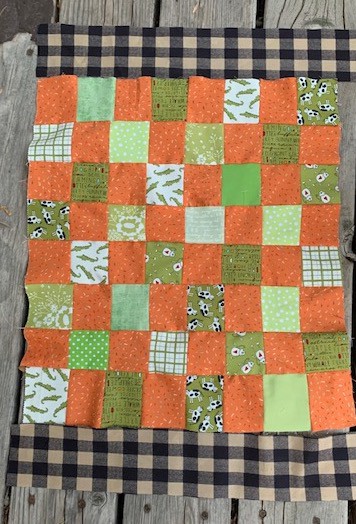
- Add a border around the outside of your checkerboard with a contrasting fabric.
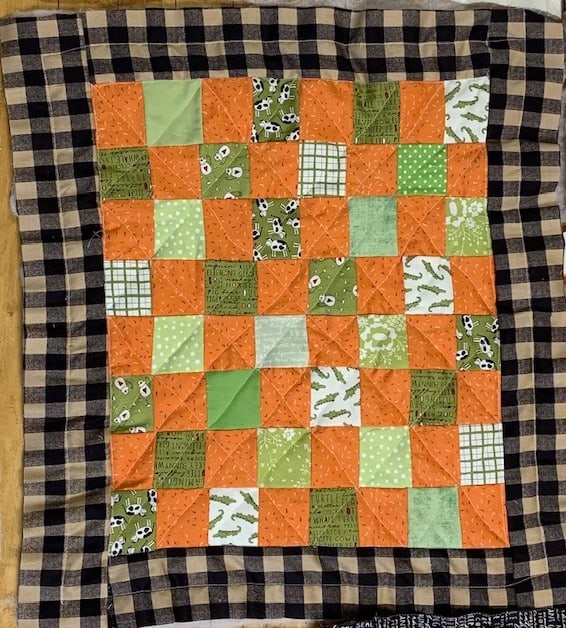
- Quilt the checkerboard on your sewing machine by sewing a straight stitch diagonally on the checkerboard squares and then diagonally on the other color of squares. Now on all of your squares sew the other direction making an X design.
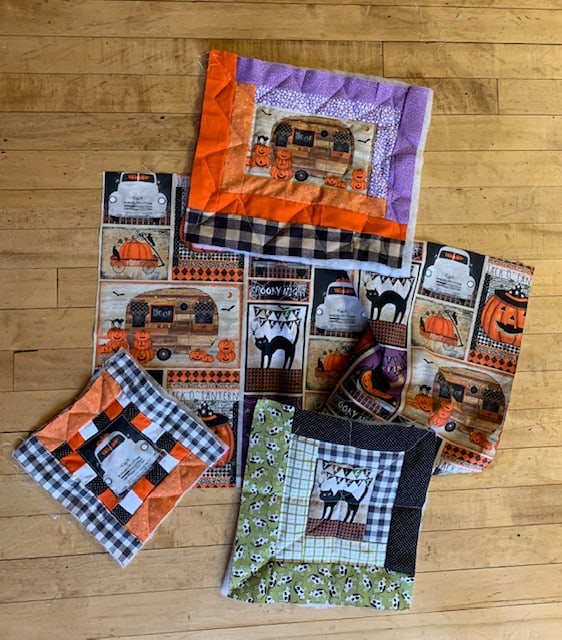
- Cut out a Halloween cut out from your fabric and use it as the center of a log cabin block.
- Do a patchwork design around some of the smaller Halloween fabric graphics.
- Once you have enough quilt blocks made, quilt each on your sewing machine.
- Sew your quilted checkerboard and quilted quilt blocks altogether.
- Place backing fabric right sides together on your quilted topper so the wrong side of your backing is facing up.
- Sew around the edge of your quilt leaving the bottom edge open for turning.
- Turn your quilt inside out.
- Sew the bottom edge closed.
- Add some Halloween appliques for more “I Spy” fun, buttons, embroidered shapes and names.
- Make some cute checkerboard pieces out of felt, wood, buttons etc…
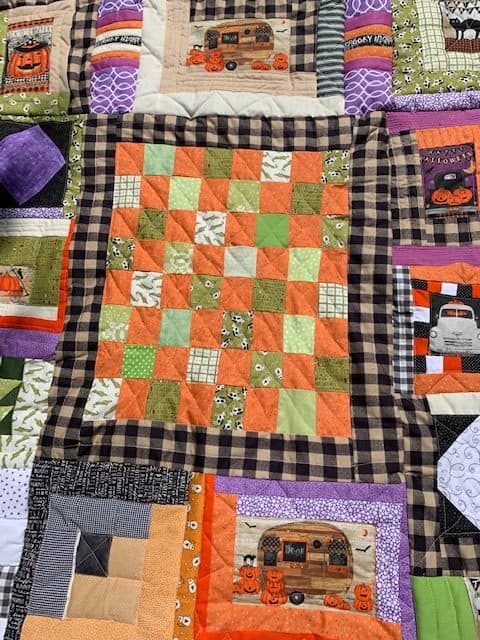
Checkerboard Squares
I’ve been wanting to design a quilted checkerboard for a while. I think it would make a cute Christmas gift. Instead of a Christmas theme though, I chose a Halloween theme because one of my younger grandchildren has a birthday coming up and I thought he would enjoy a quilt like this. Then I had the idea to add an eye spy game to the same quilt. Who doesn’t love a handmade gift!
Making a quilted checkerboard is easier than you might think. It will make up the bulk of your quilt. Choose two colors preferably something Halloweenish (if that is even a word haha). All you are doing is sewing a large patchwork quilt block that has eight rows across and eight rows down. I checked and checked again to see if there was a smaller checkerboard out there with less than eight rows but turns out you need that many to play the game. I used green and orange fabric for my squares. You can stick to strictly two fabrics only but I had some cute jelly roll fabric that I’ve wanted to use up and it was perfect for this whimsical Halloween quilt so I used a variety of green fabric squares and only one orange colored fabric for the other checkerboard squares.
Press And Add A Border
After you sew a row of small squares, take them to your pressing station. With your iron, press on the right side of your fabric row. Sew the other seven rows of squares and press. Join all eight rows of fabric squares by sewing them horizontally across and then press and cut off any long tails of thread. Your checkerboard is looking like a checkerboard. Now add a contrasting border around your checkerboard. Measure about and cut the strips to sew around your large patchwork square. Sew and press kind of like rinse and repeat. Pretty cute right?
Quilt The Checkerboard
Cut out a piece of batting as large as your checkerboard. pin around the edges of your Checkerboard quilt block. Adjust your pins as you go. Using a straight stitch, sew a diagonal line from one point to the opposite point of your quilt block sewing a line through your green squares and then do it to your orange squares. Now sew a diagonal line the other way. You will be making a X design as you quilt your quilt. Don’t sew through the border yet. You can leave it un sewn or sew a simple design around the border to quilt it.
Add Quilt Blocks To Checkerboard For “I Spy”
I love making log cabin quilt blocks. They come together so fast (I am always tempted to write “sew” instead of so when I write about quilting). There are so many ways to make log cabin blocks and I created a my own version of one.
- Cut out a Halloween fabric cut out. This will be the center of your log cabin block.
- Sew one strip of light or dark fabric or choose a strip of Halloween colored fabric over the top of your center square with the picture. Then measure the right side of your quilt block and sew a matching strip down the side. Match or coordinate fabric color to your center fabric cut out.
- Next if you chose a light colored fabric for the right side of your block, sew a dark colored fabric on the bottom that measures the full length of the quilt block. Then sew the same dark color on the full length of the left side of the quilt block.
- Continue right to left and vary the color(s) to get the look you want.
- Sewing a unique log cabin pattern around your Halloween fabric cut outs adds color to your quilt and accents the cut outs. These quilt blocks will provide the “I spy” to your quilt.
Patchwork patterns can be really easy to make and also sew up super fast.
- Cut out another fabric cut out.
- Again make the Halloween cut out the center and sew patchwork quilt squares alternating colors around it. Make the patchwork squares as small or as big as you want them to be. Fit them to the size of the center Halloween cut out you have chosen.
- You can also add strips of fabric to the top and bottom of your quilt block if you want to make it longer or taller. No rules here. Creative license is all yours when designing your quilt blocks. That makes it fun!
You can create quilt blocks with strips sewn around them or just put strips of colored fabric on each side of the fabric cut out. The main idea is to accent the cut outs with fabric and make the blocks big enough to create your Halloween quilt around the checkerboard. These quilt blocks will be hide and seek as your children use this quilt to find Halloween things hidden in your quilt blocks. I Spy items can be in plain sight or maybe kids have to hunt for how many bats are on all of your Halloween squares combined. You make the rules.
Machine Quilt The Quilt Blocks
Now don’t let this part scare you. Go for it! Come up with a simple quilting design using a straight stitch (or you can get fancier according to what kind of sewing machine you have and your level of sewing ability) to quilt the fabric quilt block to your batting. My favorite batting to use for machine quilting is thin cotton batting but I had some polyester pieces that were not too thick and used the scraps I already had for quilting this quilt.
Make a simple design of sewing from corner to corner diagonal lines like you did on the checkerboard squares, stitch in the ditch, outline the fabric cutouts, there are endless possibilities when it comes to quilting your quilt blocks. Practice on a piece of fabric if that will make you feel more confident if you need to.
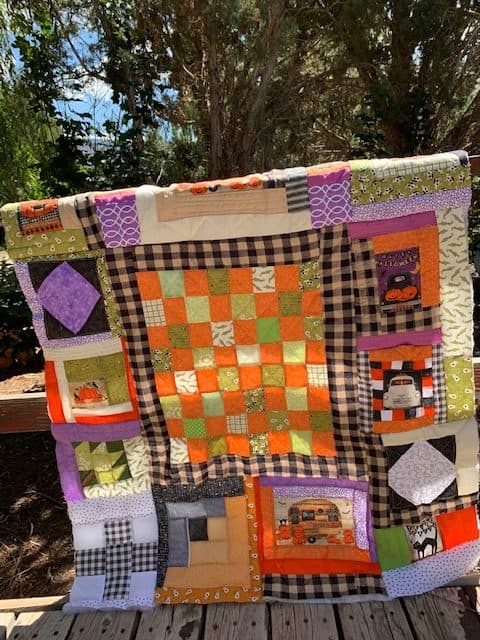
It All Comes Together
Lay out your quilted quilt blocks and your patchwork checkerboard on the floor and arrange it the way you want it to look. This might take some time to get the look you want. If you come up short on quilt blocks, add some sashing strips or more patchwork or strips to the sides or top or bottom in between quilt blocks however you think it will look best. You will need to machine quilt those to some batting as well. You could also add a large border around the entire quilt if needed. Now sew it altogether. Wow! Look at what you have created. Whimsical, magical, fun to give your children good old fashioned fun where they can play checkers (using their cute little brains outside of electric devices) and I Spy while taking turns. Creative play is so great for children! Let’s finish this quilt so you can use it as soon as possible.
Add The Backing
If you know much about my quilting habits, I love using this easy method of binding What Is The Easiest Way To Bind A Quilt. Since you already have the batting quilted to all of your quilt blocks and quilt pieces lay your backing right side down on top of your quilt topper so right sides are together. Now sew the sides together leaving the bottom edge open. Turn your quilt inside out and then top sew on your machine the bottom edge closed. Voila! Instant finish to your quilt edge!
I Spy Appliques, Buttons, & More
Depending on the age of the child or children using your I Spy game add some appliques to help tack the back of the quilt to the front. Just hand sew or machine sew around your appliques through all thicknesses to secure front to back. Or make running stitch designs with Perle Cotton thread and a sewing needle like pumpkins, bats, or moons random places on your quilt like I did when I made my daughter her T shirt quilt here How Do I Make A T Shirt Quilt: Quilt As You Go And No Interfacing. The embroidered shapes could be included in the I Spy game as well. Maybe even hand embroider their names on the quilt. Halloween buttons could be part of the I Spy if you sew those on too. Just make sure it is age appropriate no buttons if they are under the age of 3. Seek and find can include all kinds of things. Maybe even a pirate flag somewhere you add to your quilt. Get the picture? Once you get going on the I Spy part of your quilt, you will have a hard time stopping your self from adding more items.
How To Play I Spy
For children to know what they need to seek and find, you will need to make them a list of things to look for on the quilt. Here are some ideas:
- Type up a list and laminate it with the items included in the I Spy game.
- Write individual names of items to be found and laminate them, add a levi pocket to the back of your quilt to put the strips in and sew velcro or a snap to close the pocket with so the papers don’t fall out.
Checkerboard Pieces
As I was researching and designing my checkerboard online, I discovered a cute Halloween Interactive Checker Game. I decided to play with a little hesitation because I haven’t played checkers for a while well… more like for years! It was cute and fun. I was on the ghosts team and the computer was on the pumpkin team. I actually won! Pretty proud about that but just think about the hours of fun your children will have with this quilt. You need checkers to play checkers. You have created the quilted board now come up with some cute checkerboard pieces. Large Buttons, felt cutouts, fabric pumpkins, wood pieces take these suggestions and come up with your own. You will need 12 pieces for one player and then 12 pieces for the other player. A Halloween theme provides all kinds of fun ideas when coming up with checkers for your quilted game board! Or you can just be boring and buy regular checker pieces for your game.
You might Also Like
If you are in the Halloween mood, how about making a mini Halloween Quilt to hang on a wall or use as a table runner How Do I Make A Halloween Quilt For Beginners?
If you like to applique here is a creative way to use the blanket stitch Can You Use The Blanket Stitch For Applique?
Don’t forget to label your quilt. Here is a super simple way to do that How Do I Make A Simple Quilt Label?
Recent Posts
Wondering how to become a more confident quilter and how to zero in on what type of quilting really sings to you? How do you identify if you are a maker of quilts and keep believing in your abilities...
Do you need a quilt to give as a gift and need it like yesterday? Here is a fun quick quilt you can make in a day (maybe less) once you have your supplies. It features homemade raw edge, scrap back...