There is absolutely nothing like a new baby! That means a new baby needs a new quilt! Baby quilts are especially great for beginners because they are smaller and make up quicker than a twin size or larger quilt. It is so satisfying to make a baby quilt and to gift to a friend or family member. Or maybe keep it for your own new bundle!
You will need:
- Two different quilt patterns. Choose patterns that you feel are doable according to your sewing level. (I chose a cute whimsical Kitty pattern called Cat and Bird by Tilda’s World.) For my contrasting pattern, I chose a Pinwheel and Patchwork pattern.
- You will need a background fabric and fabric for the quilt blocks you are sewing. I used about 2 yards of white fabric for my background.
- Choose a variety of fabric half quarters or fabric by the yard for the quilt blocks in the colors you want your quilt to be.
- White fabric (or other color) for sashing to frame the quilt blocks.
- 1 brown fat quarter for cat faces.
- Backing fabric enough to cover a 36″ x 36″ quilt topper or a little bigger depending on how big you make your quilt and choose fabric that will compliment your fabric topper.
- Measure your quilt block pieces carefully.
- Quilt Batting.
- Black cotton crochet thread or black embroidery thread for cat eyes.
- Ultra Heat Bond to adhere cat tail and nose on the kitty block.
- Quality sewing thread.
Deer Skye Quilt and Home Design
Mix and Match Quilt Patterns
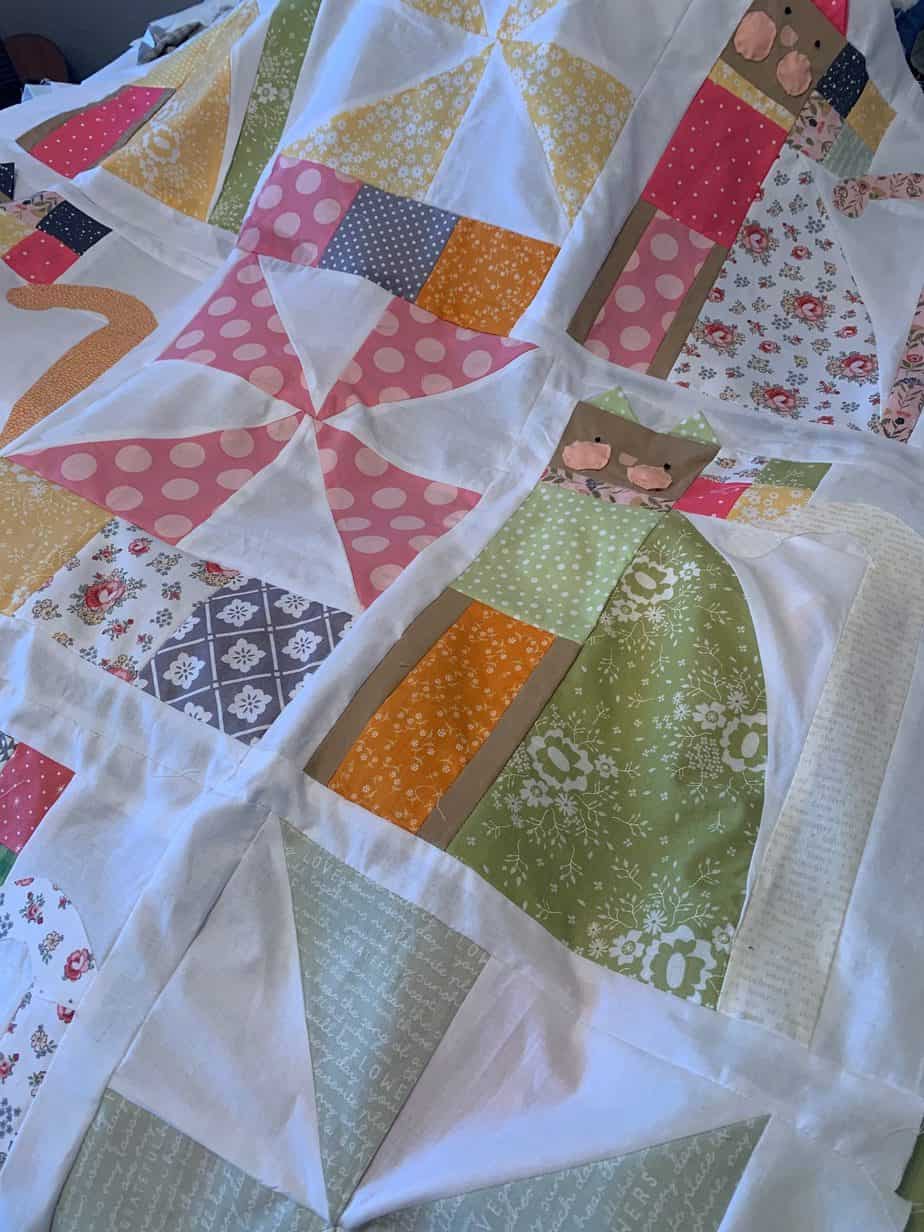
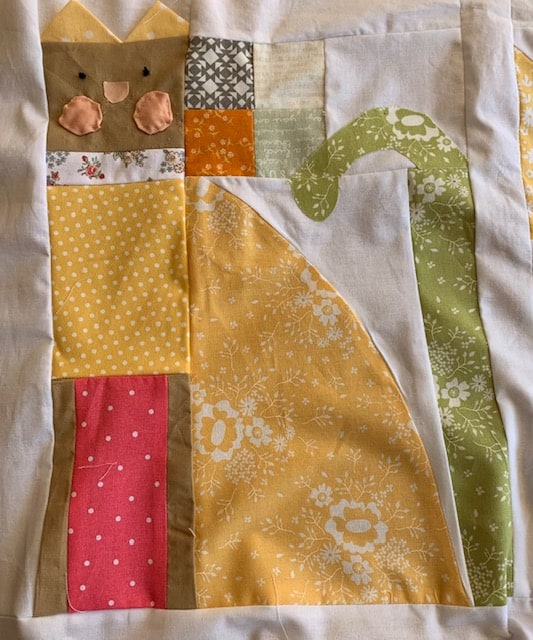
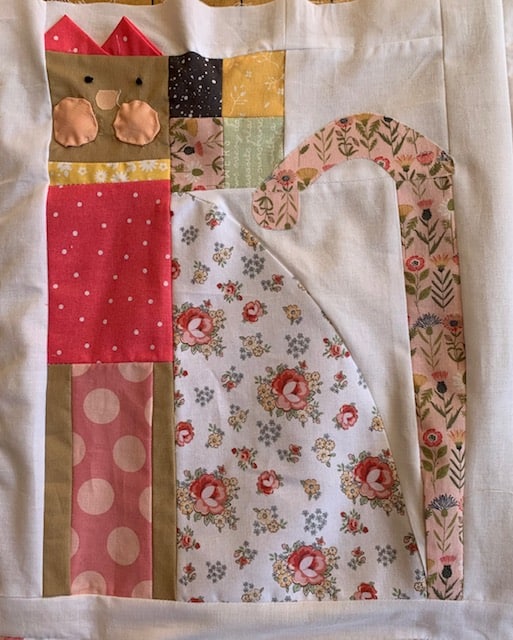
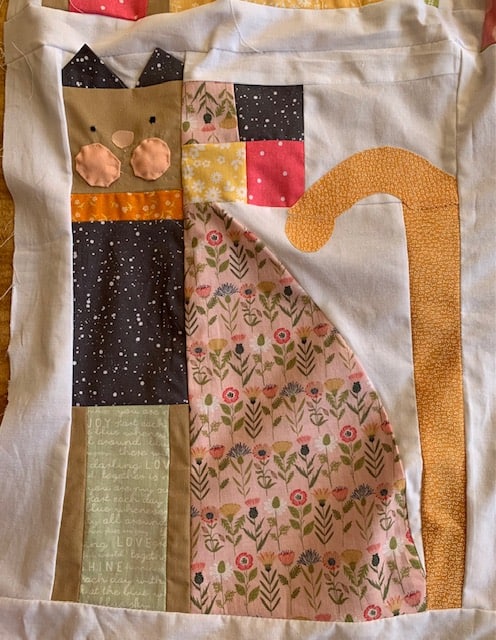
Feeling brave? I know you are saying, “What are you thinking????” Haha. I love to mix and match. I chose a free Tilda’s World Cat and Bird pattern. It is so cute and whimsical! To make the pattern a little less intensive for me, I added a small 4 patchwork next to the cat head and opted to not make the bird sitting on the tail. I changed the tail to an easy iron on style. I also made yo yo cheeks and an iron on nose. I created ears so they stand up by making Prairie Points for the ears and I love how they turned out! So if you want to attempt this pattern, I gave you the link for the initial large cat block. If you want the detailed scoop on my changes, read on to the end of the post.
Deer Skye Quilt and Home Design
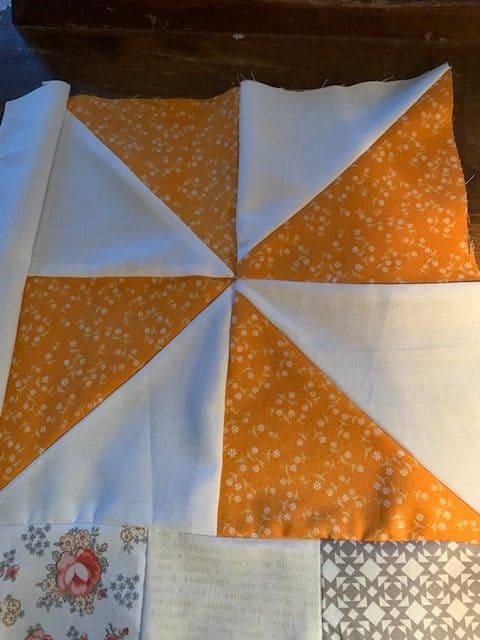
The Pinwheel block is pretty easy and you can find a lot of tutorials online for this. After creating a pinwheel with a 6″ square ruler, I added three patchwork blocks across the bottom. Also a 2″ white piece of sashing on the bottom of this block in the middle of the quilt. The pinwheels on both sides of the quilt I added sashing to the outside side.
Deer Skye Quilt and Home Design
Sashing and Background Fabric
It took about 2 yards for my background and sashing fabric. I love a white background because I love how it showcases the prints and colors I use for my quilt blocks. The sashing is the strips that frame each quilt block. Also it is background that contrasts and makes your quilt blocks pop! Typical baby blankets measure 34′ x 36″. 36″ square if you want. Don’t worry though if you want it a bit smaller or a bit bigger. Take into consideration the number of blocks you will need and if it isn’t quite big enough, add sashing or a contrasting piece of fabric that you sew around the outside to get the desired size you want. Then match up your backing fabric with the size of your quilt top.
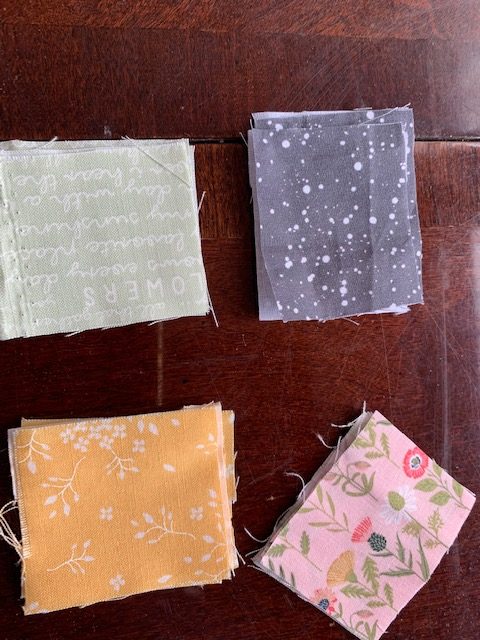
Choose Your Main Colors
I saw an adorable quilt that was done in yellows, grays, fuchsia pinks, and a variety of bright greens. It was bright and cheery and I loved the color combo. You can find your color inspiration in a lot of unexpected places. As you choose colors for your quilt blocks, and you use fat quarters like I did, choose 3 or 4 designs of each color. I also bought a variety of 1/2 yards of contrasting fabric.
You will need backing fabric that matches one or all of the colors on your quilt topper. It could also be a contrasting color.
Deer Skye Quilt and Home Design
Brown Fat Quarter
You will want one brown colored fabric fat quarter for the cat faces. This makes a nice contrast and you will also cut the legs of the cat out of this fabric. I made five cat quilt blocks and had plenty of brown fabric using just one fat quarter.
Measure 2x and Cut Once
I learned the hard way that accurate cuts matter. You will need to match up the quilt block design you choose so they are exactly the same size once you sew them together. They have to match up. You can sew extra sashing or add some patchwork, a border to your quilt squares whatever you need to do to make your quilt squares the same in size.
Be careful with the cuts you make in your fabric that you don’t add or subtract fabric without making sure you do the same for your other blocks. A word about mistakes in sewing…they are allowed! Remember any quilt you make no matter if you follow the pattern to a “T” will be your unique quilt. Don’t worry about unpicking if you need to and if your quilt blocks aren’t perfect! There is no quilt police to say you didn’t do it right! You can do this. Just give it your best and as with anything “Practice makes perfect!”
Quilt Batting
There are a variety of battings to choose from. There are high loft battings which tend to highlight your quilt blocks better than other batting once you quilt it. Low loft is easier to quilt with. You decide which you prefer. I like making my “quilt sandwiches” with lower loft batting.
Deer Skye Quilt and Home Design
Black Thread
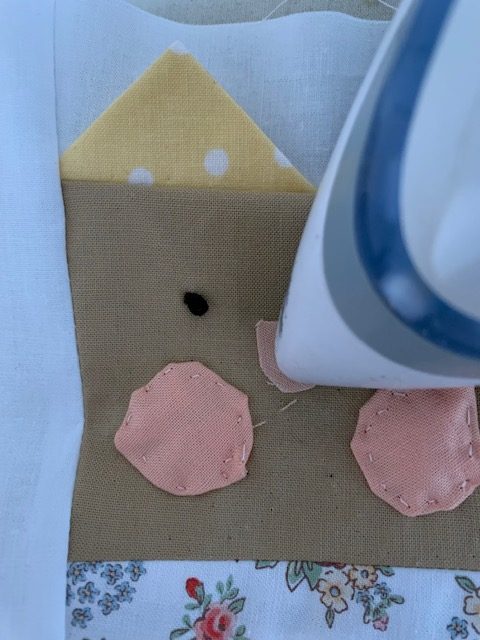
The kitty’s eyes are french knots made from black embroidery thread or cotton crochet thread. Put a knot in your thread after threading your needle. Bring your thread up through the back of your kitty face. Hold your thread with your left hand and wrap your needle 4 times around with the thread. Hang on to the thread to make sure your thread stays on the needle and then take your needle down into the hole you came up through. Knot it off and cut it short. Makes two cute kitty eyes!
Deer Skye Quilt and Home Design
Heat n’ Bond Ultra
Heat n’ Bond Ultra will glue your fabric pieces by ironing them on to your quilt top when you don’t want to sew it on to your quilt top. I used this for my cat tails (haha no pun intended), and the nose on the kitty. Very simple to use, you just place your pattern backwards on the paper like Heat n’ Bond, You want the rough part to be on the fabric as you iron over it. Peel off the paper and there will be a clear surface on your fabric. Place your fabric wrong side down on your quilt top where you want it to be and iron over it until it adheres to the fabric. You’re done! Side note found it by the yard at Walmart and bought 1/4 of a yard and had plenty left over for another project.
Thread Quality
You want to make sure you use quality thread. If you are going to the trouble of creating a quilt spending a chunk of your time making it for someone special, you want to use good sewing thread. This also helps make your sewing smoother.
Deer Skye Quilt and Home Design
Changes To Cat Block
I am all about easy if it means I can take less time sewing a quilt block while making it easier and it turns out amazing looking.
Ears
1. I added Prairie Points for ears. I love how they stand up on the blanket. To add Prairie Points for cat ears cut out 2 squares of fabric that match the square of fabric that you chose for the cat’s upper body. They measure 3 1/2″ x 3 1/2″ square.
2. Fold each square in half making a triangle. Iron. Now fold in half making another triangle and iron.
Sew all the blocks on the cat body. Take the white sashing that goes on the top of the head of the cat.
Line up the Prairie Points on the top of the cat head.
Lay the white sashing piece on top of the Prairie Points right sides together.
Sew a 1/4″ stitch across the sashing on Prairie Points.
Iron the seam open and iron your “ears” so they stand up (which they will actually do on their own but ironing them will give it that extra finished look.
Admire what you just sewed! The ears are so cute!
Cat Tail
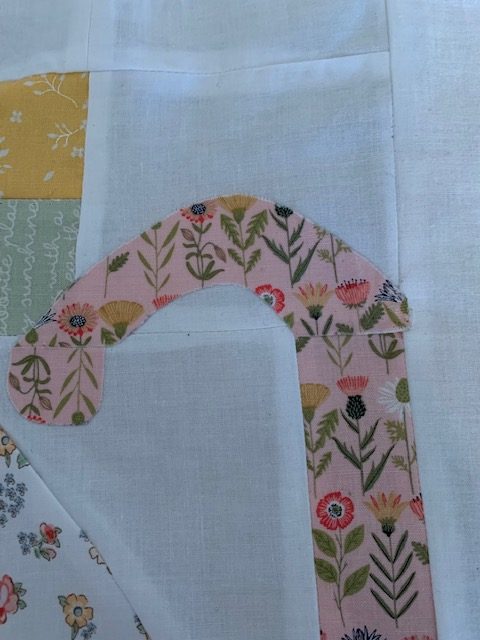
Deer Skye Quilt and Home Design
- You could easily make your own tail pattern if you want an easier option for making the cat’s tail. ( I am repeating this procedure for you) I just ironed this on like I mentioned already with Heat n’ Bond Ultra. Refer to the process above.
Puffy Cheeks on Kitty:
The cute puffy cheeks on the kitty are made of peachy fabric cut into small circles and hand sewn into yo yo’s then turned bottom side up and hand sewn around the edge into place. If you want something even easier, cut out small circles and use your Heat n’ Bond Ultra to secure it to your fabric. (Yo yo’s? you may say???? This is where you take a circle of fabric and with a threaded needle you sew a gathering stitch around the edge of the circle. Pull it tightly until the edges touch and take a stitch across the top of the yo yo and tie off your thread. Cut thread.)
Deer Skye Quilt and Home Design
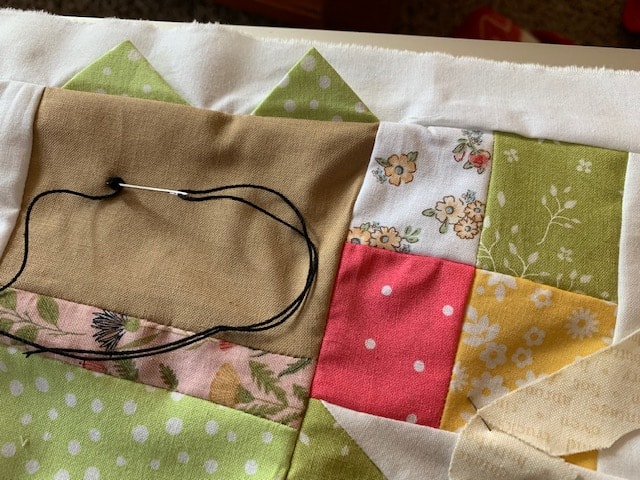
Patchwork Square
To make this block a little easier and to add some contrast you can sew a patchwork square at the top of the block next to the cat’s head.The original pattern has a bird sitting on the cat’s tail. To make this block a little easier and to add some contrast you can sew a patchwork square at the top of the block next to the cat’s head.
1. Choose 4 different fabrics.
2. Cut out 4 squares that measure
3. Sew them together in a 4 patch square. Sew the patchwork square to the white 4x 5 square. Then sew this to the top of the cat’s rounded body.
4. Now sew the two parts of the cat’s body together to make one block.
Deer Skye Quilt and Home Design
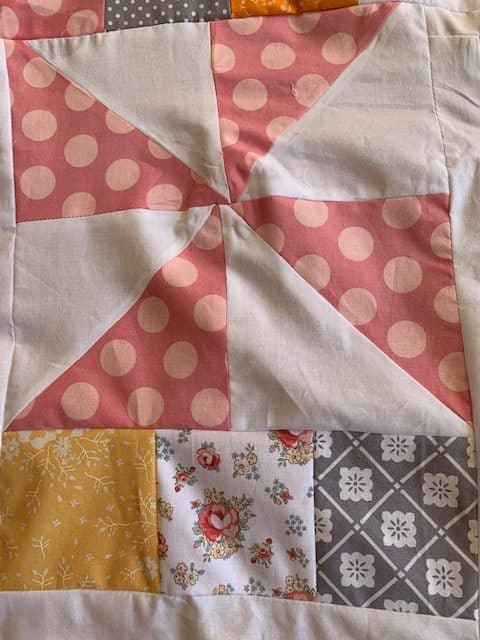
Pinwheel Quilt Block
- Cut 4, 6″ squares using your rotary cutter and your 6″ square ruler.
- Now cut 4 squares out of a colored fabric you choose. You will make 4 of these blocks.
- Take a white block and a colored block and put right sides together.
Sew a 1/4″ all the way around the two squares. - With your rotary cutter, cut these squares you just sewed together in half from corner to corner on the diagonal.
- Cut them on the diagonal.
- Now match up square to square.
- Sew pinwheels together.
- Cut 3, 6″ squares out of fabric used for your quilt.
- Sew the 3 squares next to each other in a row.
- Match the patches up with the bottom of your pinwheel block and sew it to the bottom of your pinwheel.
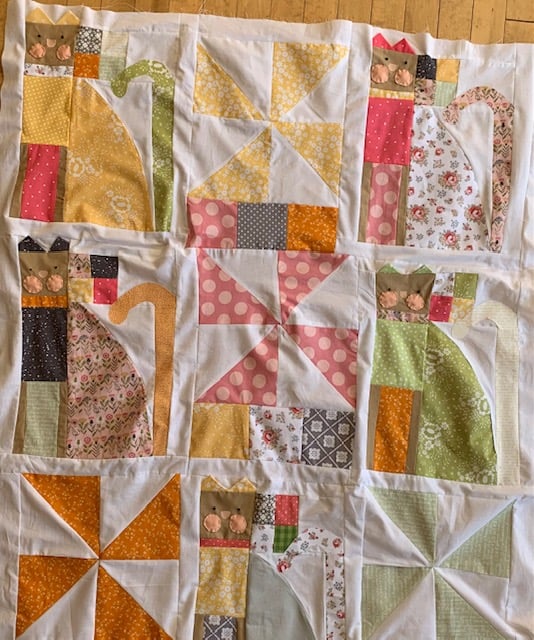
I am proof that if I can mix and match quilt blocks you certainly can! Have faith in yourself! Sew your quilt topper together arranging your quilt blocks the way you want them to go. Then make your quilt sandwich and quilt your quilt. Happy Creating!
Related Posts
Here is a pattern to make a simple beginner How To Make A Simple Scrap Quilt the Swiss Cross Quilt.
Recent Posts
Wondering how to become a more confident quilter and how to zero in on what type of quilting really sings to you? How do you identify if you are a maker of quilts and keep believing in your abilities...
Do you need a quilt to give as a gift and need it like yesterday? Here is a fun quick quilt you can make in a day (maybe less) once you have your supplies. It features homemade raw edge, scrap back...