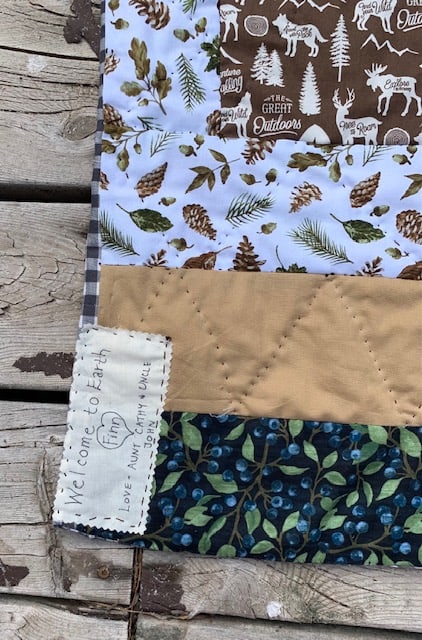
When you make a quilt, there is a whole lot of time and love and more time and more love that goes into sewing and quilting it. It is a great idea to personalize your quilt with a handmade quilt label. You decide what you will write on the label. Get creative and design your own label.
Let’s make one. It is easier than you might think.
- Determine what size and shape you want your quilt label to be.
- Use a light colored or white fabric for the background of your label.
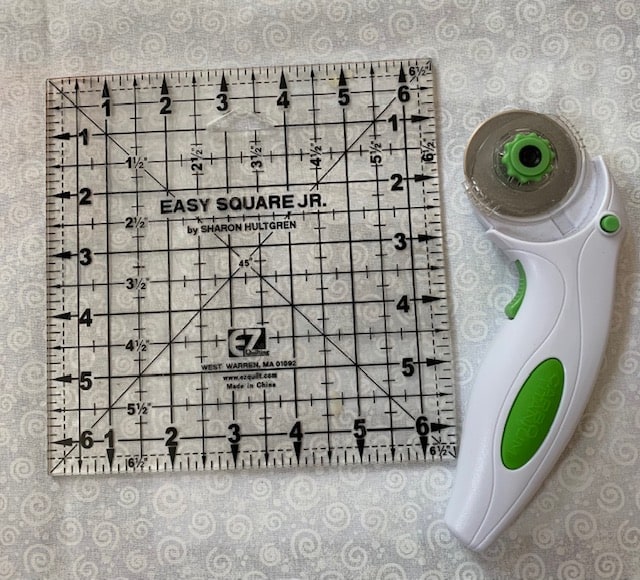
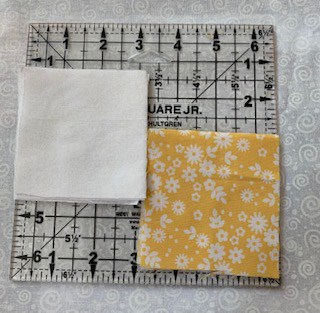
- You’re going to cut out a 6 1/2″ square of white and a 6 1/2″square of yellow fabric (or color of your choice that will match or compliment colors in your quilt).
- Cut the white and the yellow square in half. Then fold and cut in half once more. You will have 4 ,3 1/2″ white squares and 4, 3 1/2″yellow squares. (You will only use 1 yellow square.)
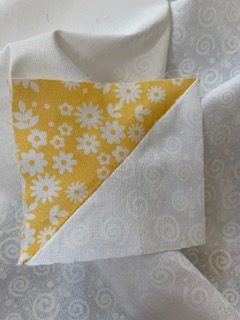
- Now cut one of the white squares and one of the yellow squares on the diagonal.
- Sew a HST or half square triangle with 1 yellow and 1 white right angle triangles you just cut out.
- Take the HST and sew it to one of your small white squares. Next sew the other 2 white small squares together. Sew the row with the HST to the row of 2 white small squares together.
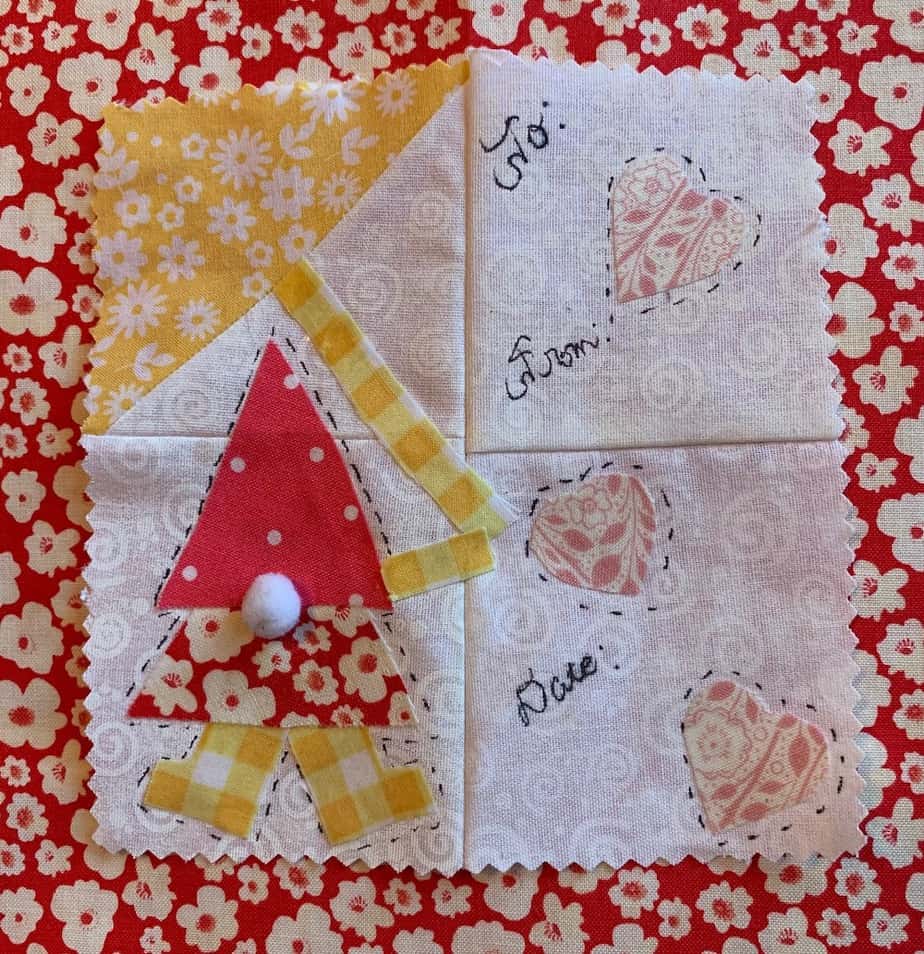
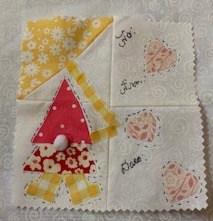
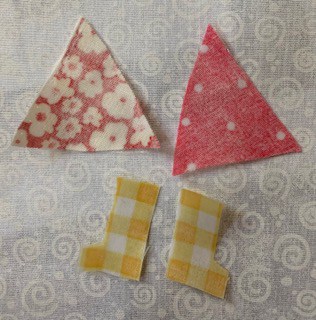
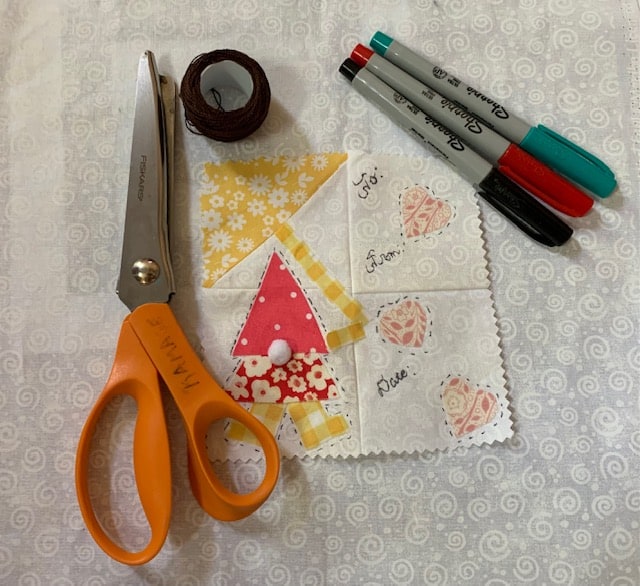
- Cut out gnome body, umbrella handle, hearts, and rain boots out of 5 small pieces of colored fabrics (colors that coordinate with your quilt top).
- Use your iron to apply Ultra Heat N’ Bond to each applique piece.
- Iron gnome boots, skirt, and hat on the label under the yellow HST which is an umbrella top. Then iron on an umbrella handle and the three hearts.
- Sew 1 small pom pom white or pink on the gnome hat for the gnome nose.
- With a black Sharpie pen outline the gnome, the rain boots, and hearts.
- Pinking Shear the edge of your label.
- Sew your label on your quilt with DMC dark brown or black thread with a running stitch on your quilt. Or bond it to your quilt using Heat N’ Bond.
There are a lot of professional looking labels that you can purchase online but where is the fun in that? If you are making a quilt for someone special it is like giving them a hug when they see a handmade quilt label created and attached to their quilt by you.
What Size To Make Your Label
Maybe this is rogue thinking on my part, but I think you can make your label whatever size you want it to be. Choose a size that is in good proportion to your quilt. This is your artist canvas and you can create a handmade label according to what you want it to be.
White Or Light Colored Fabric For Label
I designed a quilt label with a cute gnome on it. Well at least I think it is pretty cute. I chose a white swirl fabric background for my label base. After sewing my label, it measured about 5″ x 5″. I wanted the little scene that I created to stand out against a white background. I started by cutting a 6 1/2″ square of white fabric and then a 6 1/2″ yellow fabric square using my square ruler and rotary cutter.
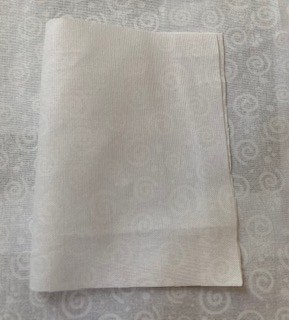
Fold the white square in half and cut it down the middle. Then cut it in half again. I used a yellow floral print to put with the white fabric to create a patchwork umbrella. You are about to make a cute umbrella for your label. Now follow the same pattern with the yellow fabric by folding it in half and cutting it down the middle. Fold and cut in half again.
Now you have 4 white and 4 yellow squares that measure about 3 1/2″ x3 1/2″.

Sew A Half Square Triangle
This is the beginning of your umbrella on your label. Sew a yellow diagonal fabric piece with the white diagonal fabric piece. Voila! The top of the umbrella is made by making a Half Triangle Square.
Sew Two Rows Together
Sew the HST to one of your remaining white squares. Set aside. Sew your last two white squares together. Join the two rows of squares together with the HST in the upper left of the top row. Now you have your label and you are ready to embellish it.
Cut Out Gnome
I created my own “free style” pattern. Cut two small triangles for the gnome hat and the gnome dress. Cut out small rain boots. Create the boots by cutting a 1/2″ inch length of fabric in an L shape. One L shape facing right and one L shape facing left.
Heat N’ Bond
Turn on your iron and iron each gnome piece to the bumpy side of Ultra Heat N’ Bond. Cut around each gnome piece so the backing doesn’t show. Peel off paper backing. You will now have a shiny substance on the back of each gnome piece. Situate your gnome boots to the bottom left side of your label. Iron on with the highest setting on your iron. This stuff is pretty cool. It attaches your fabric to fabric like disappearing glue.
It’s fun to see your gnome come together. Next iron on the dress over the boots. Then add the hat. Now iron on the umbrella handle. I cut a 2 1/2″ long umbrella handle. Then cut about an inch long piece of fabric out of the same fabric as the umbrella handle. Heat N’ Bond it to your label. It goes underneath the umbrella and then iron the 1″ piece to the end of the umbrella to the left so it touches the gnome. Next add 3 raindrop hearts. Well I call them raindrops in the shape of hearts. It goes with the umbrella theme right?
Sew On A Pom Pom Nose
A soft pom pom makes the perfect gnome nose. Sew a small pom pom on your gnome hat at the bottom of the hat and the top of the dress.
Finishing Touches
Use a fine sharpie pen to add To:, From:, and Date. If you want to add a message you can write what ever you feel is important. Be careful when you write with the sharpie because it might bleed (my writing turned out pretty rough in the picture…should have printed instead of writing cursive). Practice writing on a scrap piece of fabric that you are using for your label to get a feel for how to much pressure to put on the pen.
Finish by pinking the edge of your label. Use brown or black DMC thread and sew the label to your quilt with a running stitch around the edge of your newly created quilt label. Or iron your label on with Heat N’ Bond. By no means do you have to use this design. You can use the basic steps and create your own whimsical scene on a handmade label. Go and do! I trust. Create your own label to add to your handmade quilt. Your quilt will be treasured as a keepsake.
You Might Also Like
Scrap quilts are fun to make. How Do I Make A Simple Scrap Quilt? Swiss Cross Quilt?
Need a table runner for your kitchen table? How Do You Make A Table Runner With Panel Fabric?
Want to getaway on and have time to catch up on quilting? What Is A Quilt Retreat?
Recent Posts
Do you need a quilt to give as a gift and need it like yesterday? Here is a fun quick quilt you can make in a day (maybe less) once you have your supplies. It features homemade raw edge, scrap back...
You know those orphan blocks you just can't bring yourself to throw away? They took some time to make but they just didn't fit in the quilt you were making? Well I've got a solution for using them. A...