Fireplace mantels are often a focal point of a living or family room. You can decorate a Halloween mantel that is easy peasy and super cute. The best part about it is you may already have most of the items you need to do it with. Festive and fun looking, your family and friends will love it. Let’s get your mantel decorated.
You will need:
- Pictures of your family , framed, unframed, on canvas, etc…
- 2 amber colored jars or clear or aqua colored mason quart jars, 2 matching vases, 2 lanterns, or 2 small lamps
- Assortment of small teddy bears
- Fall decor like pine cones, faux pumpkins, cornstalks, leaves, faux flowers etc…
- Wreath optional
- Small Decorative Lights optional
We have a lot of family and friends coming over for a special family event on Sunday. Our daughter returned home from her Church of Jesus Christ of Latter Day Saints mission in Seattle, Washington. She spent eighteen months sharing the gospel of Jesus Christ and bringing others to Christ. She will speak in church on Sunday sharing her mission experiences and miracles she witnessed over those eighteen months. What a great experience for her to serve the Lord Jesus Christ. So grateful she had the opportunity to do this. It has changed her and our lives forever. Back to my mantel story…. I have been cleaning and decorating our home for weeks preparing for her return. After our church meetings, we will host a casual dinner at our home and it was time to decorate the mantel. I was trying to find a place to stash all the bears I have collected over the years since the loft area I had all my crafting stuff and I say stuff lovingly we converted into a new bedroom for our missionary daughter. The mantel in our family room became their new home.
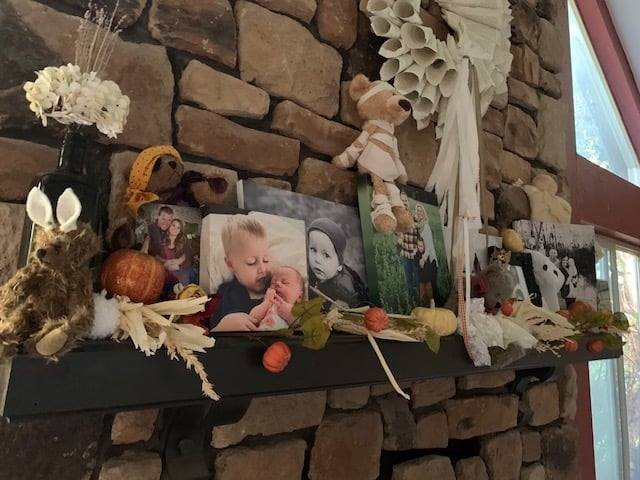
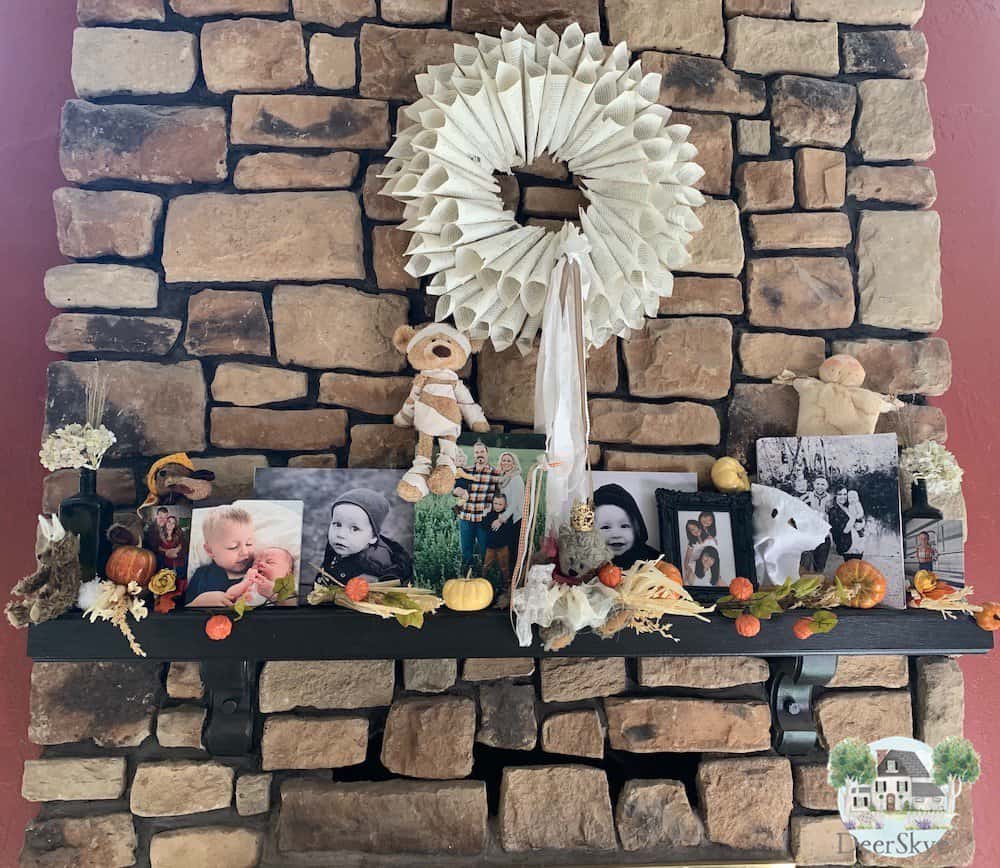
Family Photos
Who doesn’t have a treasure trove of family pics? They can be of immediate or of extended family members. Old family pictures, baby pictures you choose a theme if you like. It could be Halloween pictures if you have a variety. I chose a variety of some pics I have on canvas but you can mix and match frames, canvas, or no frame or no canvas at all. Arrange them on your mantel. I packed my pictures on top. in, around, and behind each picture letting the main picture show. I hid the edges of the photos so that I could get all the pictures in I wanted to use.
- Play with the arrangement. Switch it around. Get it just like you want it. Not perfect of course but arranged so you think it looks good.
- To make my photos balance out, I put a tall picture in the center. I put a picture on each side of the tall pic the same height. Then I added pictures that went to the end of the mantel on the left side and then on the right.
- Normally I don’t pack my fireplace mantel with lots of items but this works to give you the idea of fun and family Halloween style.
- I chose to mix black and white photos with a few color photos. If you are a stickler for balance, you can stay with all black and white photos or all color. I liked the visual variety and the color pics made the fall and Halloween decor I added pop.
Matching Jars & Faux Flowers
I cook with extra virgin olive oil and my fav oil is Tunisian Olive Oil (no perks for mentioning this). I love the look of this jar. I have several because I use these jars throughout my home to decorate with once I remove the sticker.
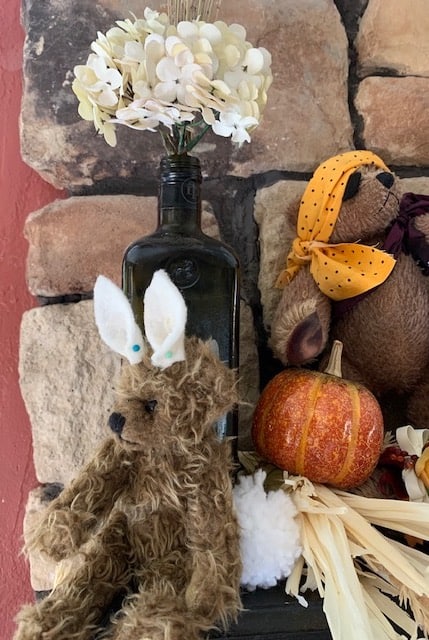
I used two of these jars for my mantel. I placed some faux white hydrangea (which would be blooming if this time of year because it is considered a fall flower) in each jar. Then I placed each jar aka “vase” on the left side of my mantel and on the right side of my mantel.
Spooky Cute Bears
This is such a fun part of the decorating process. Gather bears. I mean your cute teddy bears. You can dress them as pirates, mummies, ghosts, bunnies, witches, whatever Halloween character you want sitting on your mantel. This makes the bears come to life. Sit or stand your teddy bears wherever you want them around your pictures. Here are some simple ways to dress your bears. Also, position your bears so they look like they are peeking out from behind the pictures or hanging on to the pictures. It really looks Halloween cute!
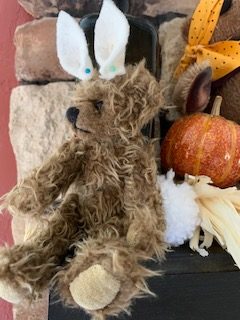
- Bunny Beat- to make a bunny add felt ears and a large pom pom for a tail. I pinned the ears on so after Halloween this cute bunny bear turns back into a teddy bear.
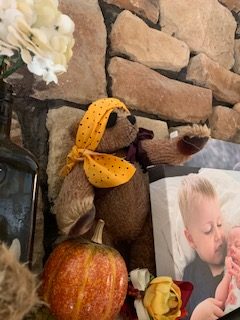
- Pirate Bear– ahoy maties turn a bear into a pirate in just a couple of steps. First cut out a Halloween colored fabric strip and tie it in a knot around his head. Let the knot show on the side of the bear’s head. It adds to the pirate look. If you have some striped fabric and want to make him a shirt that would be super cute. Also cut off pants of any color would work. I just added a felt eye patch I cut out of black felt and tucked it up under the scarf so it would stay on. If you want your eye patch to be more secure, sew it on. You can easily remove it after Halloween.
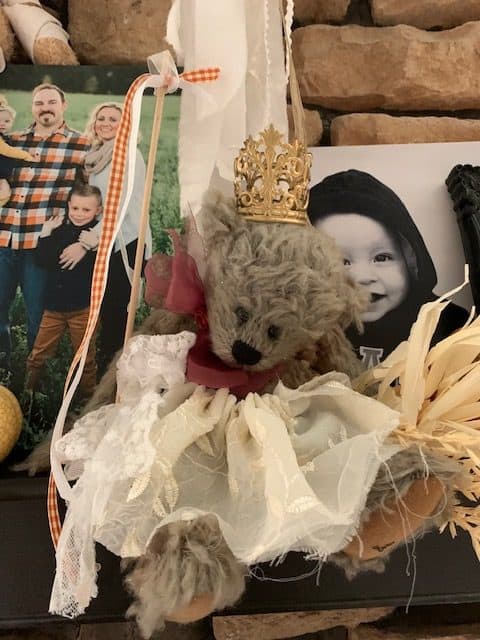
- Fairy Princess Bear– I had some fancy fabric with embroidered leaves on it and just gathered it by hand to make a skirt for my fairy princess. I tucked it in at her waist. I already had a bow tied around her neck. I also added a fancy lace bow to the side of her skirt just tucking it in to the side of her skirt. Add a paper crown if you don’t have a metal crown like mine. Make one out of wire if you want to get really creative! Then what would a fairy princess be without a fairy want. Take a skinny dowel or straw and tie strips of ribbon to it. Then put it next to the bear. Use your creativity to come up with your own style of fairy princess or queen bear.
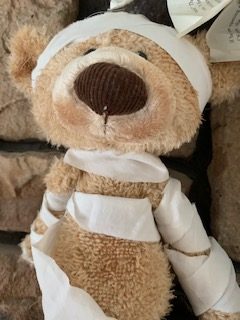
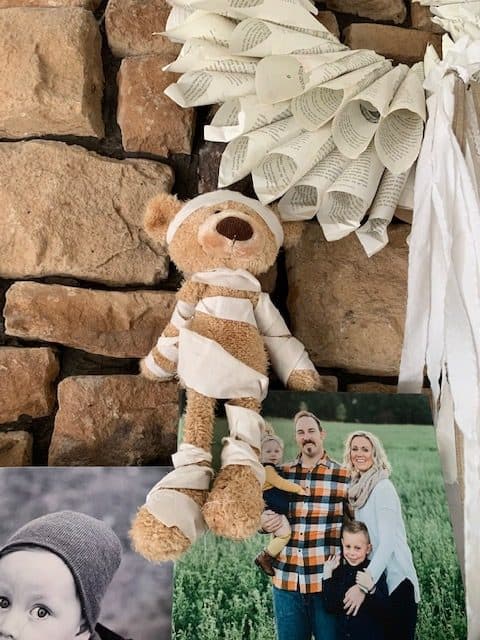
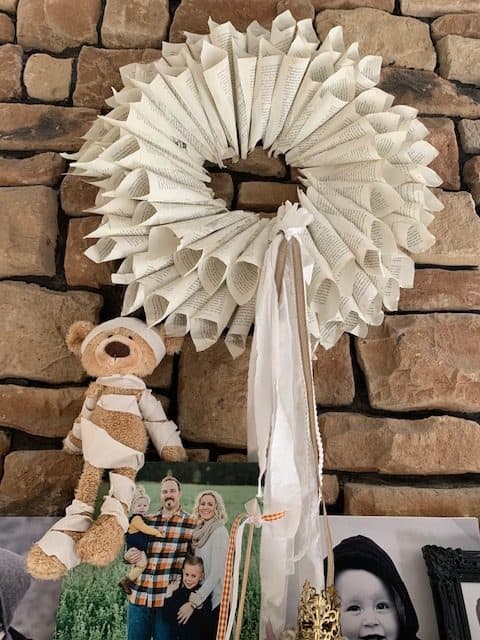
- Mummy Bear– This bear’s costume is sooo easy to make. Get some white or ecru fabric. If you have fabric scraps all the better. Tear not cut strips of fabric from your material. Then wrap the fabric strips around the bear and tuck them under in the back to make this not so scary mummy to sit on top of your pictures. Make sure the eyes are not covered up because they look so cute peeking out of the strips of fabric. Wouldn’t you agree? You can wrap yours with more fabric than I did mine. I actually left most of his face uncovered because it was too cute to cover up.
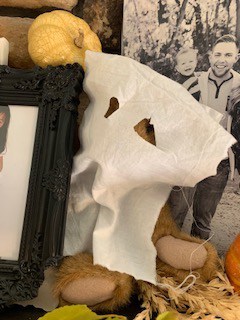
- Ghost Bear– Can you say “boo ya!” You will need a small amount of white fabric folded in half with two holes cut out of it for eyes. His costume is very easy. I love how he peeks out from behind a picture as if to say boo! I literally cut two holes (uneven I might add) in a small folded piece of white fabric. Only cut holes on the front side of the folded fabric and just put it over the teddy bear’s head. I tucked the fabric in and around the picture he was peeking out from. NO SEWING required. If you want to go even more simple, make a black mask out of felt for your bear and just put that over his eyes. He can be a masked bandit like Zorro.
- Batting Ghost– I made this ghost as a snowman originally but thought I would repurpose it as a ghost for Halloween. I created it out of low loft batting and tea dyed it. I need to add two black eyes to the head and will before Halloween. To add some more height, I wedged it behind and on top of a picture that sits on the right end of my mantel. It is about the same height as the mummy that sits on top of my picture in the middle of my mantel. Try to put some of your bears higher than the pictures because it adds some fun interest to your display.
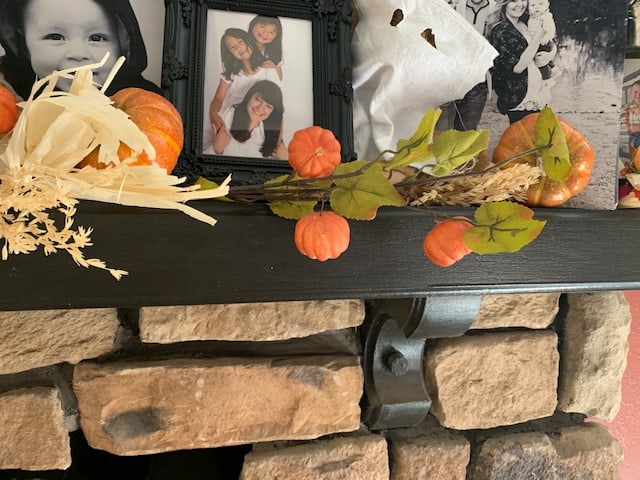
Fall And Halloween Decor
Gather the tops of a few cornstalks and wire them together. They should be about 5 to 6 inches long. You need enough to put to the side of each picture. Pinecones can be tucked into your display. Add some faux or even real sugar pumpkins. If you want to add some fall leaves or flowers you can. Festive lights (which I still have yet to add) would put a magical, whimsical touch on your Halloween mantel display.
- Place your fall floral decor around and in front of the bears and your pictures.
- Start by putting cornstalks on your mantel where you want them to go.
- Add little faux pumpkins on stems and lightweight faux pumpkins across the mantel.
- If you have faux fall flowers or leaves real or faux add them to your display too.
- Small twinkling lights would be a great addition to accent your Halloween bears and photos display.
Optional Wreath
I made a wreath out of the pages of a book several years ago. It hangs over our fireplace above our mantel. I’ve actually hung it in several different places of my home at various times. It seems like the perfect addition to my Halloween themed, teddy bear filled, picture stuffed mantel. You could also hang a wreath of greenery, pinecones, wood beads or whatever type of a wreath you like. Make a Halloween specific wreath too if you want to. If you would rather just enjoy bears and pictures without a wreath that works too. I am partial to wreaths though and I think they always elevate the design you are going for. So I will always opt for a wreath in the scheme of designing areas of my home.
Your mantel will get oohs and ahhs once you complete your Halloween mantel design. The basic design is so so easy to create. If you don’t have a bunch of teddy bears, maybe you could borrow some from a family member for the month of Halloween. Don’t be limited by my bear costume design either. Come up wit your own ideas if you like. Creativity is always encouraged here and welcomed. Once you decorate your mantel, you may keep it up all year long you’ll love it soo much. And what’s wrong with that?
You May Also Like
Want to know how to make an easy Halloween mini quilt? Check it out here How Do I Make A Halloween Quilt? For Beginners
Got a lot of T shirts and want to make a T shirt quilt? How Do You Make A T Shirt Quilt? Quilt As You Go & No Interfacing
How about making a darling mummy mini quilt. How Do You Make A Mini Quilt? Vintage Halloween Mummy
One more Halloween quilt. This quilt is interactive so to speak. Halloween Quilt With Checker Game And I Spy
Recent Posts
Wondering how to become a more confident quilter and how to zero in on what type of quilting really sings to you? How do you identify if you are a maker of quilts and keep believing in your abilities...
Do you need a quilt to give as a gift and need it like yesterday? Here is a fun quick quilt you can make in a day (maybe less) once you have your supplies. It features homemade raw edge, scrap back...