Mini quilts can be quick and easy to make. They can be used for table runners, wall hangings, and other types of home decor. Here is a vintage, quirky, easy to make vintage Halloween mummy made of strips of fabric sewn together like a crazy quilt to create a Halloween mummy and can decorate any space in your home.
Start by gathering these supplies:
- White and ivory colored or off white scrap fabric.
- A small yardage of square peach colored fabric for the mummy’s face.
- Iron on interfacing cut the size you want your mummy to be.
- Small rounded black buttons for eyes for the mummy.
- Tea and rag for aging your fabric.
Put your mummy mini quilt together:
- Cut your strips out. (Don’t tear fabric)
- Sew your strips together.
- Iron your mummy quilt topper to the interfacing.
- Quilt fabric strips by hand or by sewing machine, sewing “Stitch in the ditch” and other creative straight stitches you want to use to quilt your mummy quilt.
- Age your quilt by dabbing tea randomly on your mummy to give it a vintage aged look.
- Sew or glue short torn scraps of fabric, ribbon, pom poms, textured trims to each corner on top of your mummy mini quilt.
- Leave your mini quilt edges raw.
- Glue or sew a large wooden button on top of scraps in each corner of your mummy.
- Hang your mini Mummy Quilt on the wall.
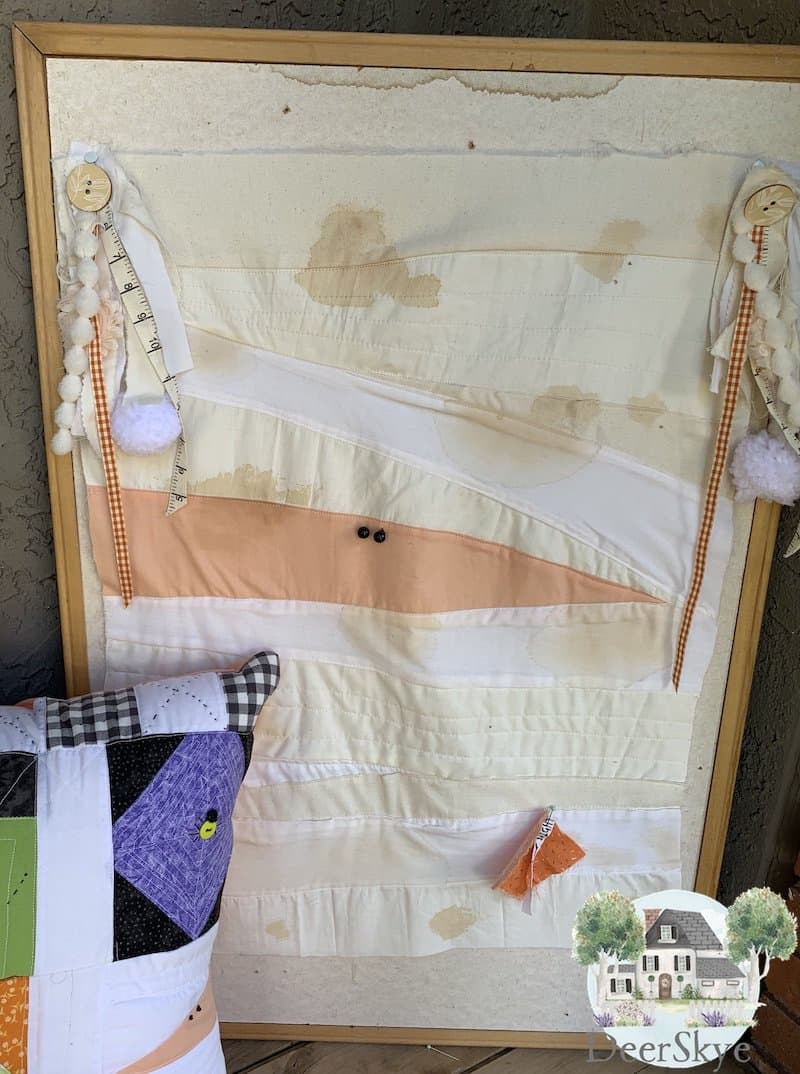
I am trying to be on top of things this year and start earlier on Halloween projects. So far I have done a fun mini Halloween quilt with a mummies, pumpkins, and friendly monsters on it. How Do I Make A Halloween Quilt? Also a Halloween I spy quilt, with the center made up of small squares for playing checkers. Halloween Quilt With Checker Game And I Spy I knew when I made my first mini Halloween quilt that I wanted to make a mummy mini quilt. I was smitten with the way the mummy turned out on my first mini quilt. So cute and festive! So here we go. Let’s get sewing and make a cute vintage mummy mini quilt. Don’t worry he is too cute to be scary and he will make you smile each time you walk by. Best part of all…it’s not that hard.
Choose Your Fabric
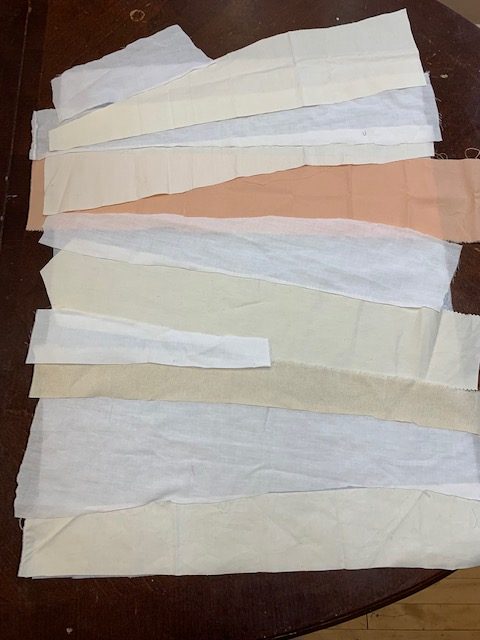
Cut the size of your thick iron on interfacing and then you will need to cut the same lengths of fabrics but vary the widths of strips of white and off white fabric for your mummy quilt. Almost any white or off white fabric will do. I am using an old pillowcase for some of my white fabric. This is a quilt that will be on display and not used as bedding so the fabric can be what ever you have on hand. One hint though to remember…don’t tear your strips for the body of the mummy. You don’t want a bunch of strings to deal with when sewing and quilting your mummy strips.
I like how the mini quilt turned out with the two neutral colors. It accents the mummy look more because it looks like he was wrapped in scraps. Originally I was going to make my mummy all white but the more I thought about it I thought a vintage mummy would look cuter so we will combine the two colors. (If you want your mummy to be all the same color, go for it.)
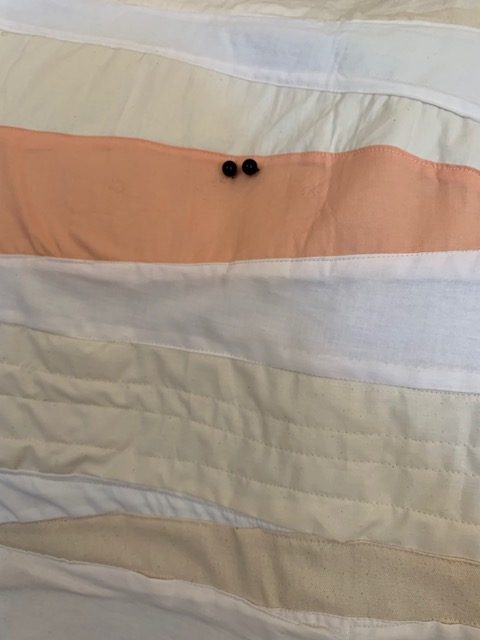
Mummy Face
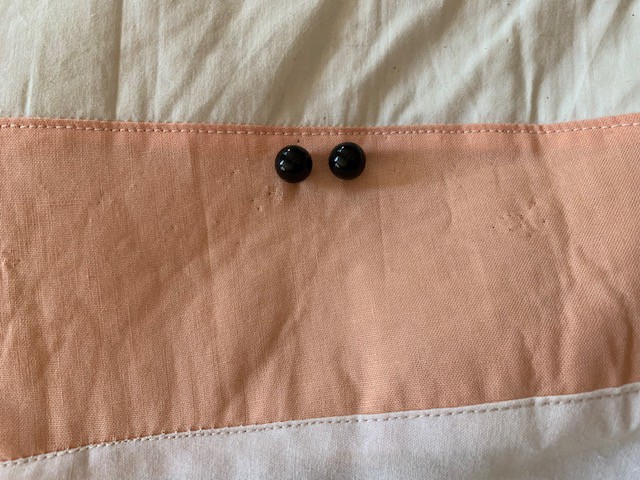
Cut out a strip of peachy fabric for the mummy’s face. You will sew white and off white strips of fabric. around the mummy face. Placement is important. You need to cover part of the peachy face with your strips of fabric but leave enough of the face fabric showing to add your buttons for eyes. The face peeks through to give the look of a mummy of course.
Cut Out Strips Of Fabric
- Cut your scraps and don’t tear them (you don’t want to deal with a bunch of loose strings when quilting your mummy. ) You get to determine how long or how wide and how long you want your mummy strips to be once it is all put together.
- Start at the bottom. Cut a strip of your fabric to put across the bottom of your quilt. It should be fairly straight across.
- Now each strip you cut from here on out can be angled at the end.
- Cut the strip for the face that is long enough to go the length of your other strips.
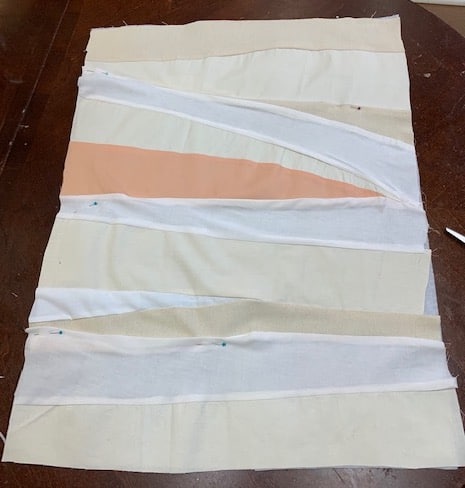
Place the fabric strips on your iron on interfacing. It will look like you are making a crazy quilt. (A crazy quilt is made of strips of fabric sewn in random and interesting strips.) This is for placement purposes so you can see how your mummy will look.
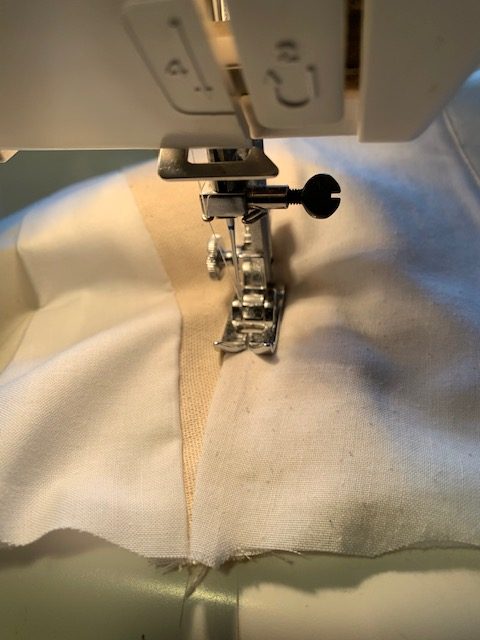
Sew Strips Together
Once you have your fabric strips where you think they look like a mummy, start from the bottom of your mini quilt and sew strips together one at a time until you add the last strip sewn at the top. Your strips will vary in width. Start with your bottom strip. Then cut the rest of your strips on a diagonal. Sew two strips together and then press the seam on top of the fabric. Sew the next strip and press and so on until you get all your fabric strips sewn together. You end up at the top of your mini Halloween quilt. Now iron your sewn strips to your interfacing. Square your mummy mini quilt up. Cut off edges that aren’t straight enough.
Iron On Interfacing
Use thick iron on interfacing for your backing. You can use this for your batting and your backing. Yes you read right. It works double duty. Once you have your mummy sewn altogether, lay it on top of the interfacing you cut out for your mummy. Iron your sewn mummy strips to the interfacing. It will give it a nice thick back. You can add backing if you want to but it isn’t necessary because you will be hanging this mini Halloween quilt on the wall or laying on the table as a runner. You don’t have to finish the edges or put a back on it. I know! You can celebrate this step! The raw edge looks great because mummy scraps would be raw and unfinished. Not that I have ever seen a mummy or been wrapped like a mummy but my imagination tells me this is true.
Quilt Your Mummy
Let’s get quilting! It goes really quick when you use your sewing machine to quilt your mummy. You can totally quilt by hand if you prefer. Just sew along each horizontal line where you sewed each strip together. It’s called “Stitch in the ditch”. I had a couple of wider strips that I sewed more than one line of stitching. Refer to my picture above. You decide what you think will look best for your mummy but I kept it simple because your Halloween mummy doesn’t have to be fancy. The strips do the work for you to make a cute mummy.
Add Eyes
Sew two round black buttons on the face part of your mummy. Place them at the top of your peachy colored fabric and put them side by side when you sew them. It will give your mummy a look of a person wrapped in rags. You will be surprised how much the eyes stand out and make your mummy come to life so to speak. You can use paint instead if you want. Just dab on two small circles of black paint. Or you can sew french knots but I really liked using rounded buttons because they give your mini Halloween quilt a real mummy vibe.
Tea Stain
I like tea staining projects because it adds a unique look to your project. Time to age your mummy with some tea stain. It instantly adds a vintage look to your fabric. Dip a rag in a bowl of tea. Then dab the tea on your rag randomly on the your mini quilt mummy. Allow your quilt to dry. This step is optional. I like the vintage look though.
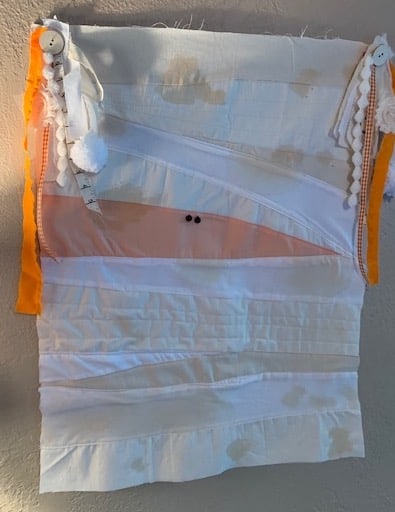
Add Trim
Okay earlier I advised you against tearing your strips but for this part I completely approve it. Rip some short fabric strips to put in each corner of your mini quilt. You will need several strips and they can be plain white or off white. Add some Halloween colored strips to your mini quilt. Glue them on each top corner of your quilt. (If you prefer sew them on, you can but it is okay to use hot glue for the final finish.) Add some large yarn pom poms to your strips. Also glue on gingham ribbon, yarn if you want, and then glue a large wooden button over each set of strips.
Put A Halloween Patch On Your Mini Quilt
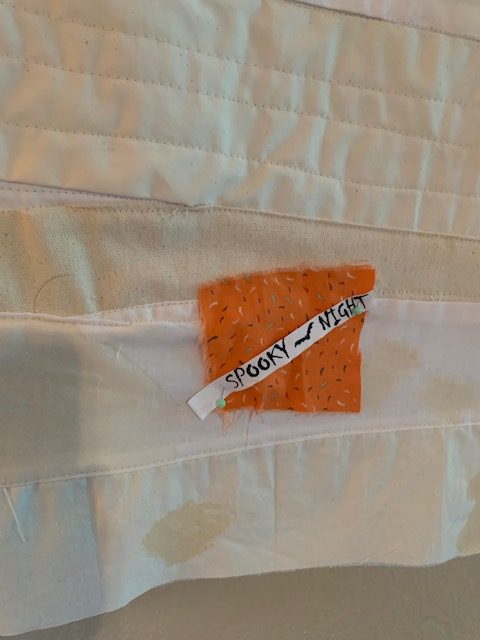
For some whimsical contrast on my mini Halloween mummy quilt, I added a small patch. The small square of fabric has rough edges and is orange colored. Hand sew it on. I used a fabric called “Spooky Night”. I cut off the Spooky Night name at the bottom of my Halloween fabric and put it over the patch. You can hand write a message on your mummy if you would rather. It adds a little something, something special. If you want to add a label with your name on it, that could be a cute addition to and you could do it in place of the patch. I have a tutorial here for making a quilt label How Do I Make A Simple Quilt Label? just make it Halloweenish looking.
Display Your Mini Quilt
There are several ways to display your Halloween mini quilt. You could lay it on a sofa table. You could put it on your dining room table for a table runner. Or hang it on a wall and show off your cute Halloween mini quilt wall hanging. Make sure you don’t put your quilt in direct sunlight. Even indirect sunlight could be harmful so choose wisely where you display your mini quilt. Happy Halloweening!
You Might Also Like
Want to know how to make some traditional quilt blocks? With just 4 simple blocks you can create your own designed quilt. What Is A traditional Quilt? 4 Traditional Quilt Blocks.
An easy and quick way to get your quilt quilted and finished is to quilt as you go, quilting a row at a time. Quilt As You Go: You Can Do It!
Another fun project gets you in the Christmas spirit. How Do You Make A Simple Christmas Table Runner?
Recent Posts
Wondering how to become a more confident quilter and how to zero in on what type of quilting really sings to you? How do you identify if you are a maker of quilts and keep believing in your abilities...
Do you need a quilt to give as a gift and need it like yesterday? Here is a fun quick quilt you can make in a day (maybe less) once you have your supplies. It features homemade raw edge, scrap back...