Toys that encourage creative play are so great for a child’s development. It allows them time to tap into their imagination and help them learn to be creative. A quilted play mat is a great tool for your child to use to boost their creativity . It also makes the perfect gift. To make a homemade play mat for a toddler you will need these supplies:
- Pick out some fun coordinating fabric scraps in a variety of textures and colors
- Fleece fabric for the backing
- Thin batting for Mushroom house, hearts, and little play critters
- Basic pattern
- Thread
- Cutting Mat
- Rotary Cutter
- Scissors
- Iron
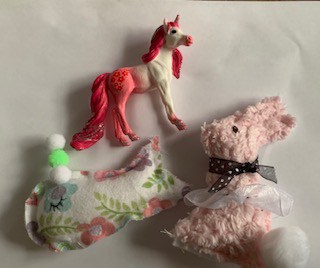
- Little animals, fairies , bunnies, cars, etc… to play with on your mat.
I totally give you permission. Okay not that you need my permission but I give you permission to have fun and be really creative on this project. My daughter in law works for a great company but wanted to be able to be home more with her children. She has a five year old and a two year old. She approached her boss about working remotely from her home and that wish was granted. My two year old granddaughter just turned two and for her birthday I came up with this crazy fun idea. A play mat might help to entertain her while her mommy is working. I’ll give you the basics of making this mat but you can run with it and add your own magical version of fun.
Fun With Fabrics
Go through your fabric stash and grab some of your scraps. I don’t know if you do this but when I buy a fabric I love, I have a hard time throwing away the scraps. This time my scraps came in handy. You can also buy yardage that you need as you plan out your play mat. You will most likely want to use fabrics that are bright and colorful. I got lucky and had a lot of fabrics in my stash that coordinated well together. (At least I think they worked well. Everyone has their own opinion lol!) Precuts work great with this project because you can sew your play mat up faster. You can also use textures like fur, or gauze, cotton and fleece because it is a play mat and it will add some interest to your play mat.
Backing No Batting
For this project you won’t need batting sandwiched in between the topper and the fabric backing. The backing will be thick enough without it. You will still quilt it and it will still look cute that way. You can use fleece, ticking fabric, minky, any fabric that is thick enough to hold its shape and not so thick that you can quilt through both layers. You can even make the back so it could be used for a blanket. It will be a fun play time whether it is a blanket or not.
I used to take our young daughters to the ball field to watch their brothers play ball. I would load a bag up with all kinds of toys, and assorted things for them to play with while we sat on a blanket near the ball field and watched them play. (My hubby was coaching our boys team at the time.) This is something that will entertain your littles if you do this type of activity with your children.
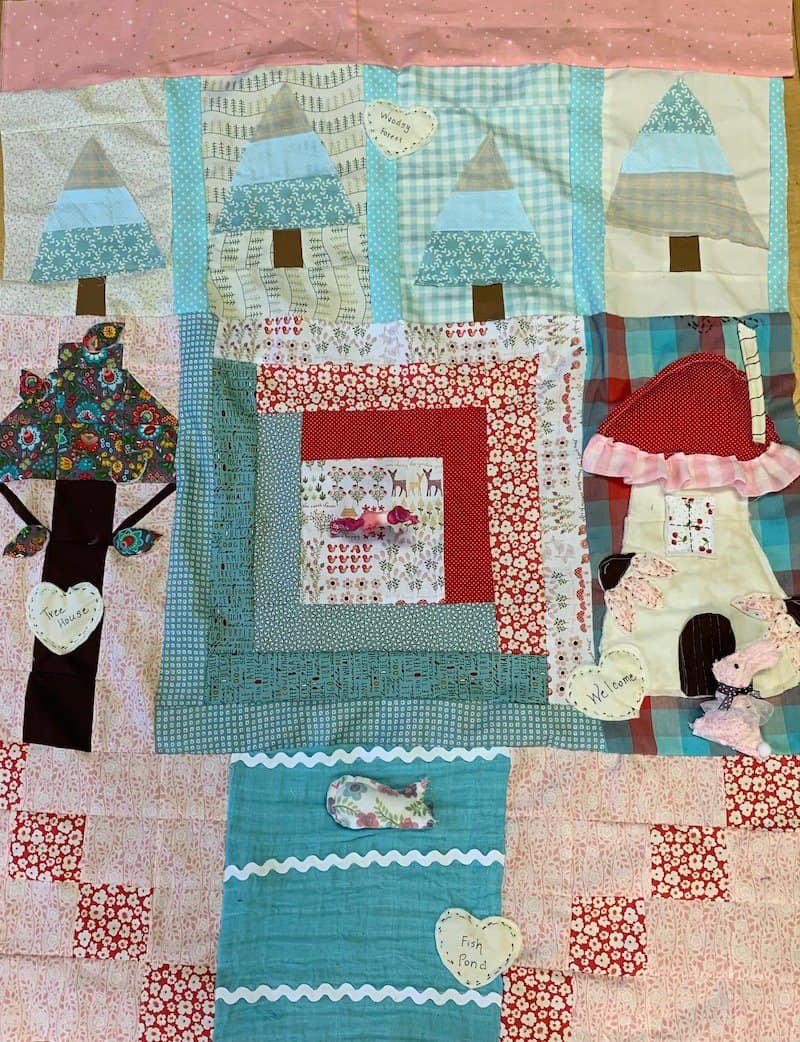
Enchanted Play Mat Pattern
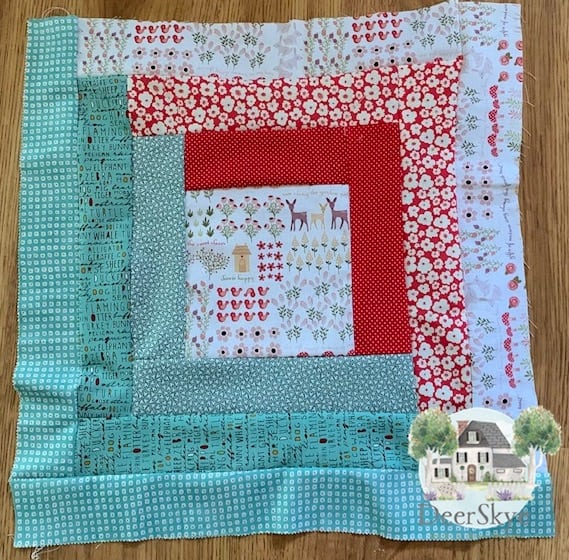
Log Cabin Block: I have been saving this really cute fabric for a long time. It finally seemed like the right project to use it on. It became the center of my modified log cabin block. My center square is really big. I like it though. It measures 6 1/2″ x 6 1/2″. I pulled colors out of the middle center square and added fabric strips that measure the same on both sides of my log cabin. I loved using precut strips for this quilt block. The finished log cabin quilt block in the center of the play mat measures 18″ x 18″. You can choose your favorite quilt block to put in the middle of this row (which is the second row) to start your play mat.
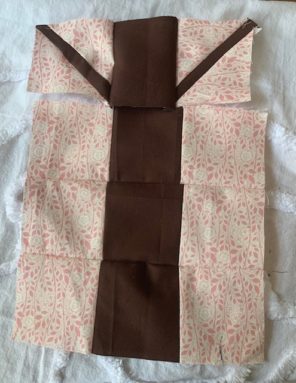

Woodsy Tree Quilt Block:
- Cut (3) 6 1/2″ x 6 1/2″ floral print fabric squares. Fold squares in half and cut. Then fold each half in half and cut again to make 3 1/2″squares.
- Cut (4) 6 1/2″ x 6 1/2″pink printed fabric squares. Fold each square in half and cut. Then fold each half and cut so you have 3 1/2″squares.
- Cut (2) 6 1/2″ x 6 1/2″ dark brown fabric squares. Fold each square in half and cut. Then cut each half in half into 3 1/2″ squares.
- The tree trunk is made of dark brown fabric sewn in rows with the pink printed fabric. Refer to the picture above to see how to sew the tree together.
- Top of the tree starts with the first row of (3) 3 1/2″floral print fabric sewn together.
- Sew (2) half square triangles and (1) 3 1/2″ square in this order hst, full square and then hst.
- The very top of the tree is a 3 1/2″ floral square sewn to a 3 1/2″ pink fabric square both cut in half and halves sewn together.
- For the two branches on the tree. Cut 2 thin strips of brown fabric. Cut a pink 3 1/2″ square on the diagonal and sew a branch to both diagonal pieces of the square. Sew another square just like this so it looks like branches. Sew this row with a branch leaning left, to a dark brown 3 1/2 ” square and then another branch square leaning right. Sew it to the top row of the tree trunk just under the floral fabric tree top.
- Iron your quilt block.
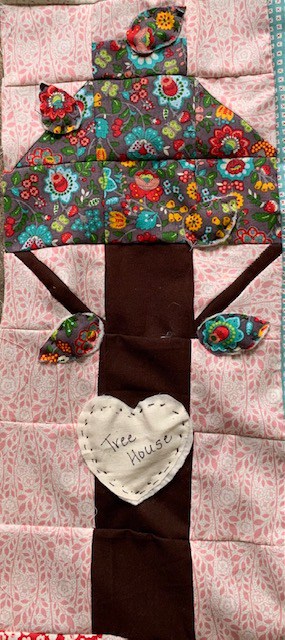
- Cut freehand leaves out of the floral fabric matching your tree top and cut out pieces of thin batting to fit each leaf. Sew each leaf on the tree with a running stitch using dark brown Perle cotton thread. Then cut a heart and sew it on with batting and by hand. I labeled my tree, ” tree house”.
- Sew it on the left of the log cabin block and press the seam right side up of the quilt topper.
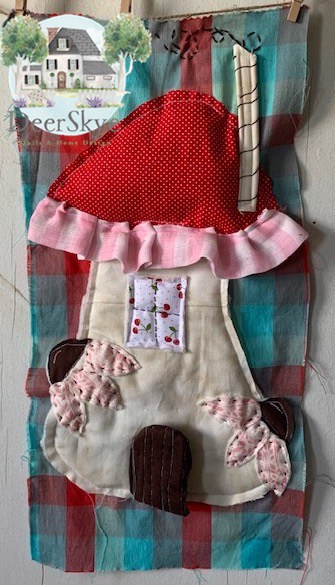
Mushroom House Quilt Block:
- Draw on paper your own inspiration for a house in the woods. I created a mushroom home for a bunny to take refuge in.
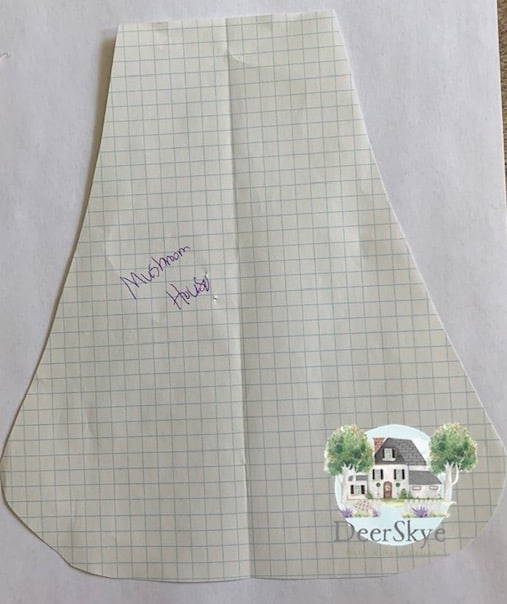
- First measure the fabric for the background of this quilt block so it is the same size as the tree house quilt block.
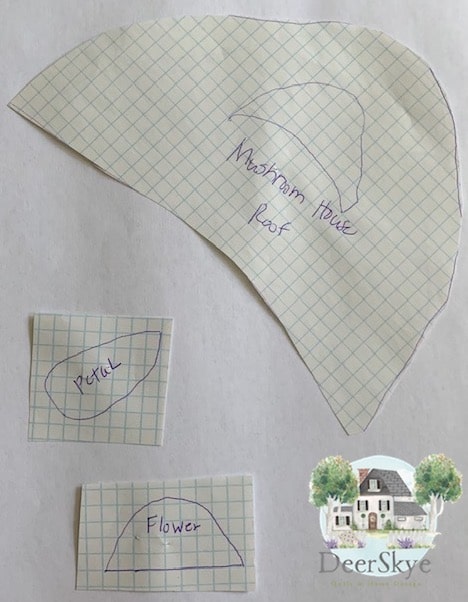
- Cut out the pattern for the mushroom house, the roof, the door, the window, etc…or you could come up with your own pattern.
- Cut batting to fit under the mushroom house and the dark center of the flowers. Top stitch around these pieces on your sewing machine.
- Cut out a quaint little window and cut a piece of batting to fit the window. Now machine stitch both pieces to the top of the house. Using Perle Cotton do a running stitch to make lines on the window.
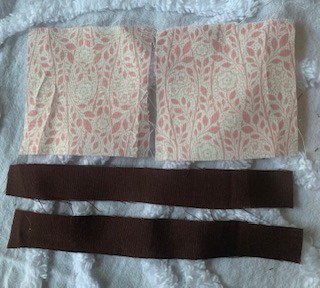
- Place the roof above the mushroom house. Sew the sides and the top of the roof to the quilt block leaving the bottom un sewn. Stuff the roof with some doll batting don’t stuff it too tight. Then sew the opening closed with your machine. You may have to stretch your roof a bit as it might want to bunch up.
- Take a contrasting piece of fabric a little longer than the length of the roof and fold it over. Sew one short side and across the length of the folded fabric.
- Turn it inside out and sew the open short side closed.
- Then, by hand gather this piece of fabric.
- Sew it at the bottom of the roof.
- Make a door by freehand cutting a rounded door out of dark brown fabric. Cut 2 door pieces. Cut out a piece of batting to fit the door.
- Take one fabric door and the piece of batting and sew around the edge of both sewing them together.
- Next, put both dark brown fabric doors right sides together and sew all the way around the door leaving a space to turn.
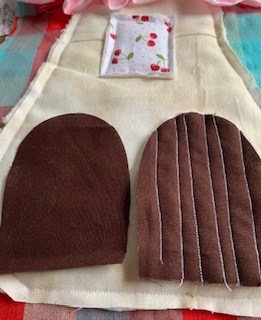
- Turn the door inside out.
- Sew the opening closed on the door by hand.
- Add a fun touch to the door to give it an old world look take a permanent brown or black marker and draw on the white thread.
- With your sewing machine sew a straight stitch down the door from top to bottom. Put the machine foot next to the line you just sewed and repeat sewing a line until the door has enough lines in it.
- I used white thread and then colored over it with a black permanent marker.
- Attach the door onto the house by sewing a straight stitch down the left side of the door and the mushroom house.
- I added flower heads in dark brown and sewed those on my machine with batting underneath.
- Each petal had batting cut to match and was hand sewn in place with a running stitch using the Perle Cotton thread.
- For the chimney, I got really creative and rolled a piece of fabric in a long roll shape using the same fabric that the house is made of. I wound Perle Cotton around it and machine stitched it into place.
- I then embroidered a stitch above the chimney to look like smoke. Note to self…my faux pas, I had a lovely swirly stitch above the chimney going on but when I stitched my top row to my middle row, I forgot about placement and most of the smoke got sewn into the seam. I still went with it though because it looked ok.
- Sew this quilt block to the right of the log cabin quilt block and press on top of the quilt block seam.
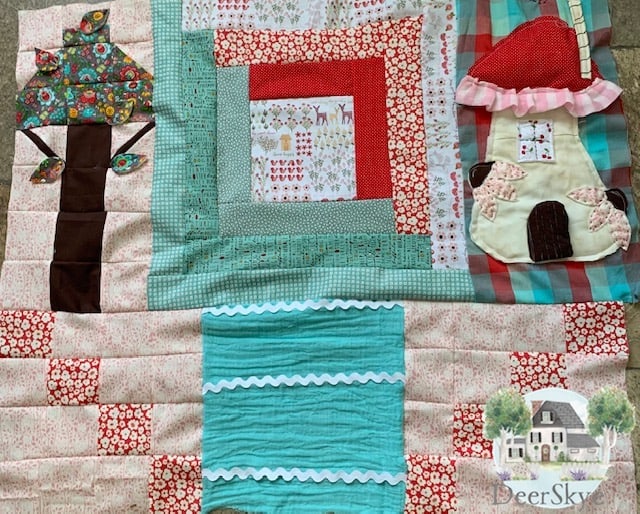
Patchwork And A Pond
My bottom row is made up of two patchwork quilt blocks and a bluish green guaze pond in the middle of both matching patchwork squares. Sew some ric rac from side to side to imitate white cap waves haha! You can refer to my picture above or create your own. Soon I will add some little fishies swimming in that brook. I sewed the three bottom quilt blocks to the row with the tree house, log cabin, and mushroom house. Then press your seam on top of the blocks that you just sewed.
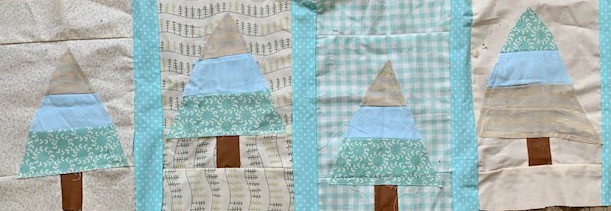
Woodsy Forest
For these quilt blocks, I had these tucked away in a pile of unfinished quilt blocks.. I know. I know. Maybe you call that cheating but I have saved these for several years and I was ecstatic that I could finally use some of them for this project. You can create your own forest of trees to go across the top of your play mat. I sewed the tree on each quilt block together using a triangle shape. Then I sewed the trunk in between two smaller quilt blocks. I sewed a larger quilt block to the tree trunk block and then top stitched the trees to the top of the trunk and all around the tree itself attaching it to the large quilt block. Look around online I am sure you can find a pattern similar to this if you’re not sure how I sewed these. (Sorry because it was so long ago, I don’t have this pattern anymore.) The trees are staggered different heights. I will come up with some cute woodland animals that can roam in this forest glen.
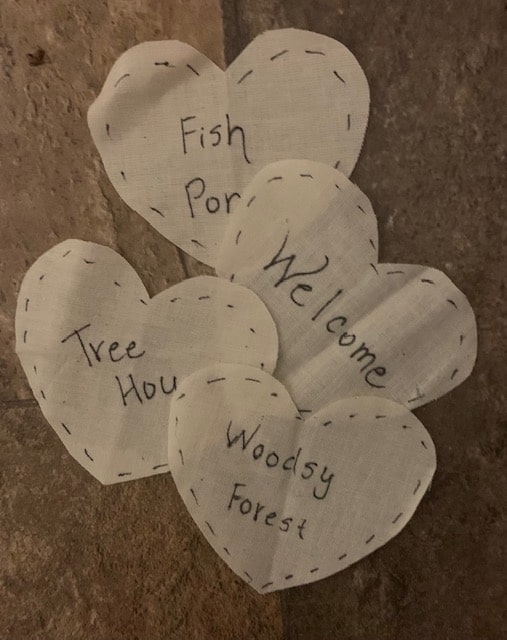
Heart Labels
For creativeness sake I wanted to label the different areas of the mat and then let my little granddaughter imagine the rest. I cut out hearts and wrote on each with a permanent marker. I named the main areas of the play mat. I cut out thin batting to go underneath each heart and then hand sewed them with a running stitch of you guessed it Perle Cotton.
Night Sky
I sewed a strip of pink cotton fabric with shiny gold stars on the fabric across the top of the play mat to finish the topper play mat. It goes nicely with the pink printed fabric you see at various places on the play mat. I will add some stars for my granddaughter to put in the sky.
Accessories
I’m just getting started with the accessories here. I plan to make more fish besides the whale I designed. I will add some stars as mentioned and a cute little car for my granddaughter to follow the strips of fabric in the log cabin quilt block. I will come up with some more woodland animals. You can draw freehand a bunny and a whale or fish. Top stitch around them leaving enough of an opening to stuff with fiberfill. Just make sure your accessories are kid friendly and age appropriate as far as safety standards.
Finishing The Enchanted Play Mat
I will add fleece to the back of my play mat by sewing right sides together and then quilting it. You can either hand quilt or absolutely sew this on your machine. Your choice. Don’t be afraid to get fancy dancy or make this play mat more simple. Either way it will serve the same purpose and the kiddos will love it! To make this play mat complete, I will personalize it with a handmade label that I will sew to the back of the play mat.
Pick A Pocket
Now that I’ve explained this play mat to you, I just got another idea. Add a cute pocket either on the front or the back to put all of the accessories in. That way when it is time to clean up, this can teach the child two things, to put things away when they finish playing and how to take care of their toys.
This might also interest you
Try chunking down your quilt to make it easy to quilt. Quilt As You Go: You Can Do It!
Now is a great time to get started on your Christmas projects. How Do You Make A Simple Christmas Table Runner?
You can use mini quilts a lot of different ways and here are some unique ways to display and use them. What Are Mini Quilts For? (Really Unique Ideas)
Recent Posts
Wondering how to become a more confident quilter and how to zero in on what type of quilting really sings to you? How do you identify if you are a maker of quilts and keep believing in your abilities...
Do you need a quilt to give as a gift and need it like yesterday? Here is a fun quick quilt you can make in a day (maybe less) once you have your supplies. It features homemade raw edge, scrap back...