Looking for just the right touch to add some Christmas spirit to your kitchen? Make a simple Christmas table runner. You can create this project any time of the year. Need a Christmas in July, October, or December project? Here you go! This project will take some time to make but it isn’t hard to do. You will love the results. You might even want to make more than one to gift. To create a beautiful simple Christmas table runner, you will need the following:
- A variety of Christmas fabric or choose red, white, green, pinks, blues, dark gray fabrics. Several fat quarters or yardage to create your runner topper.
- Add a contrasting fabric that you can use for your quilt topper. I used white fabric for my background.
- Christmas print fabric for the back of your table runner and for the prairie points.
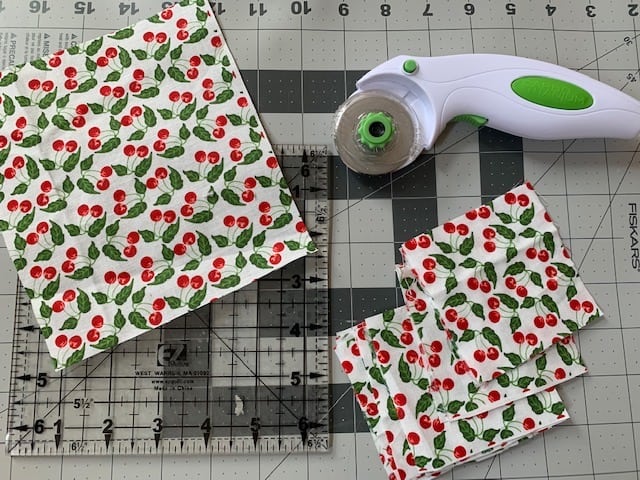
- Gather the quilting tools you will need. Quilting and sewing thread, 6 1/2 ” plastic square ruler, rotary cutter, sharp scissors, cutting mat, and an iron are the main tools.
- Batting unless your runner topper and backing make your runner thick enough to quilt without it.
- Follow my Mirrored Christmas Tree instructions for the Christmas table runner.
- Join table runner topper together by sewing the “peppermint sticks” strip in between the two Christmas tree blocks.
- Iron squares for the Prairie Points.
- Cut backing fabric to fit the front of the table runner.
- Sew together front to back adding Prairie Point Binding.
- Sew open edge and quilt by hand or by machine.
I love that kitchens are a gathering place. A place of peace. A place to come together as a family to tell jokes and talk about the days events. A place to laugh together, to cry together, and to celebrate together. It is a little thing like a table runner, a wreath, a centerpiece that make the kitchen a warm and cozy place. This pattern is a fun project to work on. It isn’t hard but it will take you some time to complete. Let’s jump in.
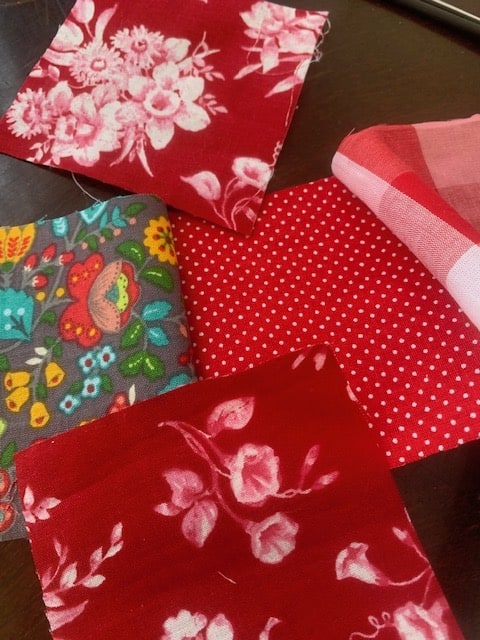
Fabrics That Speak Christmas To You
Attack your fabric stash or buy some mini charm packs of a variety of red, green, and white fabrics.There are some beautiful blue fabrics with snowflakes and snowmen too. Also some dark gray fabric with white spots can look like snow. Soft pink checks and pink fabric with red candy canes would be a good choice for fabric. Pin dots, polka dots, floral, checks and gingham fabrics sewn together in rows of patchwork make up the perfect Christmas tree centerpiece table runner. Decide what color you want your table runner to be. It really doesn’t have to be the traditional red and green and white. What colors would look great on your kitchen or dining room table?
Contrasting Fabric
Contrasting fabric works like magic on a quilt or table runner because it helps you to see the outline of the shape you are creating. In this case, Christmas trees.
- You will need a contrasting fabric such as a white fabric (I chose white fabric) to sew with the fabric squares to make the eighteen half square triangles.
- Also a contrasting print fabric for the other side of the half square triangles. These will define and outline the edge of your Christmas trees.
- A small piece of brown fabric for the trunk of the trees.
Christmas Print For Prairie Points and Backing
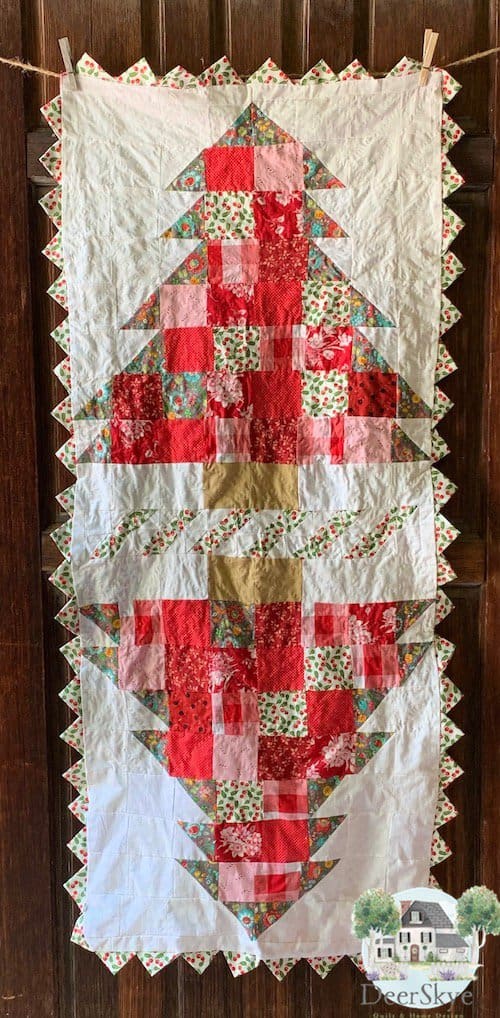
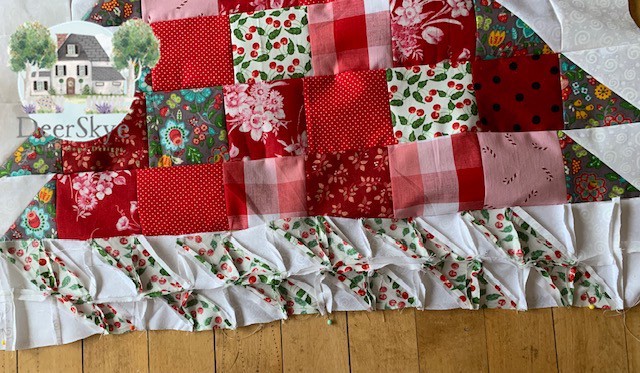
I used a Christmas holly print for my backing, Prairie Points, and Peppermint Sticks (the strip in between my Christmas trees). The backing contrasts with the colors on the table runner topper. I used the holly print for a few squares on my Christmas backing fabric for the trees on the topper. It really seemed to help pull the overall design together having my Prairie Points match a few squares on the runner topper.
Tools You Need
Get your tools altogether so that you will have them handy as you need them. Sewing thread ( I like to use 100% cotton) for sewing my blocks together. Quilting thread is stronger. There are a variety of threads you can use for this. I used a simple Dual Duty Plus hand quilting thread from Coats to hand quilt my runner. Don’t forget your 6 1/2″ plastic square ruler, rotary cutter, cutting mat, sharp scissors, and your iron.
Bat or No Bat
I think using batting for quilting is a personal choice. I felt my table runner was heavy enough with my topper fabric and my backing fabric so I could get away without using batting. Ok there. I said it! Did you gasp? Are you shocked? Since my reason for using this table runner is totally for decor, I won’t be using it for hot pad purposes or anything like that. I like the look and the sturdiness of my table runner without it. So for me, it was a good call not to use it. (Wink, wink, smiley face.)

Mirrored Christmas Tree Table Runner Instructions:
Cut Squares
- When making the 4″x 4″ squares for this project, you will cut 1 large 6 1/2″ square with your plastic ruler. (If you don’t have that size ruler, make a ruler out of cardboard. It saves mega time when you use a ruler like this!) Then fold your square in half and cut it right down the middle. Next cut each half piece of fabric into half. Cut them in half. This gives you (4) 4″ x 4″ squares.
- Cut 50 white 4″ x 4″ squares.
- Cut (8) 4″x 4 ” white fabric squares. Sew them end to end. With rotary cutter, cut them in half. You will use these as the top of each of your Christmas tree quilt blocks. This will be your first row.
- Cut (16) 4″ x 4″ white fabric squares on the diagonal from corner to corner to equal half square triangle pieces which will give you 32 half square triangle pieces.
- Cut (16) 4″ x 4″ squares from print fabric with a rotary cutter on the diagonal from corner to corner giving you 32 half square triangles.
- Take one white half square triangle and sew it with the print fabric half square triangle to create a square. Sew the half square triangles together so you have a total of 16 HST’s.
- Cut (52) 4″ x 4″ squares out of a variety of fabrics for your Christmas trees.
- Cut (4) 4″ x 4″ squares of brown fabric.
- For the Prairie Points cut out (58) 6 1/2 “squares. You can determine how large you want your Prairie Points to be. So you may need more or need less depending on the size you make your Prairie Points.
In a minute, I will tell you how to sew the squares so you can make the cutest Christmas tree table runner. It’s all about placement of your fabric squares to create the tree shape. Not hard to do just takes a bit of focus and direction. You’ve got this! Trust me!
Time To Sew
- Take the row of white blocks you sewed together and cut in half ( it is a skinny row of blocks) and this is your first row for your Christmas tree block.
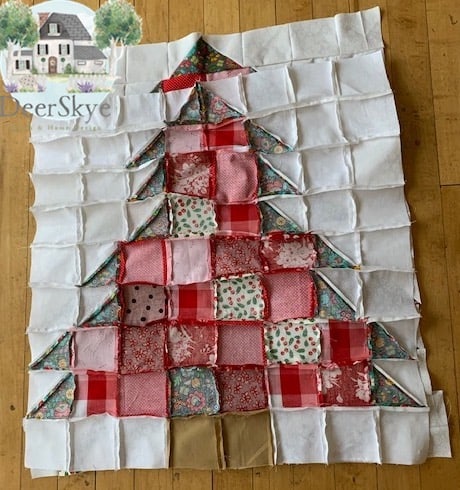
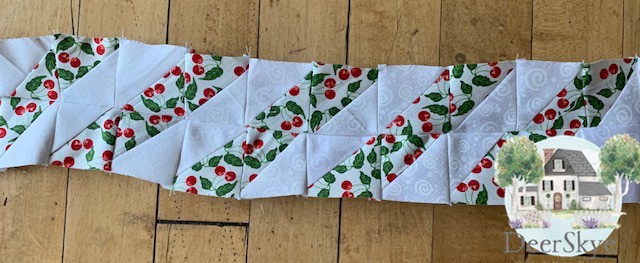
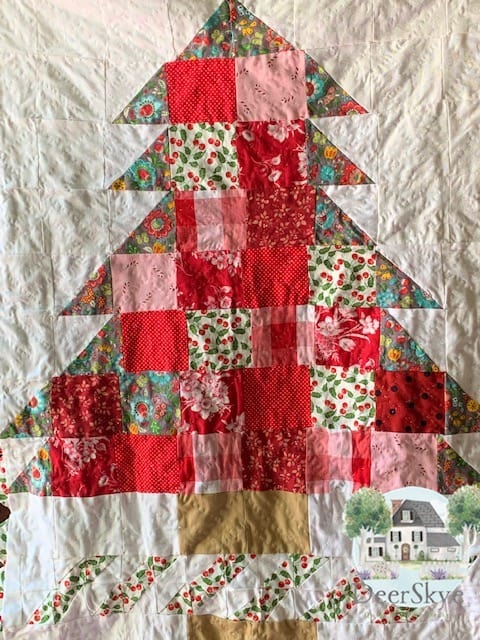
- Sew patchwork tree pieces together row by row until you have 1 Christmas tree block sewn.
- Look at the photo above for placement of each square in the row.
- Notice where each square is placed. There will be 10 rows.
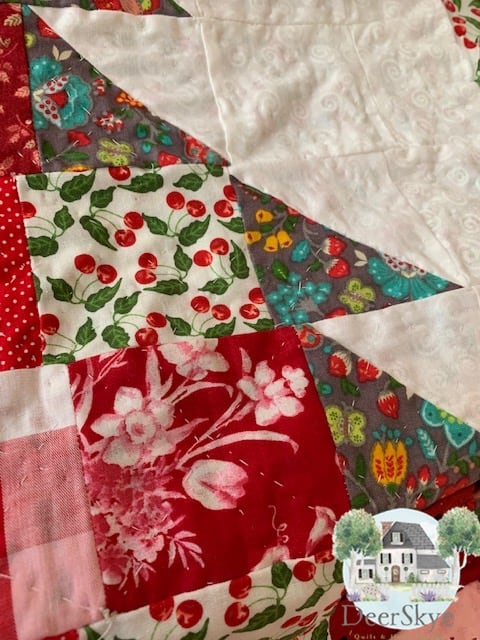
- Place half square triangles on each side of the tree as shown in the picture.
- Repeat this process and make the second Christmas Tree Quilt Block. Keep the same printed fabric for your squares that you just used for the first side of the table runner but fabric squares don’t have to be in exact order of your first Christmas tree.
Layout your squares before you start sewing them together. Then you will be confident that you are sewing the table runner correctly. You can also make your tree shorter than I designed mine if you want to.
Middle Section Peppermint Sticks
If you’re wondering or NOT haha about how I came up with the name of my table runner. …I was just going to use one Christmas tree quilt block for my table runner. Then I had the idea to make another Christmas tree quilt block just like the first. I put the two sides together with a middle section and it was the perfect size. My thought was mirror the image. Two sides that look alike…get it? Anyway hence the name Mirrored Image Christmas Trees.
- Cut( 12 ) 6 1/2″ squares. Cut 6 out of white fabric and cut 6 out of your backing fabric.
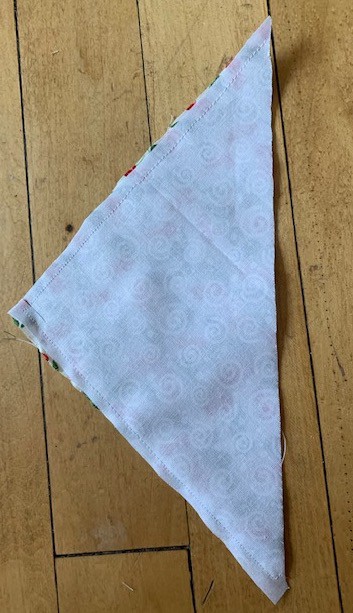
- Place one white on top of one printed fabric square right sides together. Do this six times.
- Sew a 1/4″straight stitch all the way around the edge of each set of two blocks.
- With your rotary cutter, cut each of the 6 sewn white and printed blocks on the diagonal.
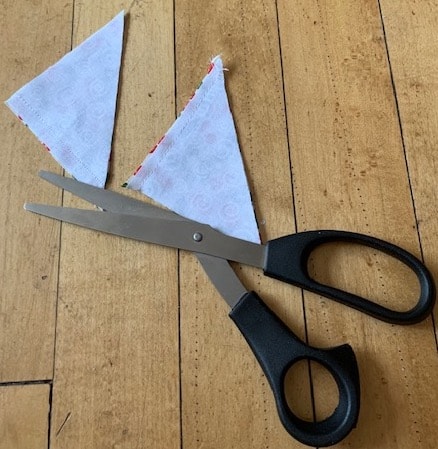
- Cut on the diagonal again. You should have 24 little squares.
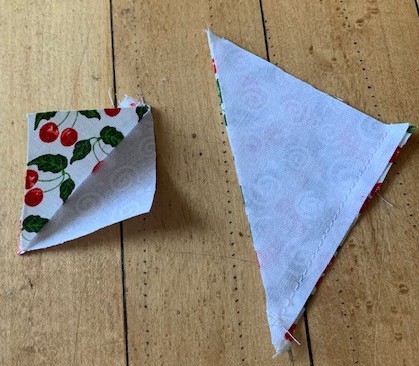
- Take each tiny square and iron the seam open.
- Refer to the above photo and sew each set of 4 small blocks into (1) 3″ x 3″ block to look like the picture above. Then sew your large blocks side by side until you have 6 3″ x 3″ blocks sewn together side by side. Ta Da! Peppermint Sticks or at least that is what I call these nestled in the middle piece.
- Cut (1) 3″ x 3″ square from white fabric. With your rotary cutter, cut it in half. Sew a half on each side of the Peppermint Sticks.
- Now place one Christmas tree block right sides together to the top of the Peppermint Sticks middle section. Then repeat and sew the other Christmas Tree block to the bottom side of the middle section.
- Iron seams open.
Add The Prairie Point Edge Around The Table Runner
- Cut out enough squares for your Prairie Points to go around the outside of your quilt.
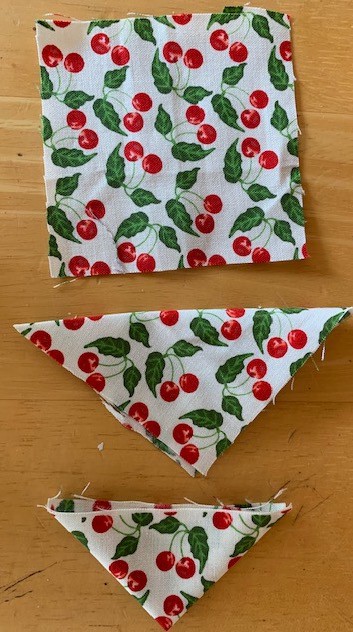
- Fold each square into a triangle and then over again into a smaller triangle and iron.
- Do this to each of your squares.
- Place your table topper and your backing fabric right sides together. Your backing fabric should be a little bigger than your table topper. Trim backing fabric to match the topper.
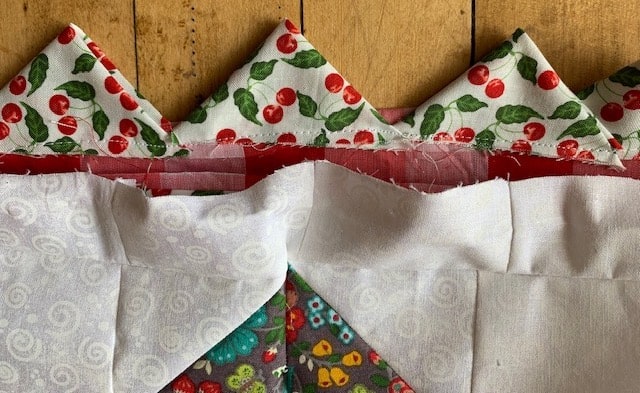
- Pin each Prairie Point in place inside the front and the back of your table runner on three sides slightly overlapping each Prairie Point. Leave the bottom open.
- Then sew around the 3 sides of your table runner securing each Prairie Point in place. Caution…sew slowly making sure you catch each Prairie Point completely. (You don’t want to go back and unpick and resew places where you didn’t sew part of your Prairie Point.) No worries though. I had to redo a few myself.
- To finish the bottom edge, machine stitch Prairie Points in place across to the end. Then fold raw edge of fabric over the edge of the Prairie Points and pin in place. Machine stitch or hand sew the bottom edge closed.
Quilt Table Runner
I hand quilted my table runner in a horizontal pattern of straight stitches. This pattern could be machine quilted on a regular sewing machine with a straight stitch just by following the pattern if you wanted. You can decide what works best for you. Happy table runner making and quilting! Enjoy! Take a little time to make something special like this before the Christmas holiday arrives. Or make a few to give as gifts. I made a lot of mistakes while designing and making this but I love the final product! So that tells you you can do it if I did it!
You might like this:
Need a cute pin cushion to hang on your sewing machine so it doesn’t get in your way? How Do You Make A Pin Cushion For A Sewing Machine?
Need an idea for a quilt label? How Do You Make A Simple Quilt Label?
Want to make a smaller quilt for a gift? How Do I Make A Throw Quilt?
Recent Posts
Wondering how to become a more confident quilter and how to zero in on what type of quilting really sings to you? How do you identify if you are a maker of quilts and keep believing in your abilities...
Do you need a quilt to give as a gift and need it like yesterday? Here is a fun quick quilt you can make in a day (maybe less) once you have your supplies. It features homemade raw edge, scrap back...