If you are thinking about learning to quilt, start by sewing an extra simple scrap quilt. There are many ways to create a scrap quilt. Begin by gathering scraps of black fabric and you will need at least 3 yards of white fabric to make a really easy and cool looking Swiss Cross Quilt. Here are the supplies you will need to get started:
- 6″ Plastic Square Quilting Ruler
- Sharp Scissors or Rotary cutters
- Fabric Cutting Mat
- An assortment of black or red fabric and white fabric cut into 6″ squares for the quilt topper.
- Quilt backing fabric for the quilt.
- Batting
- Sewing Machine
- Thread
- Iron and Ironing Board
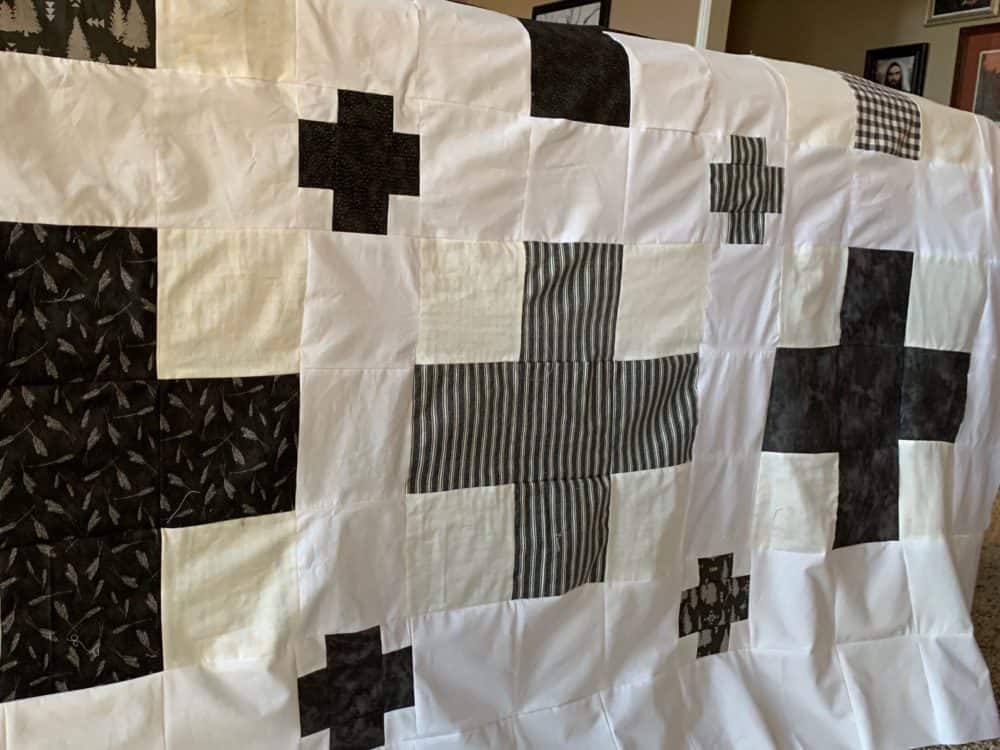
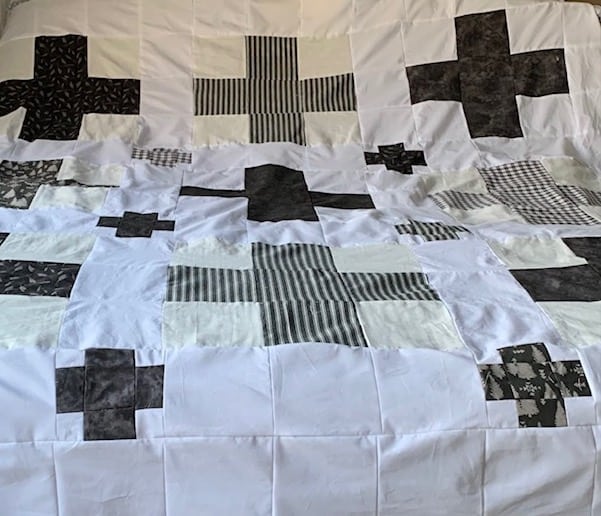
I studied abroad in Europe. I love anything Swiss or Austrian. Have you seen the movie”The Sound of Music”? Traveling within those two countries looks just like the scenes from the movie! Okay where is this going…I love the design of the Swiss Cross. The Swiss flag flies a white cross on a red background. The cross stands for You see a lot of black crosses on white and white crosses on black because this design is super trendy and popular right now. It is also classic in design. And lucky for me and lucky for you it is a really simple design to use for a simple scrap quilt. Follow along to make this classy looking and very easy to make scrap quilt. This quilt is big enough to throw on a queens size bed because I used 6″ squares. Lots of 6″ squares! If you want your quilt to be smaller, downsize to 4″ squares. That is the beauty of this quilt it is all made up of the same size square and that equals super easy and very beautiful!
Deer Skye Quilt and Home Design
Choose Your Fabric
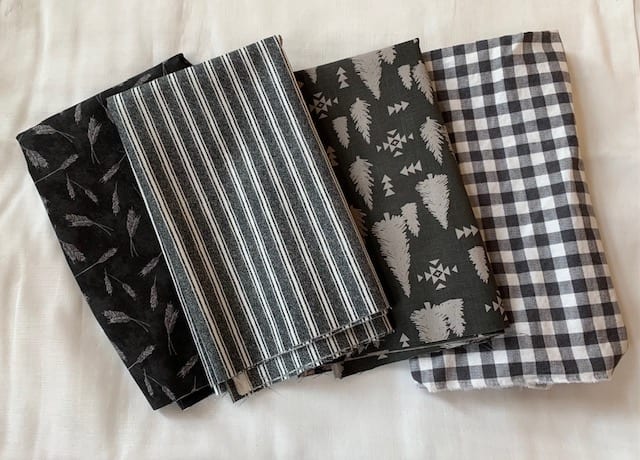
This is an important part of designing your scrap or “scrappy” quilt. Decide if you will keep your quilt black and white or if you will make your Swiss Crosses a variety of colors with a white background. That is the fun of a scrap quilt. You have total control over the look. I am sewing my scrap quilt black and white. If you already have a stash of extra fabric, then grab it. Maybe you will want your crosses in florals or dots. You can have a colored background or a design in your background instead of a plain color.
Deer Skye Quilt and Home Design
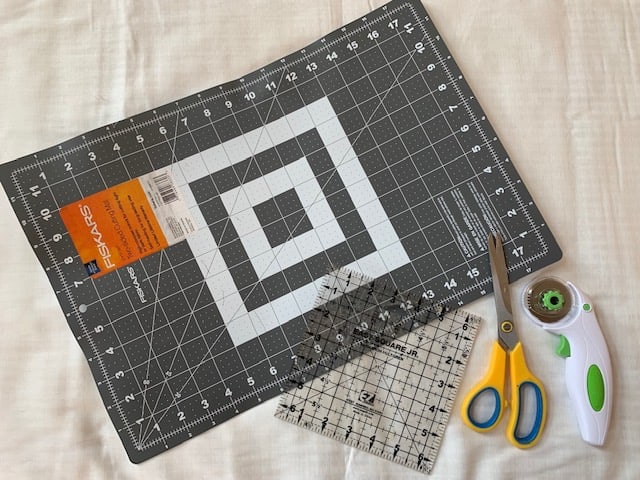
Grab Your Gear
Did you know that sewing and quilting a quilt can help lower your stress? Engaging in quilting helps you to relax and focus on the present. It helps you to concentrate on your work and put you in a state of what is called flow. It can be very enjoyable. It is worth picking up as a hobby. I am a self taught beginner and you can learn too! Make it easy on yourself and invest in a few quilting tools because it will help you succeed and makes quilting “sew” much easier! (Pun intended!) Here are the basics you will need:
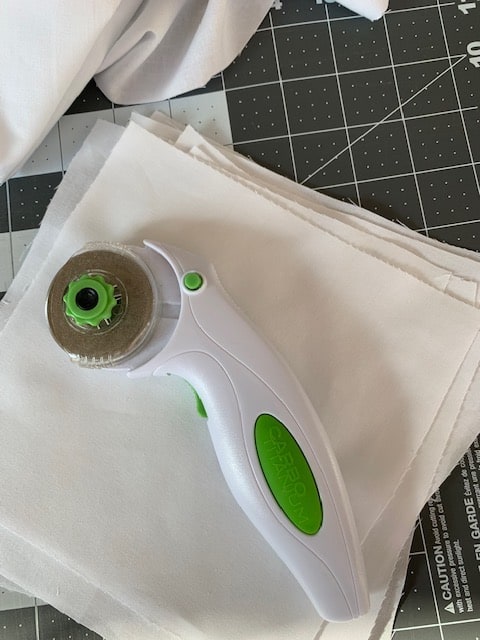
- Self Healing Cutting Mat (translation means you won’t cut through this type of mat)
- Rotary Cutter (Whatever brand you like.)
- Sharp Fabric Scissors
- Clear Square Ruler (Whatever size you want to use. I used a 6″ but a 4″ will make a smaller quilt if you don’t want to make a Queen Size.
- Seam Ripper (wink wink!)
- Iron & Ironing Board
- Sewing Machine
- Quality All Purpose Sewing Thread
- Sewing Pins
I think I bought my cutting mat at Wal Mart. I don’t have a recommendation because I went off of price but you can research deeper into that if you like. A rotary cutter is essential to cutting your squares accurately and quickly! I don’t know about you but anytime I can save some time on a project it is worth it to have the tools to do that. Remember you are suppose to stress less and not tear your hair out doing it! Sharp fabric scissors come in handy for cutting strings at the sewing machine and after sewing cutting off strings. The 6″ square ruler was a lifesaver! Loved how quickly I could cut around my fabric for my many squares! A seam ripper well what can I say? I did have to use it a few times but that’s okay because mistakes are always allowed when doing a project. It helps repair those mistakes and sets you back on course with your sewing. Ironing your seams makes you look so professional in your sewing! Sewing machine is a given although you can sew by hand but I don’t think my hand stitching would hold my quilt together. Maybe I’ll try that someday haha! Quality sewing thread is a must. It also makes your sewing go smoother.
Deer Skye Quilt and Home Design
Swiss Cross Pattern
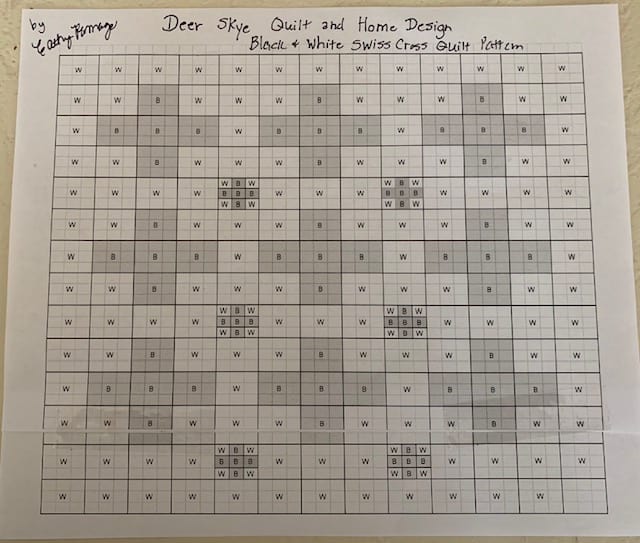
I am rather proud of myself. I made up my own pattern. Yes it was an easy quilt to create but it took some figuring on my part. So I will share it with you. Don’t get overwhelmed when you look at the overall pattern. I promise I will help you every step of the way. It doesn’t take much to start seeing your quilt come together and that makes it a fun and easy quilt! You basically sew 3 squares across at a time to create your quilt. I kept it simple for me and FOR YOU!
Deer Skye Quilt and Home Design
Cut Your Squares
Start by cutting out all the squares for your quilt.
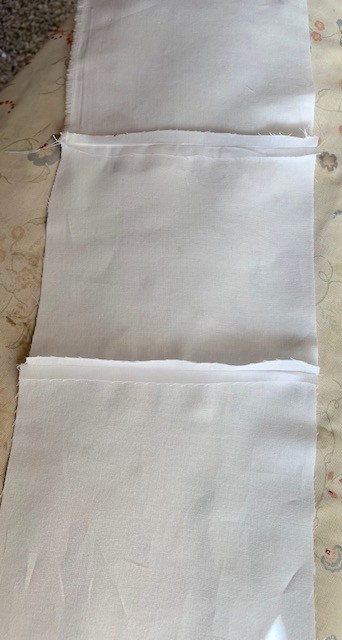
- White Fabric: Cut 120 6″ squares. (A word about white fabric…I bought two different variations of white fabric by accident! Learn from my mistake. White fabrics are not all alike. I had already sewn the white squares with the black and ran out of fabric. I found a cheaper fabric (still high quality) and forgot to take a swatch with me (oops) to match it to a different white fabric I bought. So there is a slight difference in my whites.
- Black Fabric: Cut 45 6″ squares. It is important to note that each large Swiss Cross is made of 5 squares so cut out 5 squares out of the same pattern of black fabric each time you cut squares from black fabric for the large crosses.
- The small crosses are made of 6″ squares cut in half.
Then cut 45 6″ squares of black fabric. Each large Swiss Cross is made of 5 black fabric squares so when you cut your black fabric cut 5, 6″squares out of the same fabric. The small blocks are optional. I wanted to make my quilt pattern unique so I added 6 small Swiss Crosses. I will tell you the secret to making the smaller blocks in a minute. You don’t have to make these. You can put white fabric squares in their place if you want to.
Deer Skye Quilt and Home Design
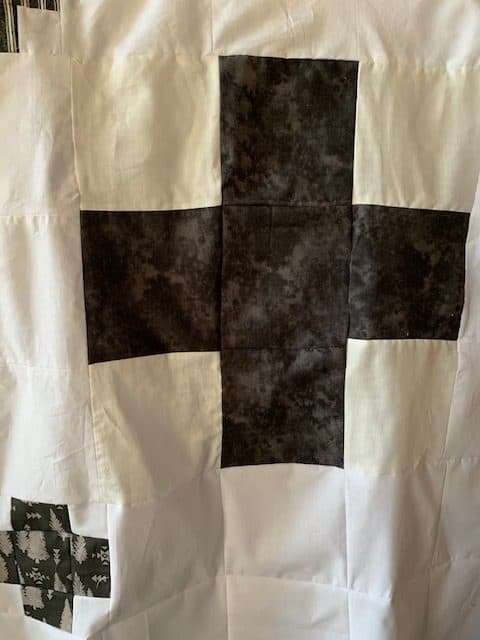
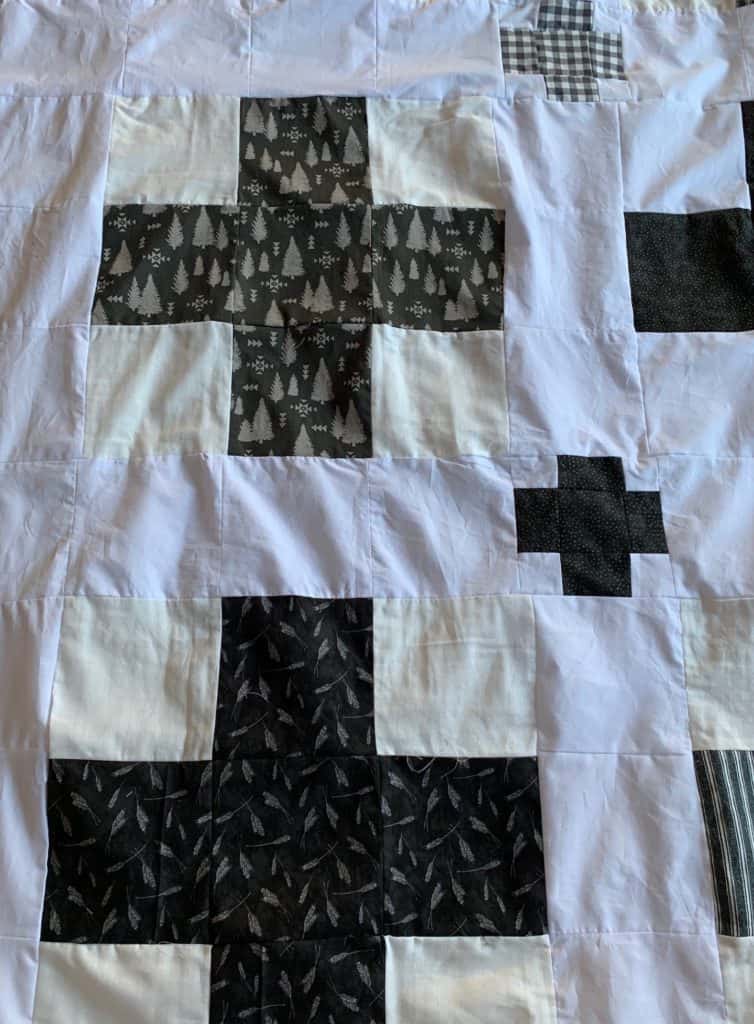
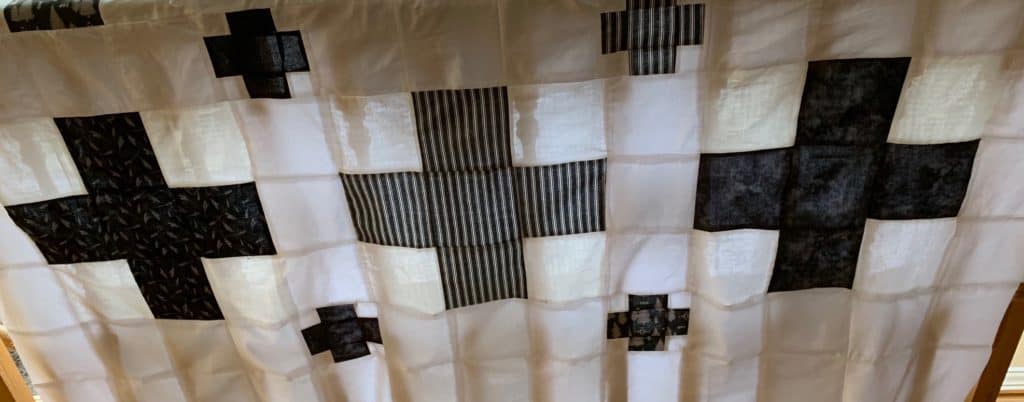
Sew Large Swiss Crosses First
Put on a movie or listen to your favorite play list. Let’s make this extra enjoyable and relaxing. I sewed my quilt together three squares at a time. Begin your quilt by sewing your large Swiss Cross blocks first. They are made up of a simple nine patch. 1st row: take one white square and sew it to a black square. Then sew another white square to the other side of the black square. 2nd row: Sew 3 black fabric squares together.

Deer Skye Quilt and Home Design
I found it much easier to iron seams as I went rather then waiting until the entire quilt top was sewn. It just takes seconds and then you are ready to sew again. Line up your two rows of sewn squares one on top of the other and pin and sew the two rows of squares together. Row 3: Sew a white square, a black square and then another white square together. Iron and attach to the other two rows you have already sewn. Voila! You did it! Repeat this process and make your other large squares. When you finish sewing the large squares together you will have 9 large Swiss Cross squares.
Deer Skye Quilt and Home Design
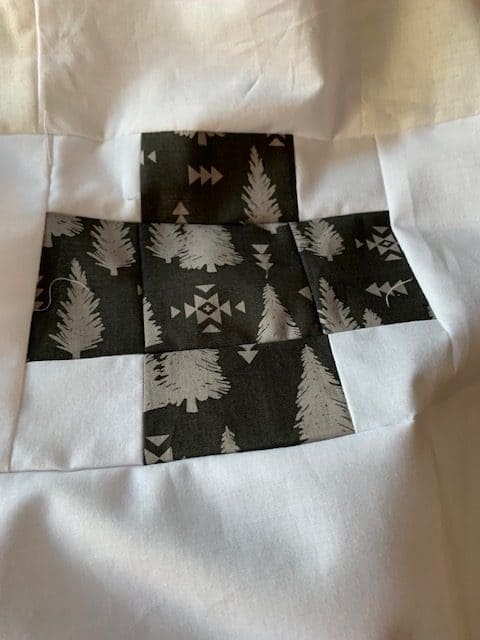
Small Swiss Crosses
I made the small Swiss Crosses to make my quilt unique. You don’t have to add these to your quilt unless you want to. You can put a 6″square of black fabric or just a white square in place of the small cross if you like. All I did was take a 6″ square of white fabric, fold it in half and then cut it in half. Then I halved and cut it again. That gave me 4 small white squares. I did the same with 2 black fabric squares. Then sew the squares together just like you did for the big Swiss Crosses. One more step. Take your 6″ square ruler and your rotary cutter and cut around it to fit the 6″ square. Ta da! You have a smaller version of your large square.
Deer Skye Quilt and Home Design
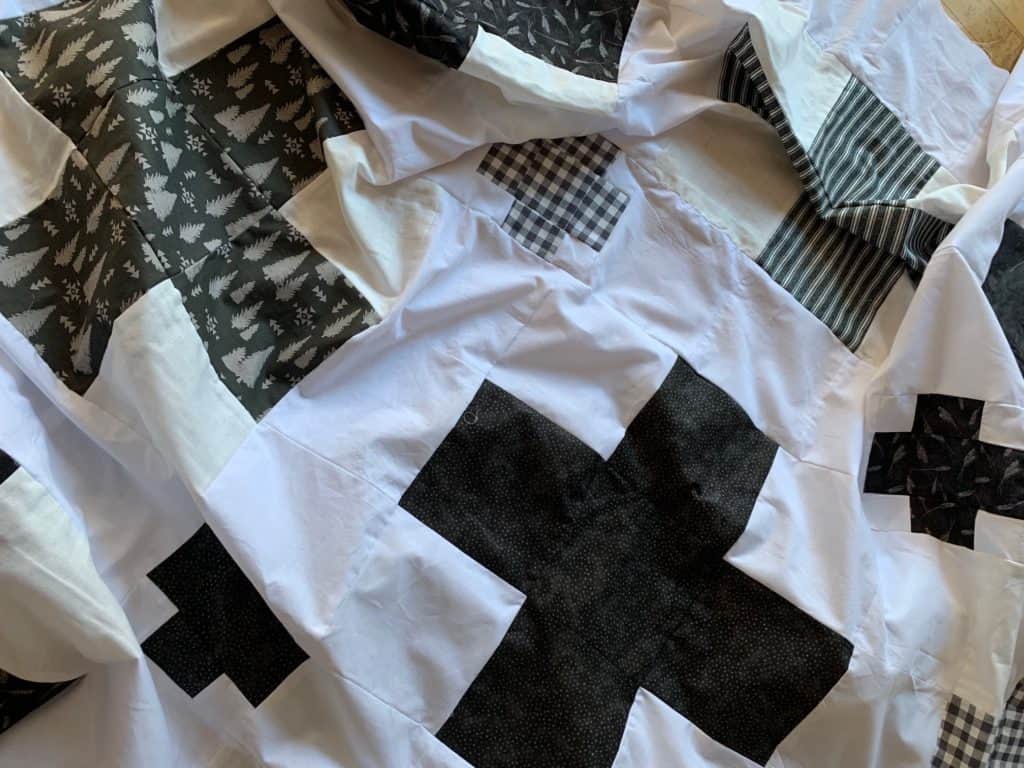
Sewing Your Quilt Top Altogether
Think in threes to sew your quilt top together. Sew three white squares together. Iron the seams and sew it to the left side of your large Swiss Cross block. Sew another set of three white fabric squares. Attach in between each large black Swiss Cross 9 patch square.
Deer Skye Quilt and Home Design
Deer Skye Quilt and Home Design
The Top Of The Quilt Topper
- Sew 14 white fabric 6″ squares together. Iron Seams open as you go.
- Attach this row of 14 squares to the top of the row you sewed with the three Black Swiss Crosses.
- Now you are ready to sew the next row of two small Swiss Crosses with white fabric squares.
- Sew 4 white squares together.
- Sew a small black Swiss Cross square to the right side of the 4 white squares you just sewed. Iron seams open. You now have 5 squares sewn together.
- Now sew three white squares together. Pin to the right side of the 5 squares you just sewed so they match up with the small black cross square on the end of the 5 squares you just sewed together. Iron the seams open.
- Take another small black cross square and sew 4 white squares to the right of the cross. Iron seams. ( Small Black Cross, white square, white square, white square, and white square.)
- Sew this row to the 3 white squares attached to the 5 squares you just sewed.
- You are ready to sew this row of squares to the bottom of the large Swiss Cross blocks
- Look at you! You have 4 complete rows of blocks sewn together! Love it when a plan aka quilt pattern comes together!
Deer Skye Quilt and Home Design
Rinse, Repeat
Now just repeat the same method 2 more times starting from the beginning. Big crosses row, small crosses row, big crosses row and another row of small crosses. Then finish off your quilt topper with 14 white squares sewn in a row on the bottom just like you did at the top of your quilt. Iron seams. Your next assignment and mine is to find backing fabric, batting and quilt your quilt. To be continued in a future post!
Recent Posts
Wondering how to become a more confident quilter and how to zero in on what type of quilting really sings to you? How do you identify if you are a maker of quilts and keep believing in your abilities...
Do you need a quilt to give as a gift and need it like yesterday? Here is a fun quick quilt you can make in a day (maybe less) once you have your supplies. It features homemade raw edge, scrap back...