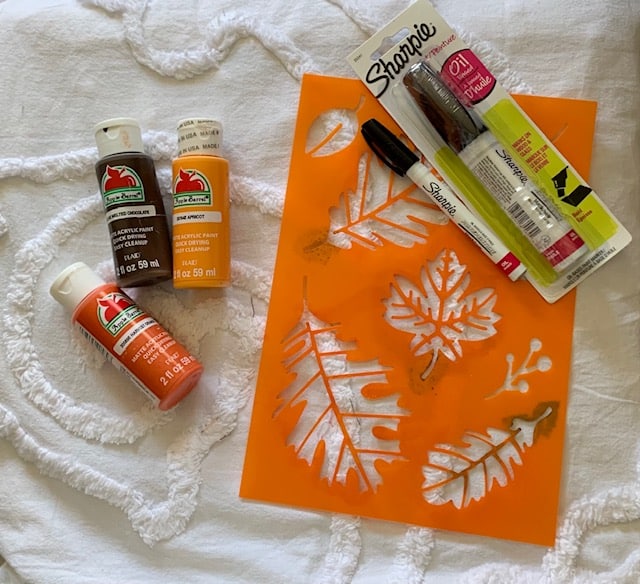
You can create a fall sign that you use for both the fall season and Halloween. You will need a wooden board, some white paint , orange, red, and brown craft paint, a pencil, some brown stain for aging your sign you make by soaking steel wool in vinegar, a hand sander, sharpie black marker both fine and medium point and a stencil with fall leaves to create this sign.
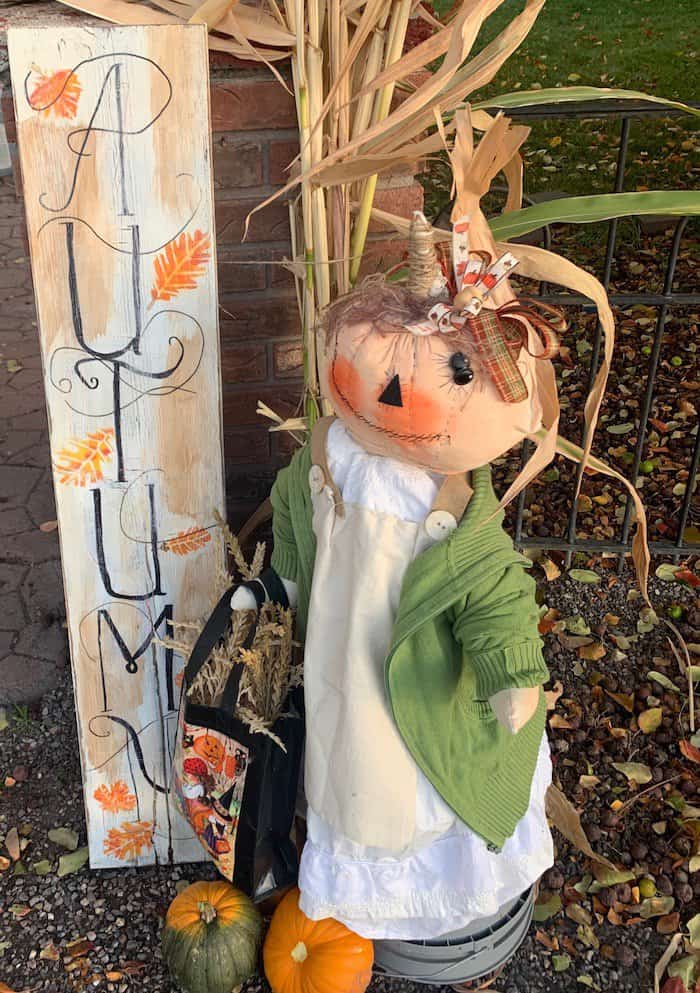
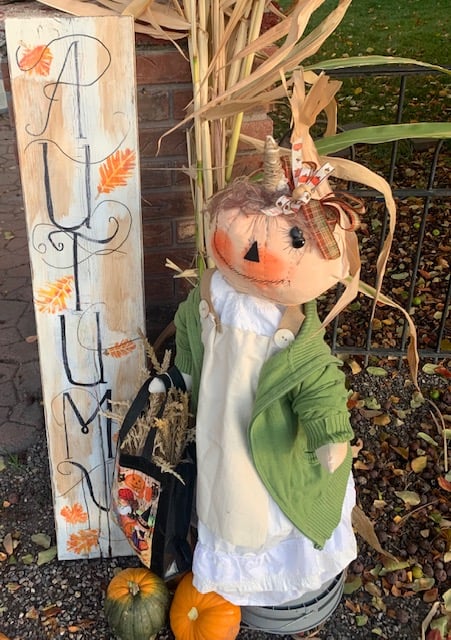
Every year I think I will decorate for fall and Halloween and then the season comes and goes and I miss out making our home look inviting and festive on the outside. Our neighbors across the street goe all out in scary skeleton Halloween decor. It is quite the production like something you would see at Disneyland complete with music and cool lights. I lean towards the non scary and cute decor. The fall sign isn’t really too hard to create and the end product looks pretty cute. I sat my sign out in front our walkway leading up to our porch and placed some Halloween decorations beside it. The non scary type and what I consider to be kinda cute. It’s the perfect spot for inviting people into our yard when they visit our home.

Wooden Board
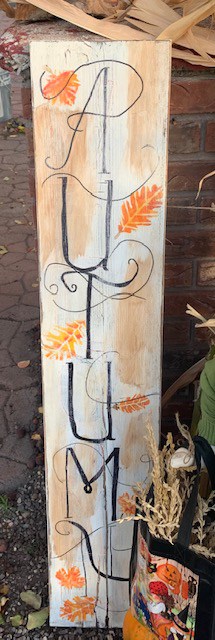
You can use a variety of wooden boards. Decide on the length and width that you want it to be. Did you know if you buy a board at Home Depot they will cut it in half for you for free (at least at mine) if you buy it there. I had a welcome sign I had painted a couple of years ago that didn’t really catch attention. I didn’t like the colors. It was a chunky board heavy enough that the wind wouldn’t blow it over. It was originally stained with dark walnut for the background and then letters spelling “WELCOME” painted in orange and gray. Also a large sunflower painted on the side of it. Drab is how I would describe it. I decided this was the year I would remodel, remake, and spruce it up. Only instead of a welcome sign I would make it into a fall sign that would read AUTUMN. It looks so much better at least in my opinion.
White Paint And Craft Paints And A Pencil
Walmart sells a cheap white paint perfect for crafting. It only costs about $15. I sanded over my board and painted the board with my white paint. I’m not a calligrapher or very adept at doing fonts for signage but I got up some courage and took my pencil and drew out the word Autumn. I searched for the word Autumn on a sign that was written the way I wanted it so I tried to copy the font. Grab your pencil and draw the letters to the word you want on your board. Ok come on you are writing in pencil. If you make a mistake, it’s forgiving and you can start over. Practice on paper before you draw your word if you want to. You will need red, brown, a light orange, and dark orange for stenciling leaves on your sign after you fill in Autumn or whatever word you choose with your permanent markers.
Options For Putting A Word On Your Wood Board
If you want to use a stencil with alphabet letters on it to write a word on your wood board, it is a little easier creating letters that will look professional but they still have a stenciled look if you know what I mean. Not that that is bad but I wanted a sign with letters a that looked a little more creative. Once again, this is up to you and the look you want on your sign.
One other way is to get some black tracing paper. Print off a word with the font you want. Tape the tracing paper to your wood board. Now set the paper with the word or letter you want to trace over the top of the tracing paper. Trace each letter. Now you can outline and fill in the letters with your sharpie pens.
Sharpie Pens
Sharpie makes some great pens for writing on signs with. They come in several sizes black and white depending on if you want a black chalkboard type background with white writing or white background with black writing. I used a Sharpie for filling in my letters. I felt a little guilty thinking maybe I should paint them but I was planning to go over the writing with my sander and it would probably look about the same either way. It was much easier and controllable with a marker versus a paint brush. So do what you are most comfortable with.
Stencil Leaves
I stenciled some fall leaves at various places on my sign. I started with dark orange craft paint stenciling in a couple of places and then used a lighter orange followed by a bit of red here and there on top of the stenciled leaf. You want it to look natural like the color flows into each other. Stencil the stem in brown. Add several leaves where you want them to be on the sign.
Age Your Sign
I wanted my sign to look aged and have an overall shabby look to it. You can make a cool as in pretty awesome brown stain that works like an aging paint. To make this concoction your take a piece of steel wool and place it in glass jar that has a lid. Then add distilled white vinegar to it. Fill the jar almost to the top with the vinegar. Leave the lid off the jar. Let it sit for two to three days so it can turn brown. It gets darker the longer you let it sit. I put a sponge in the stain and rubbed it on my board in several places.
Let The Sanding Begin
My husband is an expert wood worker. He has every tool you can imagine. He is pretty picky about who uses his tools so to keep peace in the family haha I bought my own my orbital sander last year. It was easy to use and actually I like using it on many of my projects. Believe me if I can use a sander, you certainly can use a sander. I sanded the edges of my sign to look time worn and then began sanding over the entire sign. I sanded each letter in different places on each letter I had filled in with Sharpie pens to give it an aged look. I sanded over the brown stain to make it more rustic and aged looking. It didn’t take long to sand over my word Autumn and the leaves. It was pretty easy and I was super happy with the final result.
Display Your Fall Sign With Halloween Decor
Once fall arrives, put your sign on your porch or somewhere in your yard. When October arrives, add it to your Halloween decorations outside. I have the perfect walkway into my yard and wanted to play it up for Halloween. So I set my sign by one of my columns at the front of my walkway, added a few cornstalks I tied together and created a pumpkin girl to greet trick or treaters.
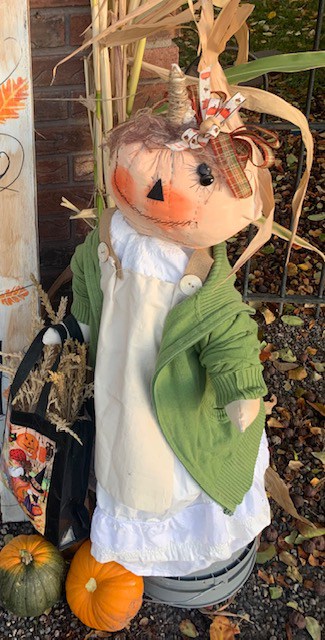
Pumpkin Girl
- I made my pumpkin girl: out of a tomato triangle.
- Covered the metal triangle with fabric that was fastened to the top so it fit the triangle.
- Pinned a child size dress over the fabric on the tomato triangle.
- Made a pumpkin shaped head out of fabric. Stuffed the head with doll batting.
- Painted the head a peachy skin color with craft paint.
- Embroidered a mouth with dark Perle Cotton Thread and hand sewed two black buttons on the side next to each other for eyes. Dotted the tops of the buttons with one dot of white paint.
- Sewed running stitches down the front of the head from the top to the bottom to make it look like a pumpkin head.
- Glued on a black felt triangle nose.
- Added two stuffed arms I stuck in the arms of the dress and pinned a sweater over the dress and the stuffed arms.
- Made a make shift apron by pinning fabric to the front of the dress with burlap ribbon for straps and added a couple of cute large buttons that I sewed to the straps.
- I added a fabric wrapped with twine stem on the top of her head.
- I put the triangle with the pumpkin girl on a bucket so it would sit firm on the ground.
- She holds a Halloween trick or treat bag filled with the tops of some cornstalks.
Your Halloween decor can be whatever you want but it is fun to display your sign by it. I chose Autumn because it was more versatile and I could use it for two seasons instead of just Halloween.
You Might Also Like
How about making a cute mini quilt to hang in your home, set on the table as a table runner, or hang on your front door. It’s easy and fun to make How Do You Make A Mini Quilt? Vintage Halloween Mummy
Want to know how to decorate your mantel for Halloween? There are a lot of ideas out there but have you ever used teddy bears? Take a look at How Do You Decorate A Halloween Mantel? Easy! Super Cute!
Would you like to know how to make a simple kids backpack that can be used for trick or treating and beyond? How To Make A Simple Kids Backpack Halloween Style
Recent Posts
Wondering how to become a more confident quilter and how to zero in on what type of quilting really sings to you? How do you identify if you are a maker of quilts and keep believing in your abilities...
Do you need a quilt to give as a gift and need it like yesterday? Here is a fun quick quilt you can make in a day (maybe less) once you have your supplies. It features homemade raw edge, scrap back...