How do you define traditional when it comes to quilts? Traditional quilts are quilt patterns that have been passed down generation to generation. They came across the plains with the pioneers.
Traditional quilt blocks fashioned into quilts had repeating quilt blocks and patterns on them. They were hung as doors and windows until the homeowner was able to build wooden doors and add glass paned windows. Here are some of those traditional quilt blocks and how to create a quilt with them. Improve your quilting skills and follow along as I teach you how to make 4 traditional quilt blocks. Then sew them together in a beautiful quilt made by you.
- Double Four Patch
- Double Nine Patch
- Pinwheel Quilt Block
- Maple Leaf
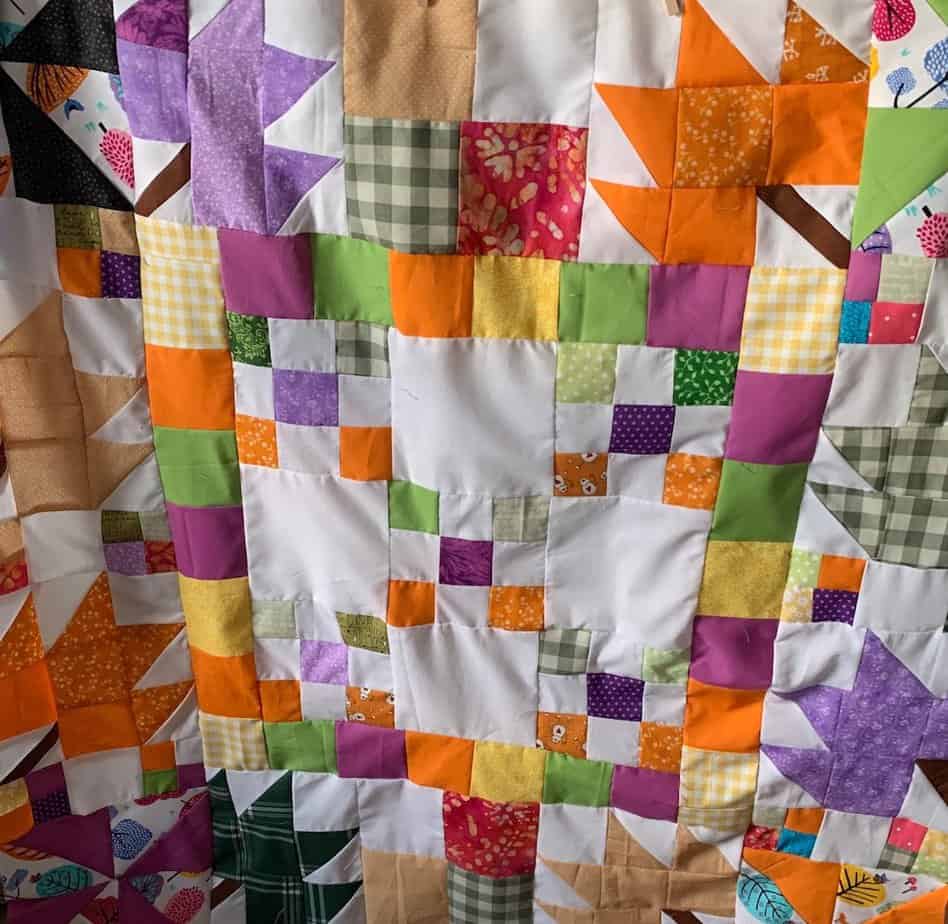
My mom was a quilter. My mom’s mom was a quilter. My husband’s mom was a quilter. I have been around quilting all of my life. I think my first recollection of quilting was me sitting under the umbrella of a blanket being quilted by my grandma Gladys and my mom Joy and some of her sisters Gloria and Christine. It’s a beautiful memory for me. I dabbled a bit in quilting as I grew up and learned a few basics but I didn’t get really serious about it until after my children were raised. You can enjoy this hobby though at any stage of life. It is great therapy (wrote a blog post about that Is Quilting Good Therapy? ) It can help you monitor your stress if you pick this hobby up. You can create your own quilt with these blocks. I used these 4 quilt blocks to create an Autumnal or Halloween Quilt. Boo ya!
Four Patch Patchwork
You can almost do this patchwork quilt block with your eyes closed it is soooo easy! It dates back to the 1800s. This quilt block was sewn often because the pioneers would use leftover fabric from clothing and blankets whatever they had on hand. Have you ever been on a pioneer trek? My hubby and I did a handcart trek last summer. It was hard and wonderful at the same time remembering ancestors that trekked to Utah from the midwest because of their belief in Jesus Christ and to join their families out west. I am sure there were four patch patchwork quilts folded neatly and packed in their handcarts. I would have packed my handcart with as many patchwork quilts as it could carry to wrap my family members in for warmth and comfort.
If you have never made this type of quilt block, you may fall in love with it because there are so many ways to design a quilt with this quilt block. Alternate it with other quilt blocks or use this quilt block alone for a quilt topper. Patchwork style would also make a creative burst of color for your quilt backing. Anyway it is fun and it is like I said very easy. Definitely a beginner quilt block!
Here is what you will need:
- Fabric: 2 or 4 different fabrics one solid and one patterned. You can also use only patterned or only solid fabric if you choose.
- (You can make your patchwork squares any size the size you want. Really big squares make up a quilt topper really fast!) Each square in the four patch block should be the same size to make your four patch quilt block.
- Sew a solid square and a patterned square together. Sew a patterned square to a solid square. Place your iron on the right side of your fabric squares and press. Now sew the two sides together to make one 4 patch quilt block.
- Press the right side of your quilt block.
Ta Da! This might become one of your fav quilt blocks to make because honestly you could make a whole entire quilt with just this one quilt block. It sews up really fast! My four patches are small for this quilt but you can make them bigger if you like. (Even though they are small, they still sew up pretty fast.)
Just a word about ironing. I use to iron my seams open and depending on the project will probably still do this if my quilt block needs it. Good news though. I recently learned from seasoned and professional quilter Jenny Doan, to take your iron and quickly iron your quilt block on the top side of the quilt block right side up. Works like a charm! Much quicker too. You don’t need to keep heat on it too long. On to the next quilt block.
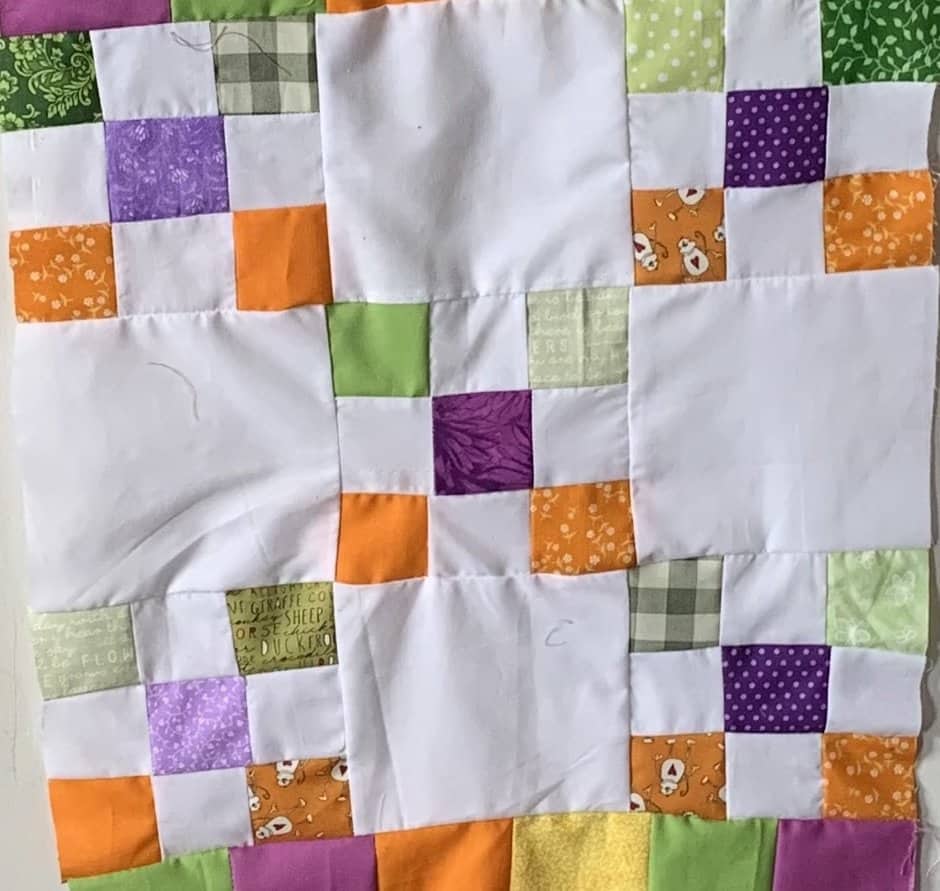
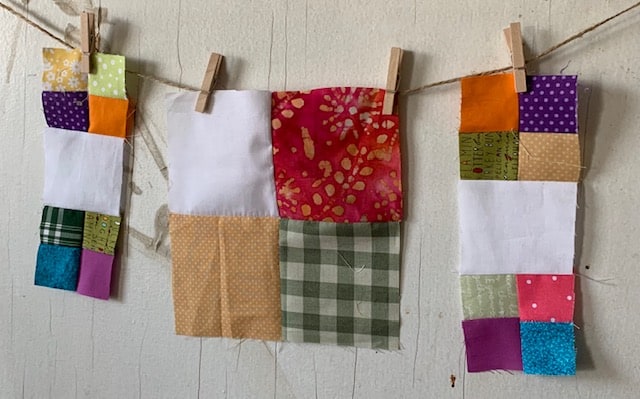
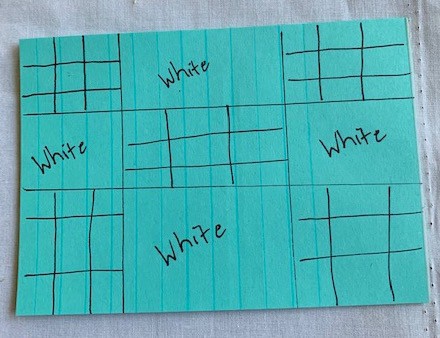
Double Nine Patch Quilt Block
I have been dying to try this quilt block. I love the look of it. It isn’t too difficult either. When you put several of these quilt blocks together, you come up with a quilt full of blocks that looks like they are floating. This block can be changed up in so many interesting ways.
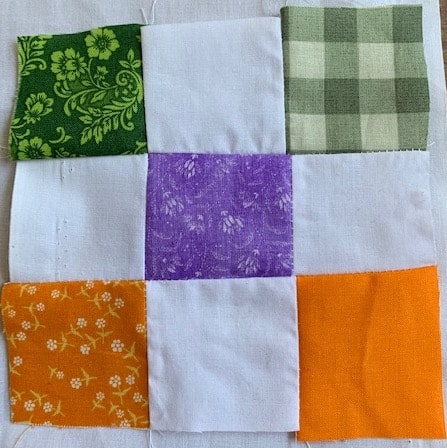
- You will need white fabric and a variety of orange, green, and purple fabrics if you are doing a quilt like mine. You are welcome to use your own choice of fabrics. One color with a variety of prints sewn with white gives you the floating effect. I love this look. I plan to make a quilt with just the disappearing nine patch for a comforter for my bed.
- 2″ Squares: 1 green, 1 white, 1 green. Sew in this order.
- 2″ Squares :1 white, 1 purple, 1 white. Sew in this order.
- 2″ Squares: 1 orange, 1 white, 1 green. Sew in this order.
- Iron right side of each row.
- Then once you make the quilt block iron right side up.
- Make 5 of these colorful double 9 patch quilt squares.
- Cut (4) 6 1/2 ” white squares of fabric. Cut to fit the nine patch square.
- Join whites and color blocks together according to rough sketch below.
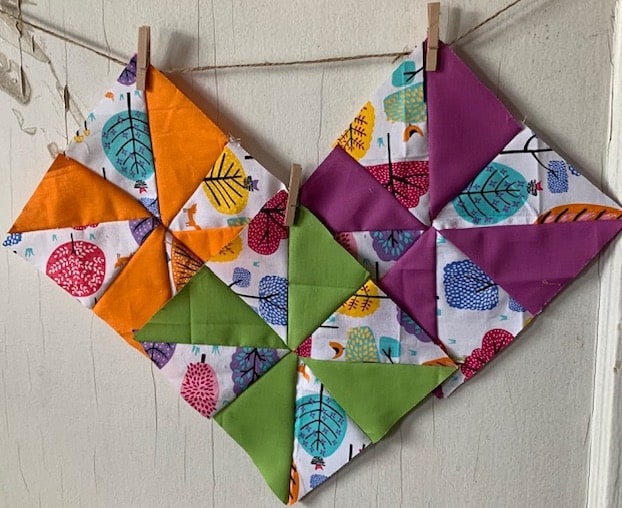
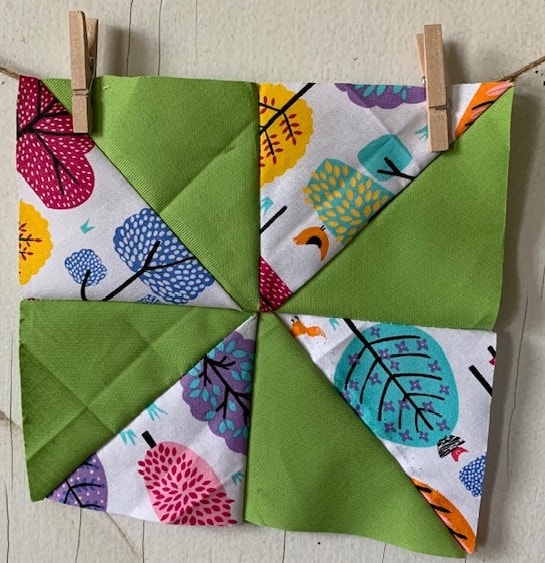
Pinwheel Quilt Block
This traditional quilt block dates back to the 1800’s and was designed by a woman traveling in a conestoga wagon! Pinwheels make up quick and make a cute quilt added to a variety of quilt blocks or repeated over and over again on a quilt. Festive, fun, and easy, not bad for a quilt block. Add this quilt block to some four patch and nine patch quilt block squares to make a cute Halloween quilt or you can create a non seasonal quilt.
Here are some tips for making this quilt block:
For my Halloween quilt project, I cut a 6 1/2″ block out of a patterned fabric. Then cut 1 square of solid fabric measuring 6 1/2″ x 6 1/2 ” square. I’ve had this bright colored patterned fabric for a while and decided it would work well in my autumnal Halloween quilt.
- Cut 1 square of patterned fabric and 1 square of solid fabric the size mentioned above.
- This is the neatest trick ever when sewing pinwheels. Take the two squares and place them right sides together.
- Here comes the neat part…sew a straight stitch all the way around the edge of the square.
- Once sewn, with your rotary cutter, cut the squares on the diagonal and iron on top of the two diagonal pieces (which by the way are still sewn together.)
- Cut both of your diagonal pieces on the diagonal again. You will have 4 diagonally sewn pieces.
- Iron on the right sides.
- You’re ready to sew them into a pinwheel quilt block.
- Refer to the pinwheel above as to how to place the diagonal quilt pieces together to make a quilt block. Line the pieces up carefully. Place your patterned fabric pieces so they touch in the center and look like a pinwheel.
- I made 6 of these quilt blocks for my quilt. Two for each side , two for the top and two for the bottom. I nestled them on each side of the double nine patch quilt square and then placed two on top and two on the bottom of the large quilt block.
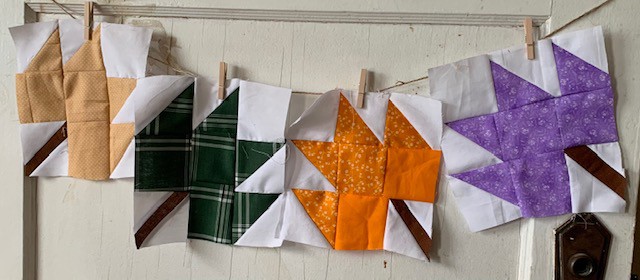
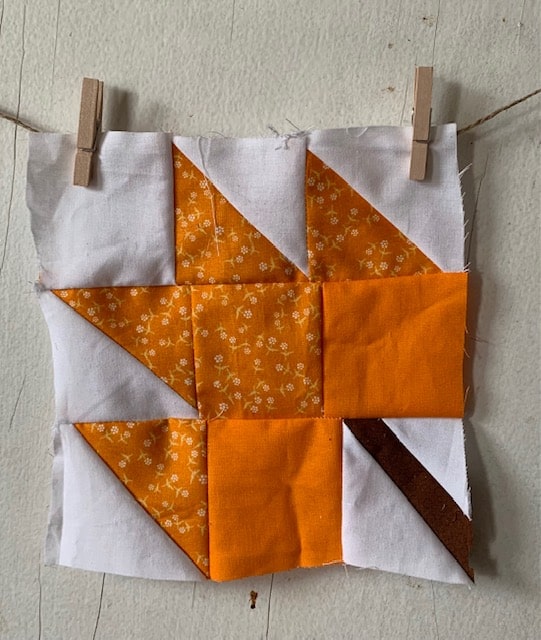
Maple Leaf Quilt Block
You can go crazy with the maple leaf patchwork pattern. Design leafs in solids, patterns, or both. They can be fall colors, spring colors just about any color you want them to be. They are fun to make as you watch them take the shape of a leaf as you sew. They don’t take too long to create and are just flat out cute! Because of the way they are place them leaning right or place them leaning left. Very versatile! This block was first published in 1910 by Practical Needlework. Not quite as old as the other three quilt blocks but just as cherished.
Here is how it goes:
First of all you determine what size you want your blocks to be to create the maple leaf block. Measure your blocks carefully for your quilt so that they all match up and you don’t start sewing and come up with a large and small maple leaf. Although you can still use a small one but you want to make your blocks the same size on purpose. I got going and came up with three different sizes and suddenly realized, “Wait a minute…. oops they aren’t the same size.” Maybe that is because I got lost in the fun of making them. They really are cute when you get them sewn and you realize that you sewed them in the shape of a maple leaf!
Refer to the picture of above for placement.
- Fabric: White or solid color for background and color fabric your choice of patterns or solids for the leaf.
- Assemble your block this way: 1st row is a white or solid square. Half triangle square made up of background fabric and leaf fabric. Make another Half Square Triangle like the first one you just sewed.
- 2nd Row Is Half Triangle Square, square of leaf fabric next to another square of leaf fabric.
- 3rd Row is Half Triangle Square, square of leaf fabric.
- The end square on this row is different from all the rest of the blocks but don’t worry. You’ll get the hang. Cut a square of background fabric. Now take your rotary cutter and cut it on the diagonal. Decide how wide you want your leaf stem to be. Cut it out of brown or whatever fabric you choose. Cut it the length of your two diagonal pieces of fabric you just cut. Make the width as wide or as skinny as you want. Square it up with your other squares in your row.
- Iron each row before sewing the rows together. Iron your quilt block. Yippee! One maple leaf quilt block done.
Assemble Your Quilt
You can choose just one of the blocks we’ve talked about in this post to create an entire quilt if you like. I decided to combine all four to make a Halloween/Autumnal quilt as I already mentioned. You are welcome to do that too. Be fearless and come up with your own design using one or more of these quilt blocks. Add your backing maybe you would like to finish your quilt this way What Is The Easiest Way To Bind A Quilt? Then quilt your quilt by hand or machine and don’t forget to add your own creative quilt label and here is a way to make one How Do I Make A Simple Quilt Label?
Then maybe you will pass your quilt down from person to person to be cherished and loved because you made it.
Recent Posts
Wondering how to become a more confident quilter and how to zero in on what type of quilting really sings to you? How do you identify if you are a maker of quilts and keep believing in your abilities...
Do you need a quilt to give as a gift and need it like yesterday? Here is a fun quick quilt you can make in a day (maybe less) once you have your supplies. It features homemade raw edge, scrap back...